9 minute read
Installation
Overview
The SelfPrivacy server is created within an hour. It is available only in cloud hosting.
Delegating installation risks your privacy and security.
To start, you need these things:
Money on the card: $15 to start and ~ $5 per month
SelfPrivacy app is free, but hosting and domain name registrars are not.
Passport (optional)
The hosting provider may ask for proof of identity when you sign up.
In addition, European jurisdiction requires to know your customer. Providing photos or photocopies of documents to anyone online is a bad practice that we condemn.
Prepare a password manager
You will register many different accounts. Qwerty123 or VerySecurePassw0rd are very bad passwords. A good password is a passphrase:
expert repose postwar anytime glimpse freestyle liability effects
Or strings like:
}Rj;EtG:,M!bc4/|
It’s a good security practice to store passwords in a password manager such as KeePassXC. This way, you have to remember only a single password: the password manager’s master passphrase.
Guide steps
We will be purchasing a domain, then connecting it to the DNS provider.
Step 2: Generating API access tokens
We will generate three tokens:
Launch the SelfPrivacy application and begin the installation process using the accounts and tokens you’ve prepared.
Step 1: Domain
Domain — a registered text name that links to the IP address of a server.
As an example, Wikipedia.org and SelfPrivacy.org are domains.
    domain    links to  IP address
SelfPrivacy.org  -->  135.181.45.111
Purchasing a Domain
Choose a Domain Registrar
As an example for the guide, we will use Porkbun.
Choose a domain
Domains support hundreds of extensions such as .com, .me, .love, .rocks, etc.
- Always check the annual renewal price, as it can significantly exceed the initial purchase cost
- A normal domain price is $8-15 per year
- Choose a name that’s easy to dictate over the phone and to put on a business card
Choose DNS provider
DNS provider — is the control center for routing all services under your domain.
It’s like an address book.
For example, it can configure links such as:
cloud.your.domain-> your file-cloud servicepassword.your.domain-> your password manager service
We support three DNS providers: pick one from the list below
| Provider | Privacy Law | Tracking | Jurisdiction |
|---|---|---|---|
| deSEC | GDPR | No | 🇩🇪 Germany |
| DigitalOcean DNS | GDPR, CLOUD Act | Yes | 🇺🇸 USA |
| CloudFlare | GDPR, CLOUD Act | Yes | 🇺🇸 USA |
Get nameservers from DNS provider
Nameservers — are pointers that tell the internet which DNS provider manages your domain.
We need to get Nameservers from the DNS provider, then paste them to your Domain Registrar provider.
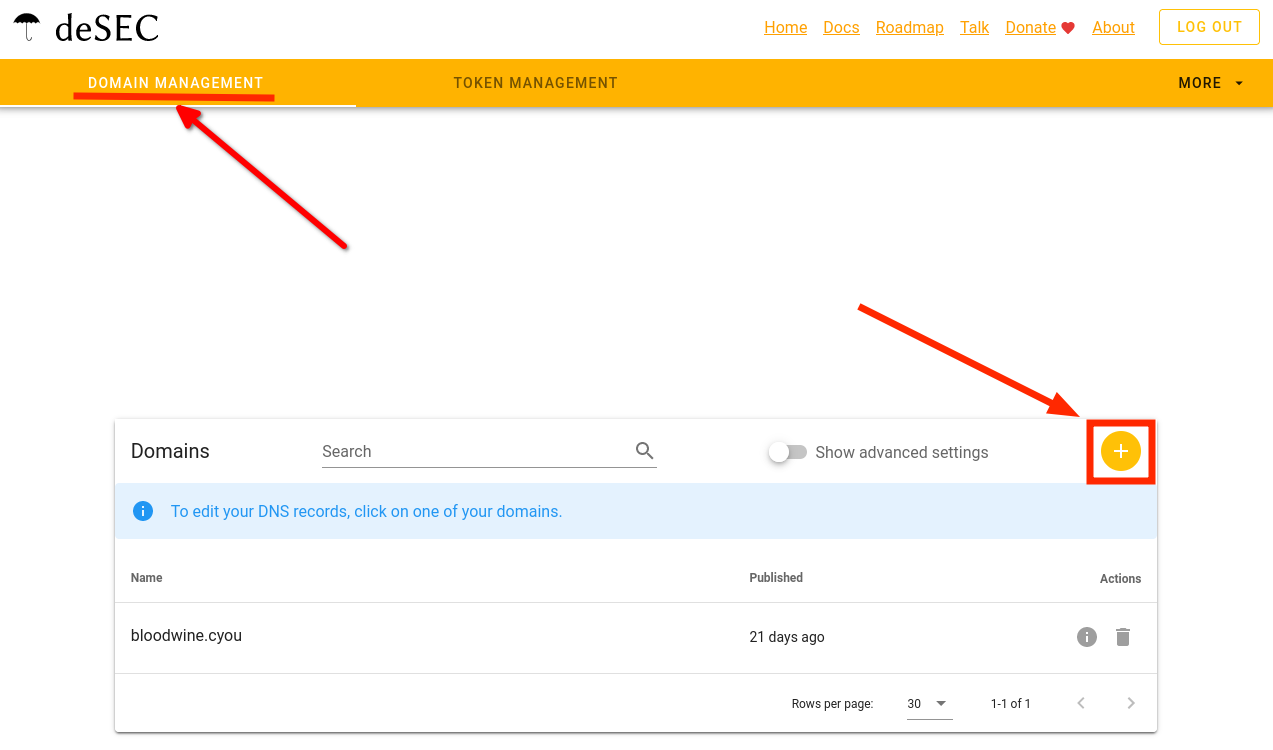
If you chose deSEC: How to get nameservers
-
Create a deSEC account
-
Go to the domains page
-
Click on the plus button
-
Enter your domain name. Click Save
-
Copy the names obtained in the Nameservers field

You will get the Nameservers.
For our example, they are:
ns1.desec.ions2.desec.org
You’ll use them in the next step.
The nameservers you receive might be different.
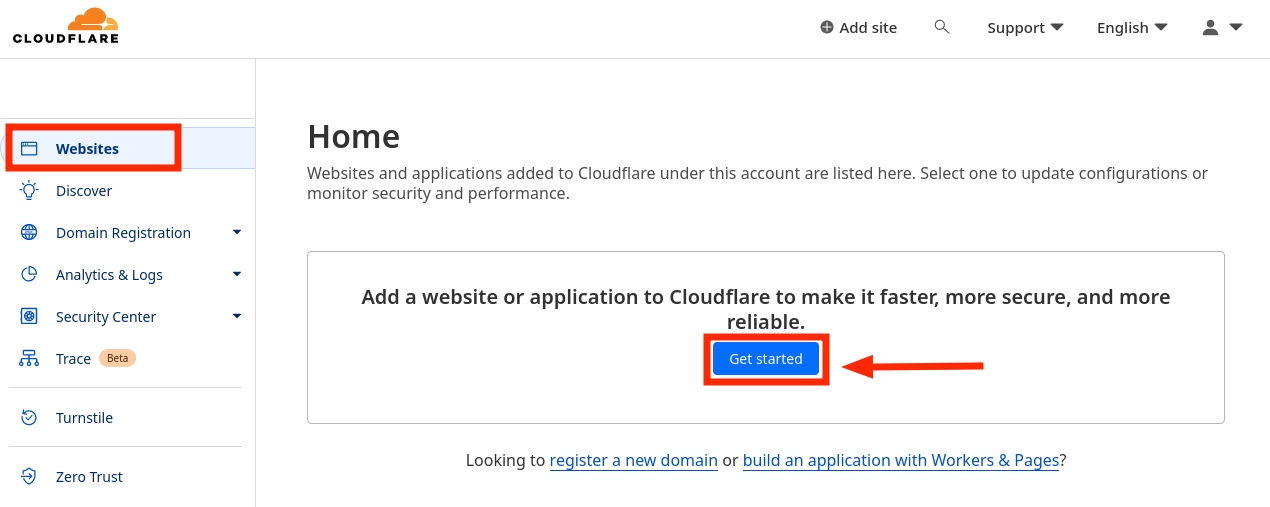
If you chose Cloudflare: How to get nameservers
-
Go to this link. On the left menu, click Websites, then the blue Get started button.
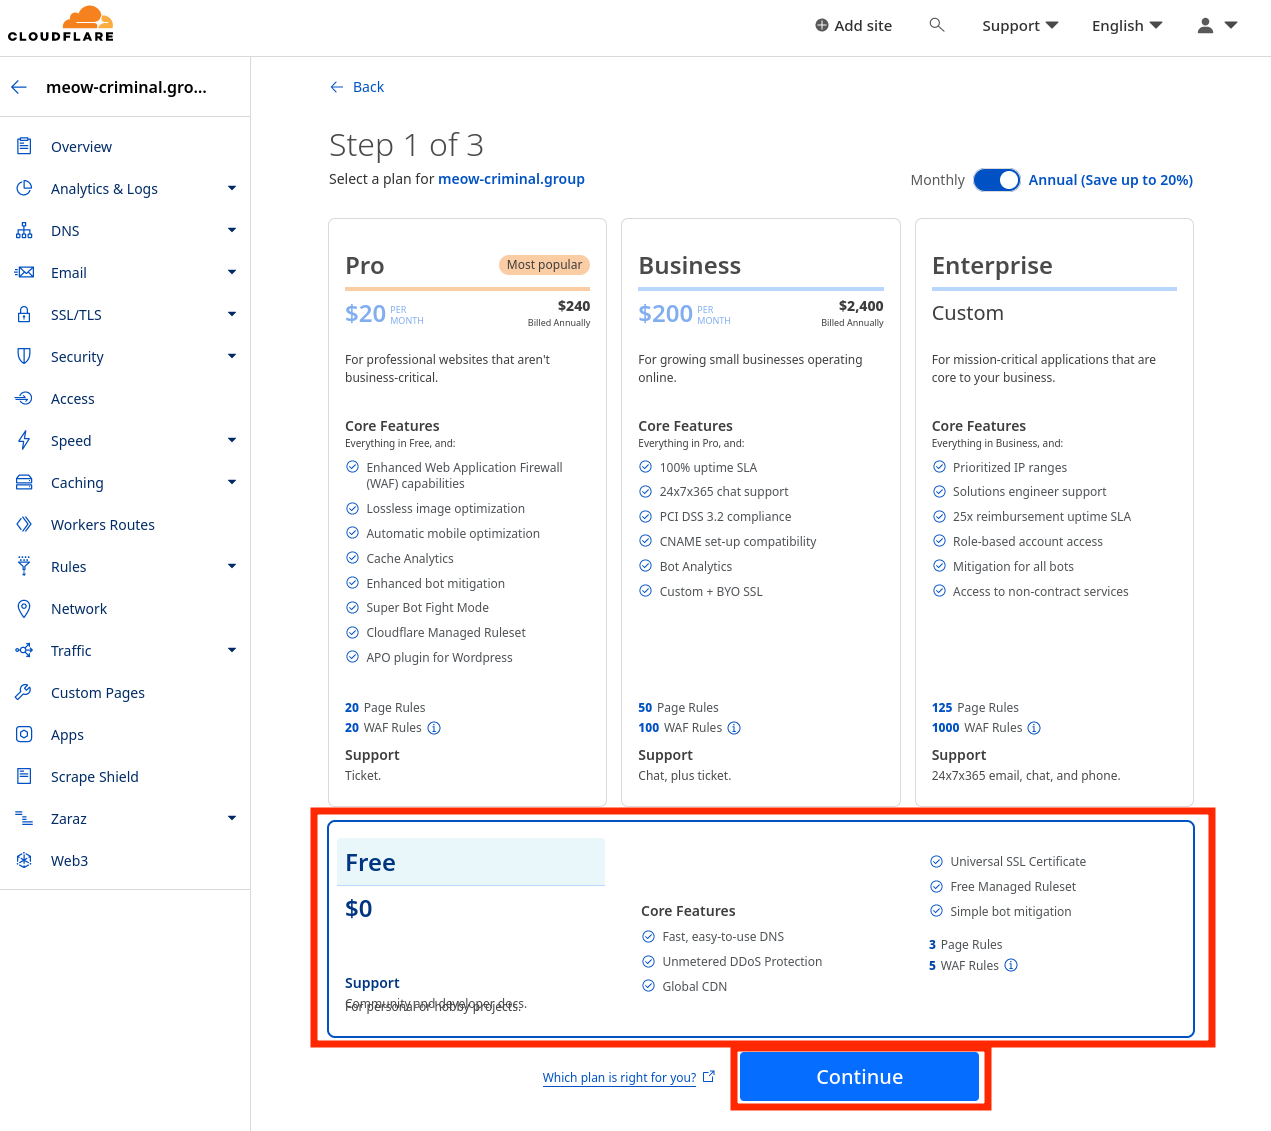
- Select the Free plan and click Continue
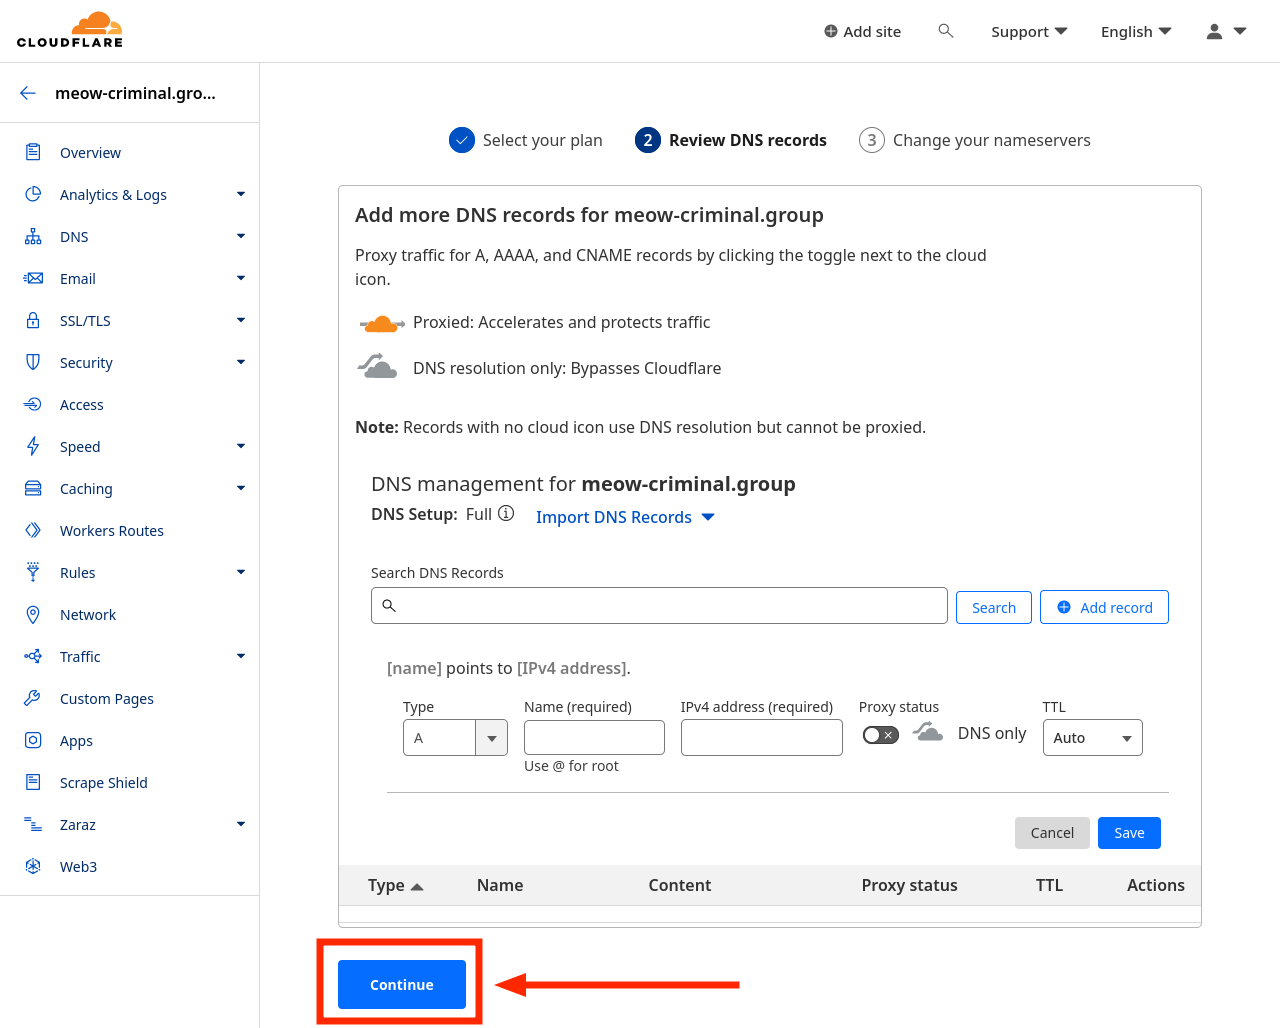
- On the Review DNS records tab, don’t change anything. Click Continue
- Copy the nameservers, paste them to password manager. Then click Continue
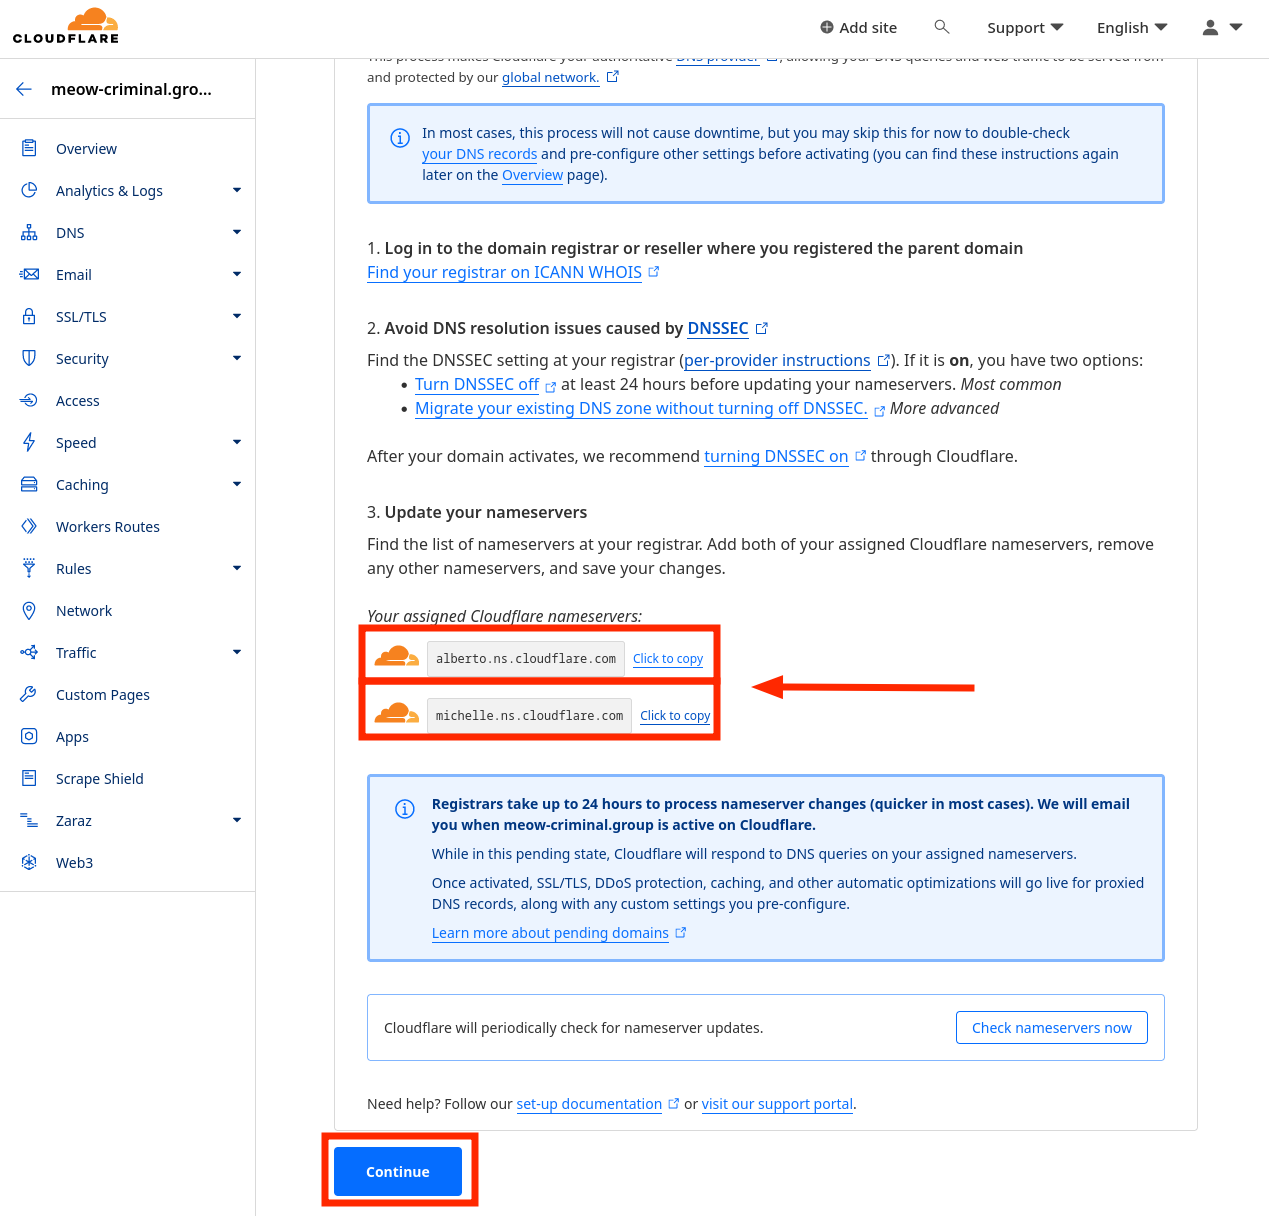
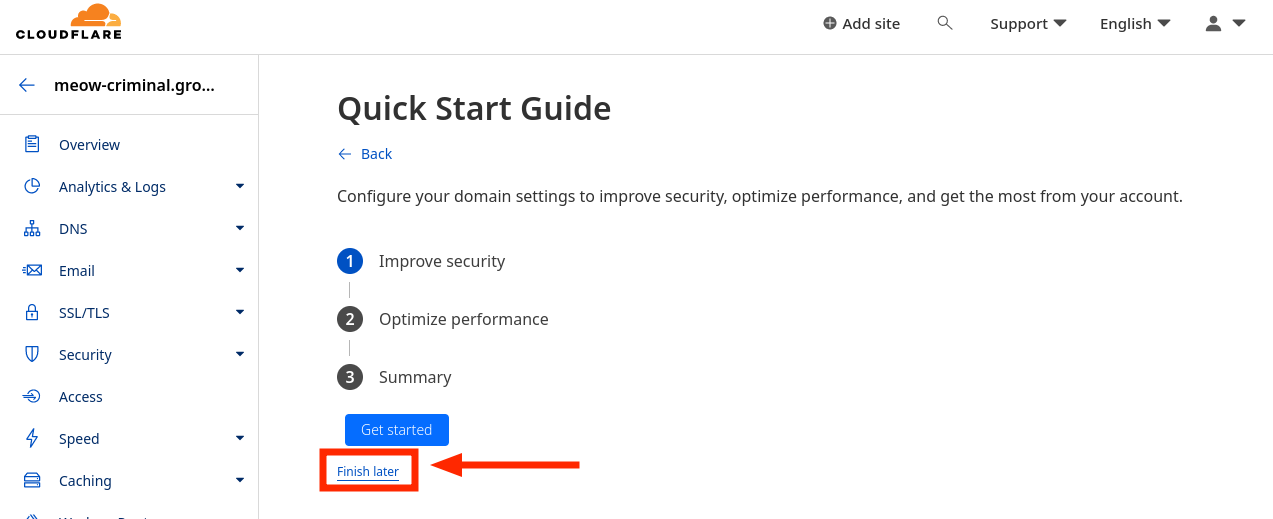
- On the final page, click Finish later
You will get the Nameservers.
For our example, they are:
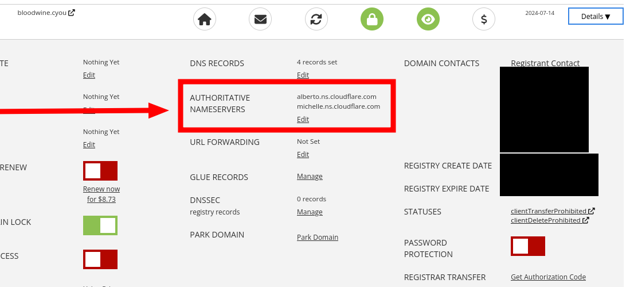
alberto.ns.cloudflare.commichelle.ns.cloudflare.com
You’ll use them in the next step.
The nameservers you receive might be different.
If you chose DigitalOcean DNS: How to get nameservers
-
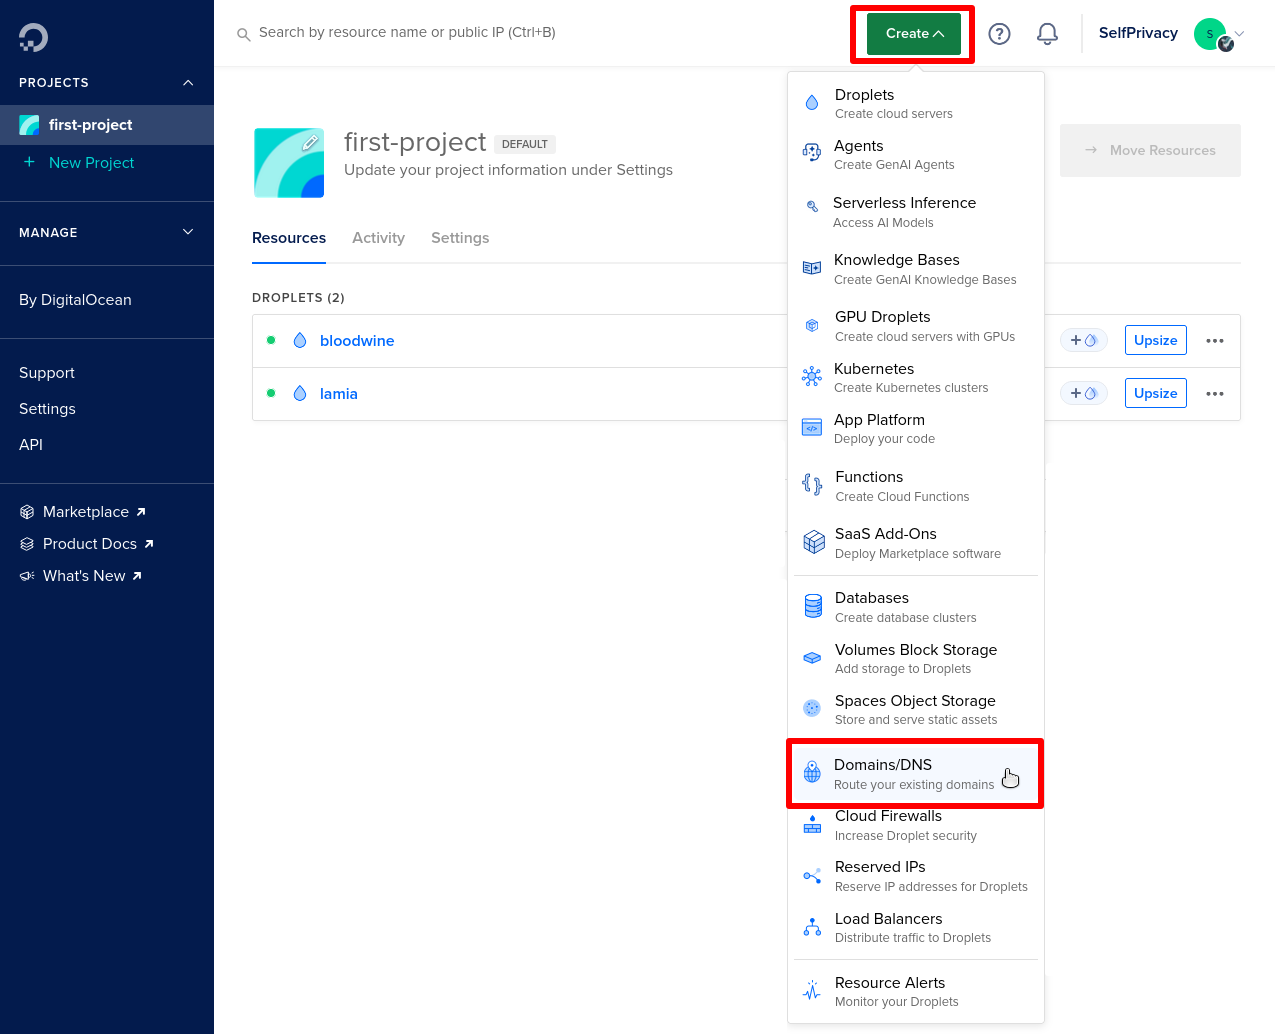
Create a New project, then go to manage the new project
-
Click the Create button at the top, and select Domain/DNS
- Enter your Domain
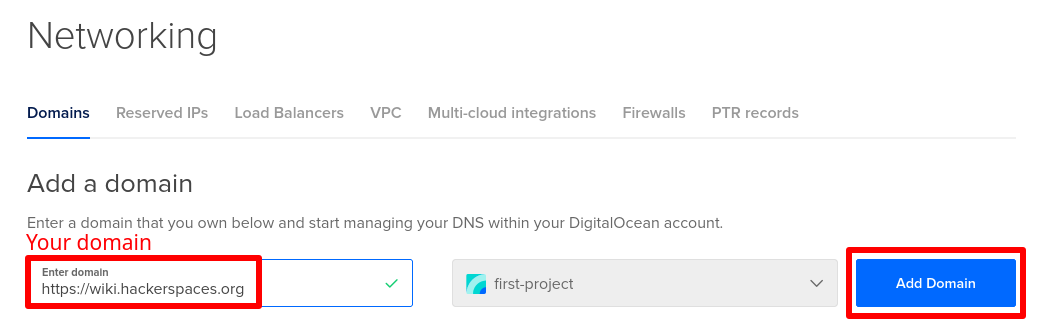
- Click Add Domain.
You will get the Nameservers.
For our example, they are:
ns1.digitalocean.comns2.digitalocean.com
You’ll use them in the next step.
The nameservers you receive might be different.
Configure Nameservers in Domain Registrar
DigitalOcean has a good guide for many popular registrars. Even if you are not using DigitalOcean for DNS, this guide can help you!
Here are the instructions for Porkbun, but you can use your domain registrar; the steps should be roughly similar.
-
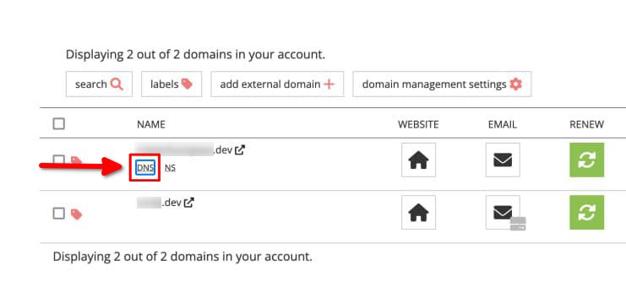
Go to the Domain management panel.

-
Hover over the purchased domain and click DNS.
-
In the Domain management panel, find the Authoritative nameservers setting.
-
Click Edit.
-
Enter the
Nameserversobtained in the previous step.
Most changes happen in minutes but sometimes they need up to 48 hours.
Step 2: Generating API tokens
API tokens — are almost the same as login and password, only for a program, not a person.
SelfPrivacy application uses them to manage services in all accounts instead of you.
We will generate three tokens:
Store all your tokens in the password manager!
Generate DNS provider token
To manage the Domain, SelfPrivacy needs a DNS provider token, not a Domain registrar token.
If you chose deSEC: How to get a token
-
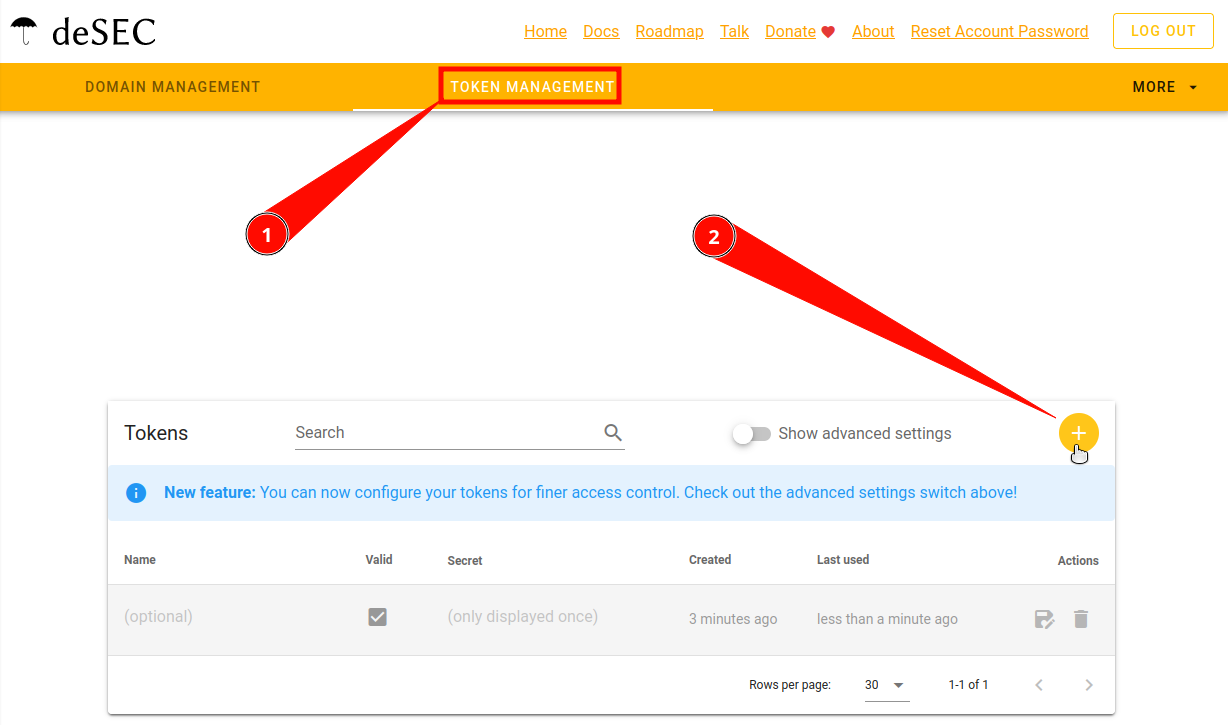
Go to the Token management tab.
-
Click on the round Plus button in the upper right corner.
-
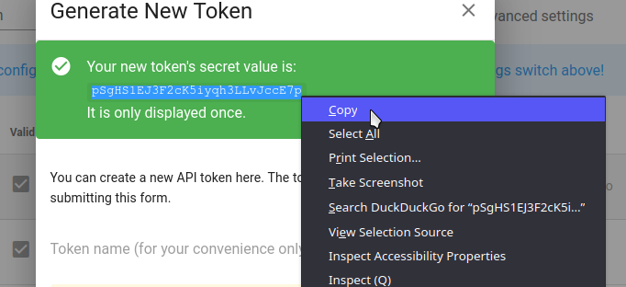
Generate New Token dialogue will be displayed. Enter any Token name you wish. Advanced settings are not required, so do not touch anything there.
-
Click on Save.
-
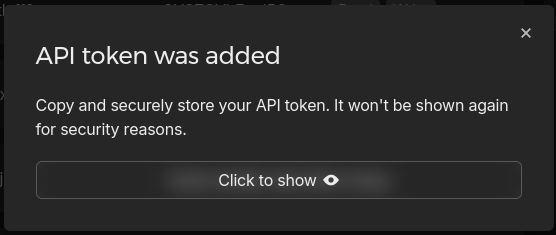
Make sure you save the token’s secret value as it will only be displayed once.
If you chose Cloudflare: How to get a token
You can choose the video tutorial or the detailed text description.
-
Go to the Cloudflare dashboard
-
Click on the profile icon in the upper right corner. For the mobile version: click on the menu button with three horizontal bars in the upper left corner
-
From the menu that appears, click My Profile
-
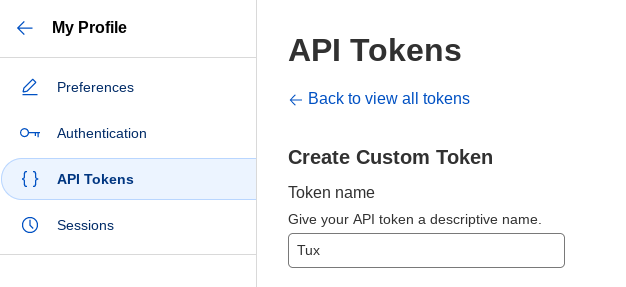
In the My Profile menu, select API Tokens
-
Click on the Create Token button
-
Scroll down until you see the Create Custom Token field and the Get Started button on the right side. Press it.
-
In the Token Name field, give your token any name
-
In Permissions. Click on the blue label at the bottom + Add more
-
Copy the settings shown in the screenshot below
Text settings description
First line: Zone, DNS, Edit
Second line: Zone, Zone, Read
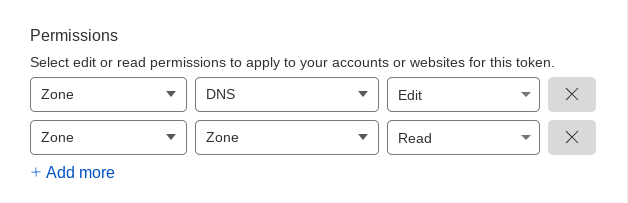
Your selection must look like this.
-
Next, look at Zone Resources. Below this heading there is a line with two fields. The first should be Include, and the second should be Specific Zone. Once you select Specific Zone, another field will appear on the right. Here you select your domain.
-
Scroll to the bottom and click the blue button Continue to Summary.
-
Check that you have selected everything correctly. You should see a line like this:
your.domain - DNS:Edit, Zone:Read
-
Press Create Token
-
Copy the created token
If you chose DigitalOcean DNS: How to get a token
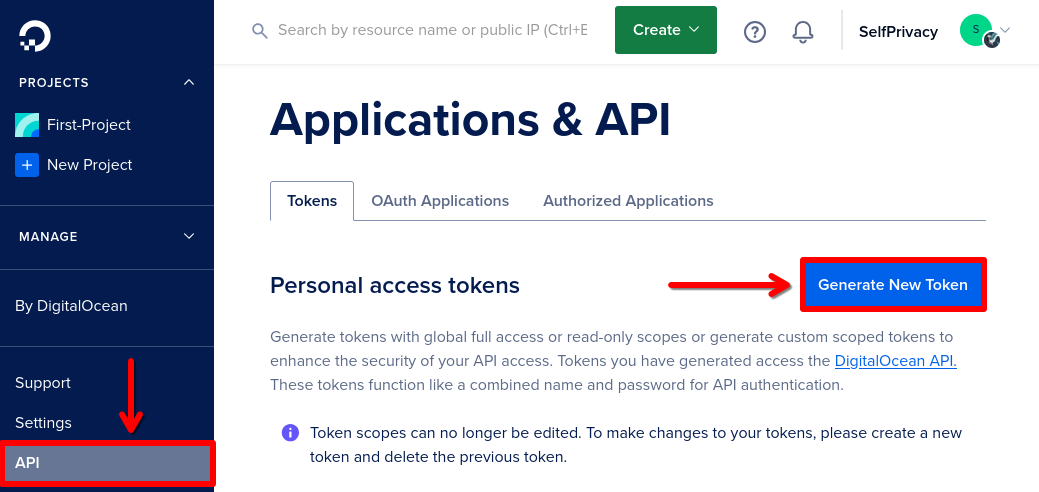
- Go to DigitalOcean API menu. Click Generate New Token
- Set Expiration to No expire. Scopes to Custom Scopes.
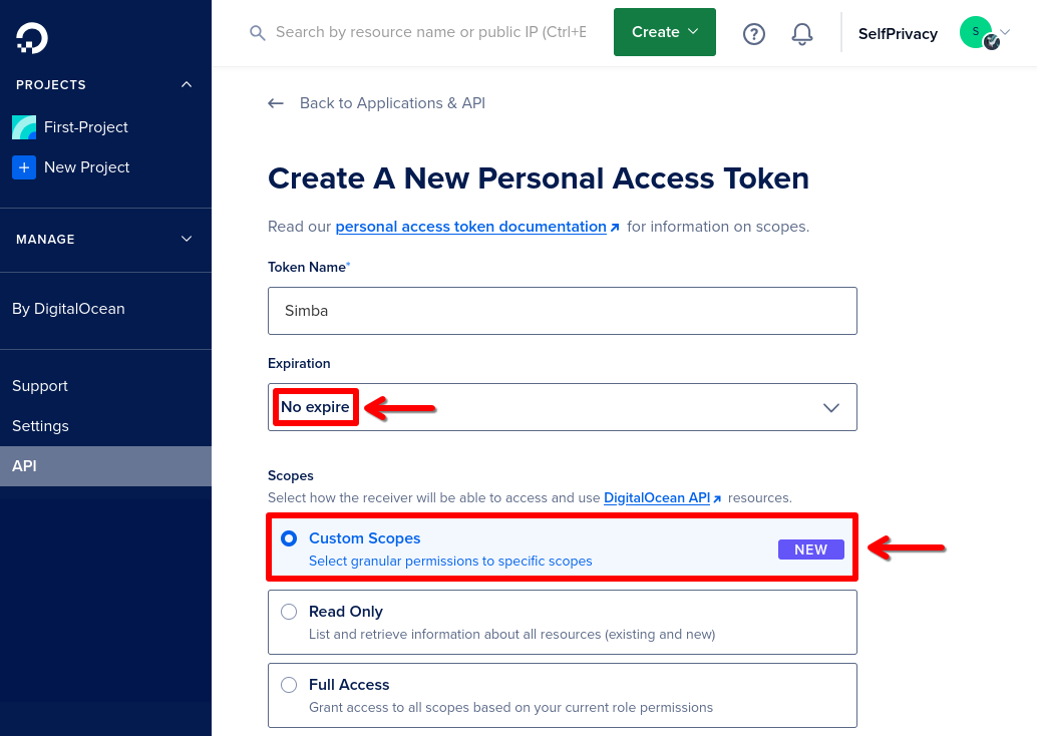
- In the Custom Scopes token rights menu, select only domain
- Click Generate Token.
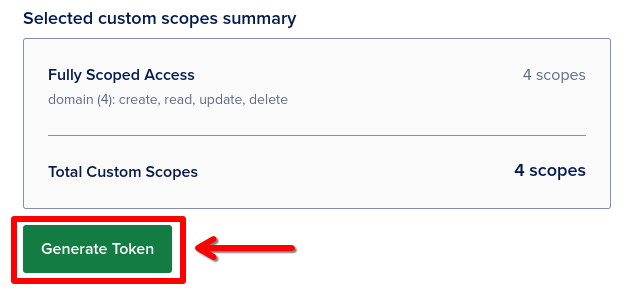
- Copy the token.
Generate Hosting provider token
We support two Hosting providers: pick one from the list below
| Parameter | Hetzner | DigitalOcean |
|---|---|---|
| Passport/ID required | Yes | No |
| Governing laws | GDPR, EU | GDPR, U.S. legislation |
| Logs collected | System logs only (Privacy Policy) | Google Analytics on the site (Privacy Policy) |
| Data disclosure | Does not disclose (GDPR-compliant) | May disclose under the U.S. CLOUD Act |
| Average monthly price (2 vCPU · 2 GB RAM · 50 GB SSD) |
$8 | $17 |
| Payment methods | Credit card, SWIFT transfer, SEPA | Credit card, PayPal, Google Pay |
| Available locations | Finland, Germany, USA | Germany, USA, Netherlands, Singapore, United Kingdom, Canada, India, Australia |
| Email Issues | E-mail service becomes available with a delay | E-mail service not available |
If you chose Hetzner: How to get a token
-
Visit the hetzner console page
-
Create a project
-
Point the mouse at the side panel. It should open and show you menu items. Click on Security (with a key icon).
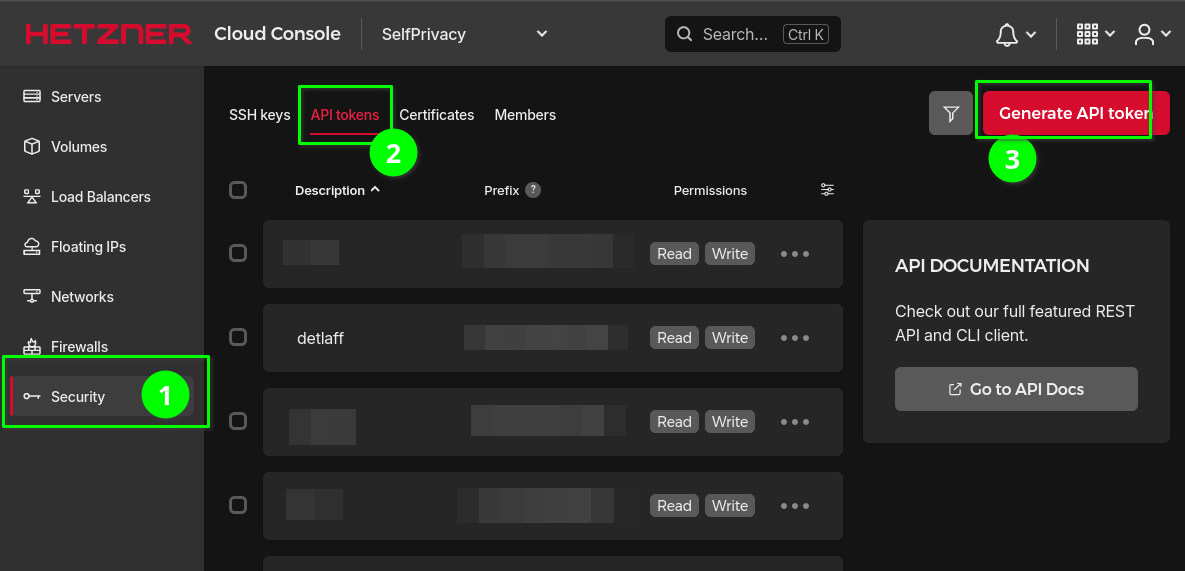
-
At the top of the interface click on API Tokens
-
On the right side press the Generate API token button
-
Enter any name in the Description field
-
In Permissions select Read & Write
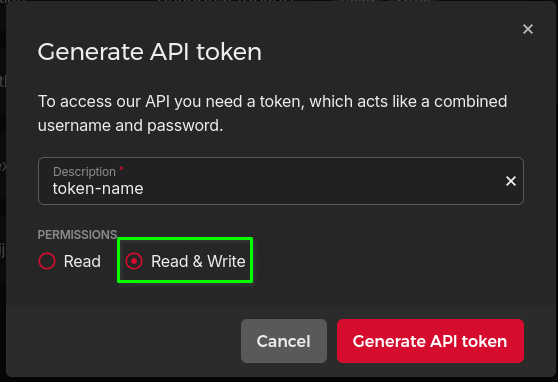
-
Click Generate API Token
-
Save the token
If you chose DigitalOcean: How to get a token
If you’re using DigitalOcean as your DNS provider: do not use a previously created token.
We will generate tokens with different permissions for security reasons.
- Go to DigitalOcean API menu. Click Generate New Token
- Set Expiration to No expire. Scopes to Custom Scopes.
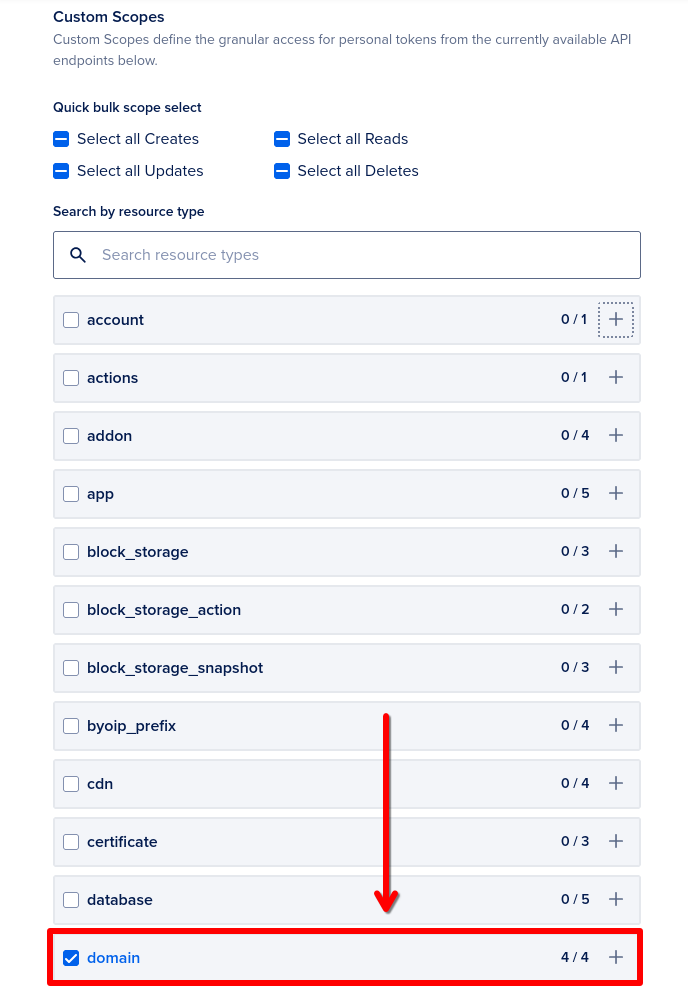
- In the Custom Scopes token rights menu, select:
accountblock_storageblock_storage_actiondropletimagemonitoringregionssizesuptime
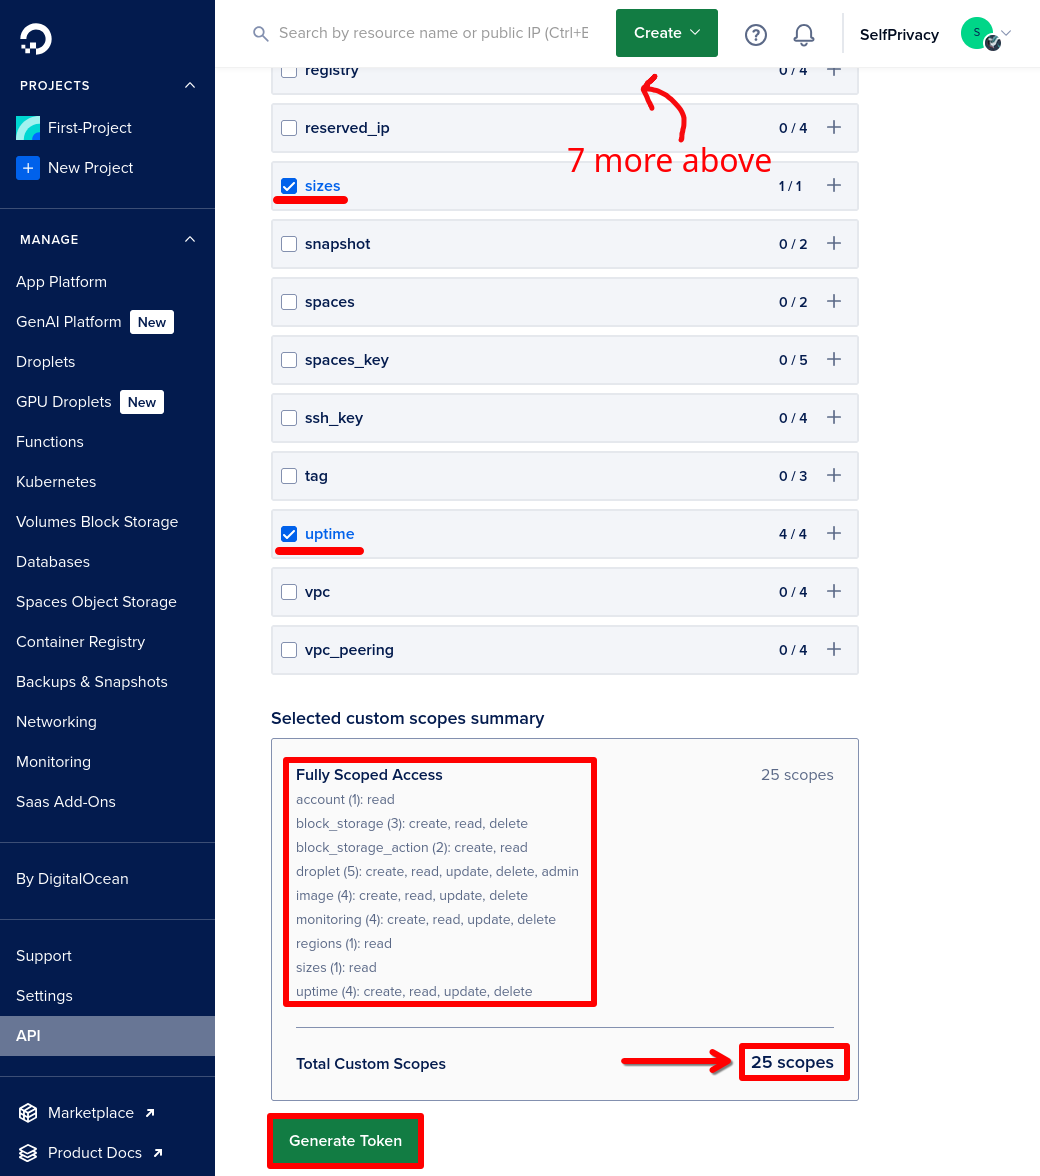
Double check that you select the correct rights! Total Custom Scopes must be 25.
-
Click Generate Token.
-
Copy the token.
Generate Backup provider token
Backblaze — is a Backup provider for storing your data.
SelfPrivacy makes only encrypted backups, so your information stays secure.
-
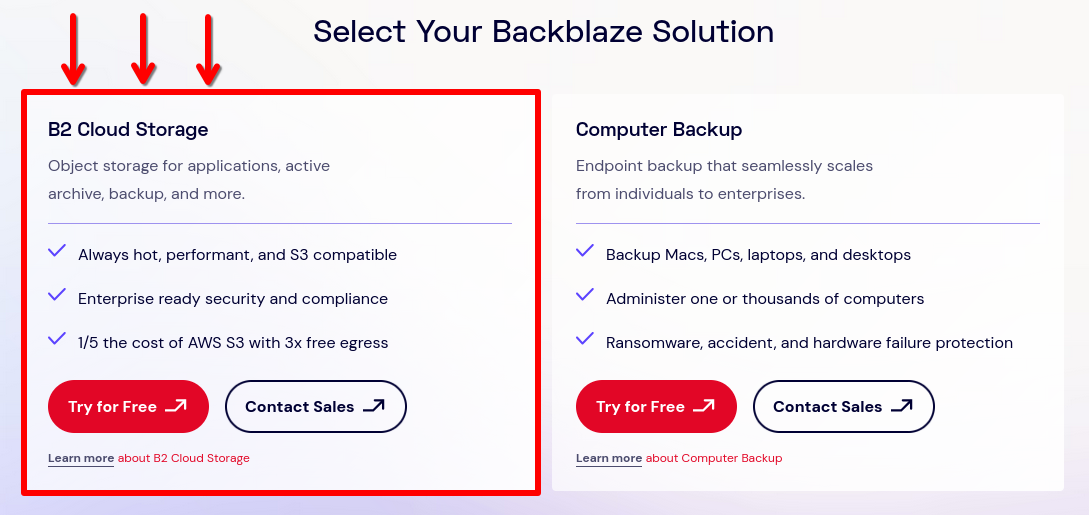
You may be asked Select Your Backblaze Solution, select B2 Cloud Storage
- Choose a storage location closer to your server location
-
Visit the following link (This page only allows you to log in to an existing account, not to create one)
-
Click on the blue Generate New Master Application Key button
-
Copy keyID and applicationKey
keyID: 17bd5c965c64                        <-- Like this one

applicationKey: 0047342ef1ab5da253d3e8fd   <-- And like this one
Step 3: Installation
Open the SelfPrivacy app. Enter the setup wizard. It’s time to use the tokens we obtained earlier.
The application will prompt you to choose the server location and specifications. We recommend selecting a server closer to your current location. If you have around 5 users, a server with minimal specifications will be sufficient.
The application will prompt you to create a master account that will act as the administrator. Save the account password in a password manager, such as KeePassXC.
At the end, click “Create Server”, the process may take up to 30 minutes.
If something goes wrong, contact the support chats.
After installation, we recommend creating a server recovery key
If something happens to your device, with the recovery key, you can seamlessly connect to the old server.
In the app, go to the “More” menu, then “Recovery Key”. Click “Generate Key”.
You will see a list of words — this will be your key. Save it in a password manager, such as KeePassXC. For security reasons, the application does not allow copying the key.
Remember, possessing this key gives an attacker full access to your server.