Welcome to the SelfPrivacy documentation!
This is the multi-page printable view of this section. Click here to print.
Documentation
- 1: Installation
- 2: Theory
- 3: Available services
- 3.1: E-mail
- 3.2: Nextcloud
- 3.3: Forgejo
- 3.4: Delta.Chat
- 3.5: Jitsi
- 3.6: Mumble
- 3.7: Vikunja
- 3.8: Vaultwarden
- 4: Backups
- 5: How-to guides
- 5.1: How to get root access via SSH
- 5.2: How to change the DNS provider to deSEC
- 5.3: How to manually clean up your server's disk space
- 6: About us
- 6.1: Team
- 6.2: Motivation
- 6.3: Roadmap
- 6.4: Donations
- 6.5: Privacy Policy
- 7: How to contribute
- 8: Frequently Asked Questions
1 - Installation
Prepare for installation: buy a domain, register accounts, generate access tokens
Overview
The SelfPrivacy server is created within an hour. It is available only in cloud hosting.
Delegating installation risks your privacy and security.
To start, you need these things:
Money on the card: $15 to start and ~ $5 per month
SelfPrivacy app is free, but hosting and domain name registrars are not.
Passport (optional)
The hosting provider may ask for proof of identity when you sign up.
In addition, European jurisdiction requires to know your customer. Providing photos or photocopies of documents to anyone online is a bad practice that we condemn.
Prepare a password manager
You will register many different accounts. Qwerty123 or VerySecurePassw0rd are very bad passwords. A good password is a passphrase:
expert repose postwar anytime glimpse freestyle liability effects
Or strings like:
}Rj;EtG:,M!bc4/|
It’s a good security practice to store passwords in a password manager such as KeePassXC. This way, you have to remember only a single password: the password manager’s master passphrase.
Guide steps
We will be purchasing a domain, then connecting it to the DNS provider.
Step 2: Generating API access tokens
We will generate three tokens:
Launch the SelfPrivacy application and begin the installation process using the accounts and tokens you’ve prepared.
Step 1: Domain
Domain — a registered text name that links to the IP address of a server.
As an example, Wikipedia.org and SelfPrivacy.org are domains.
    domain    links to  IP address
SelfPrivacy.org  -->  135.181.45.111
Purchasing a Domain
Choose a Domain Registrar
As an example for the guide, we will use Porkbun.
Choose a domain
Domains support hundreds of extensions such as .com, .me, .love, .rocks, etc.
- Always check the annual renewal price, as it can significantly exceed the initial purchase cost
- A normal domain price is $8-15 per year
- Choose a name that’s easy to dictate over the phone and to put on a business card
Choose DNS provider
DNS provider — is the control center for routing all services under your domain.
It’s like an address book.
For example, it can configure links such as:
cloud.your.domain-> your file-cloud servicepassword.your.domain-> your password manager service
We support three DNS providers: pick one from the list below
| Provider | Privacy Law | Tracking | Jurisdiction |
|---|---|---|---|
| deSEC | GDPR | No | 🇩🇪 Germany |
| DigitalOcean DNS | GDPR, CLOUD Act | Yes | 🇺🇸 USA |
| CloudFlare | GDPR, CLOUD Act | Yes | 🇺🇸 USA |
Get nameservers from DNS provider
Nameservers — are pointers that tell the internet which DNS provider manages your domain.
We need to get Nameservers from the DNS provider, then paste them to your Domain Registrar provider.
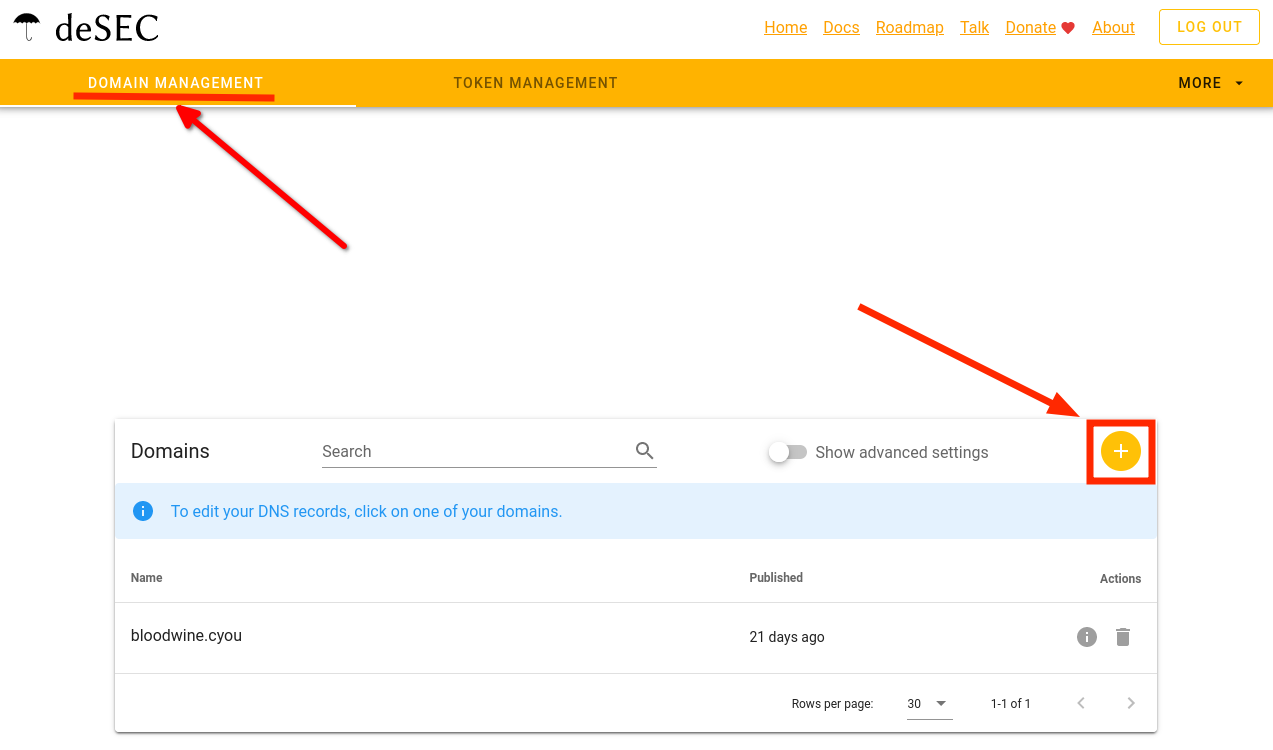
If you chose deSEC: How to get nameservers
-
Create a deSEC account
-
Go to the domains page
-
Click on the plus button
-
Enter your domain name. Click Save
-
Copy the names obtained in the Nameservers field

You will get the Nameservers.
For our example, they are:
ns1.desec.ions2.desec.org
You’ll use them in the next step.
The nameservers you receive might be different.
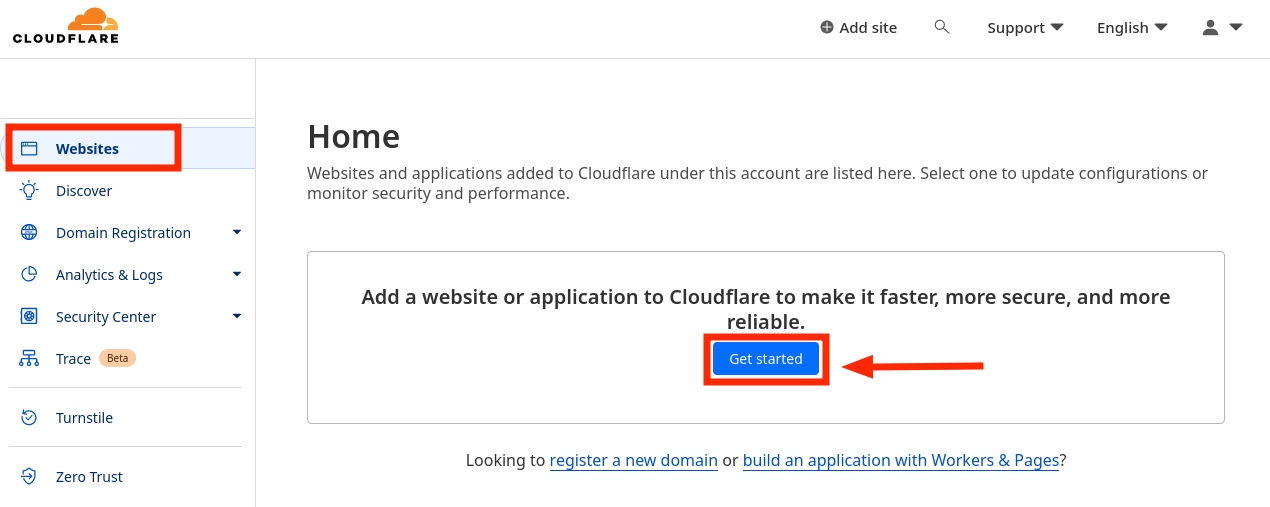
If you chose Cloudflare: How to get nameservers
-
Go to this link. On the left menu, click Websites, then the blue Get started button.
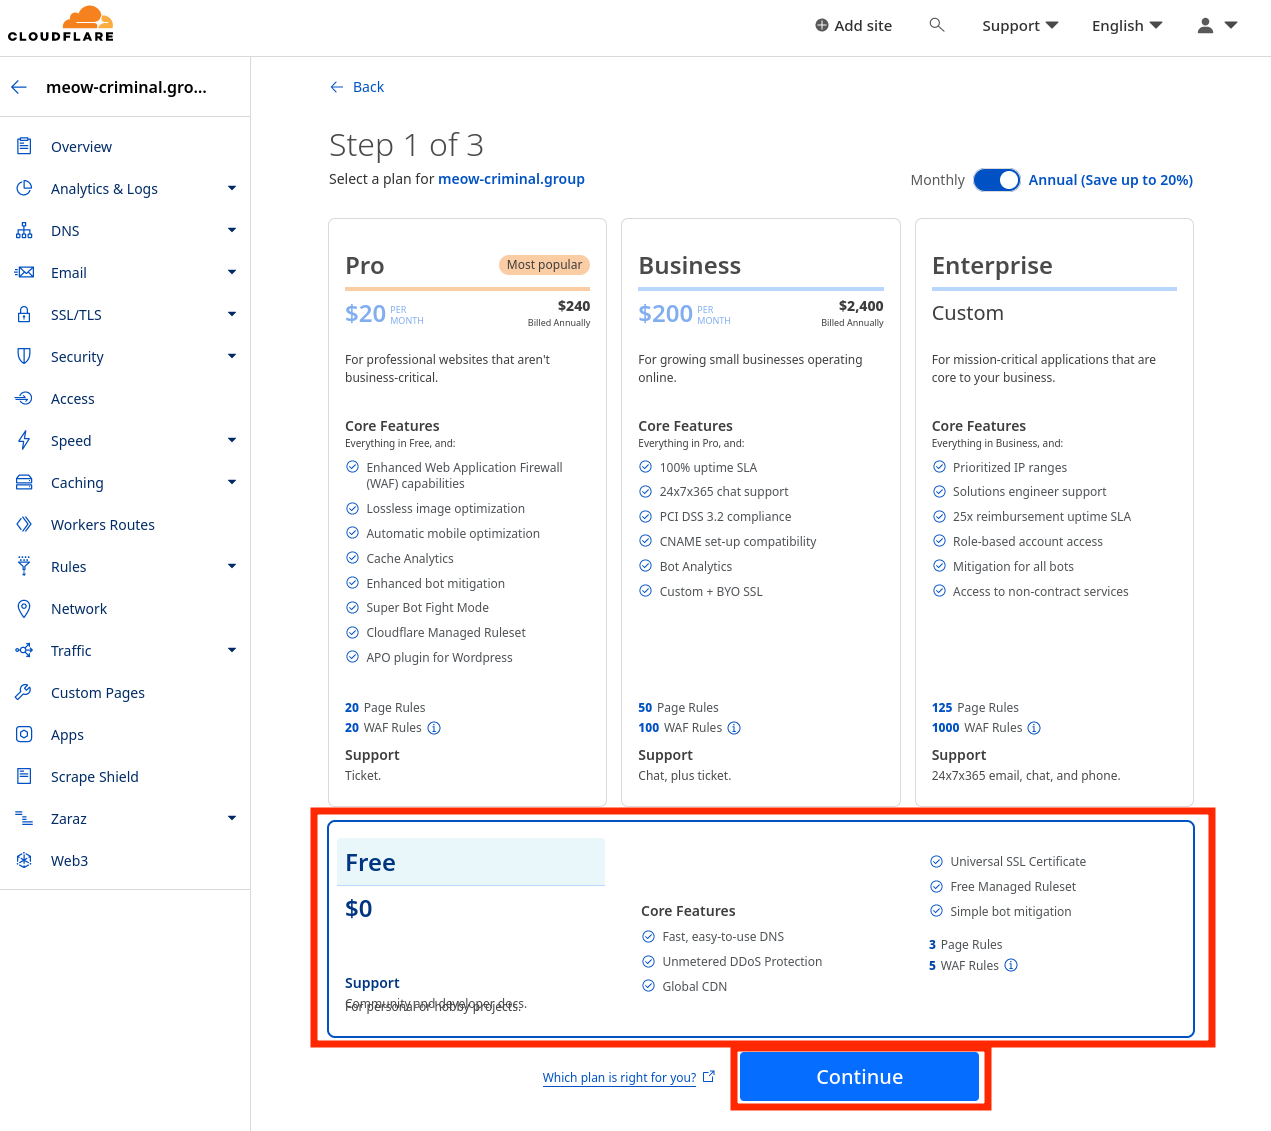
- Select the Free plan and click Continue
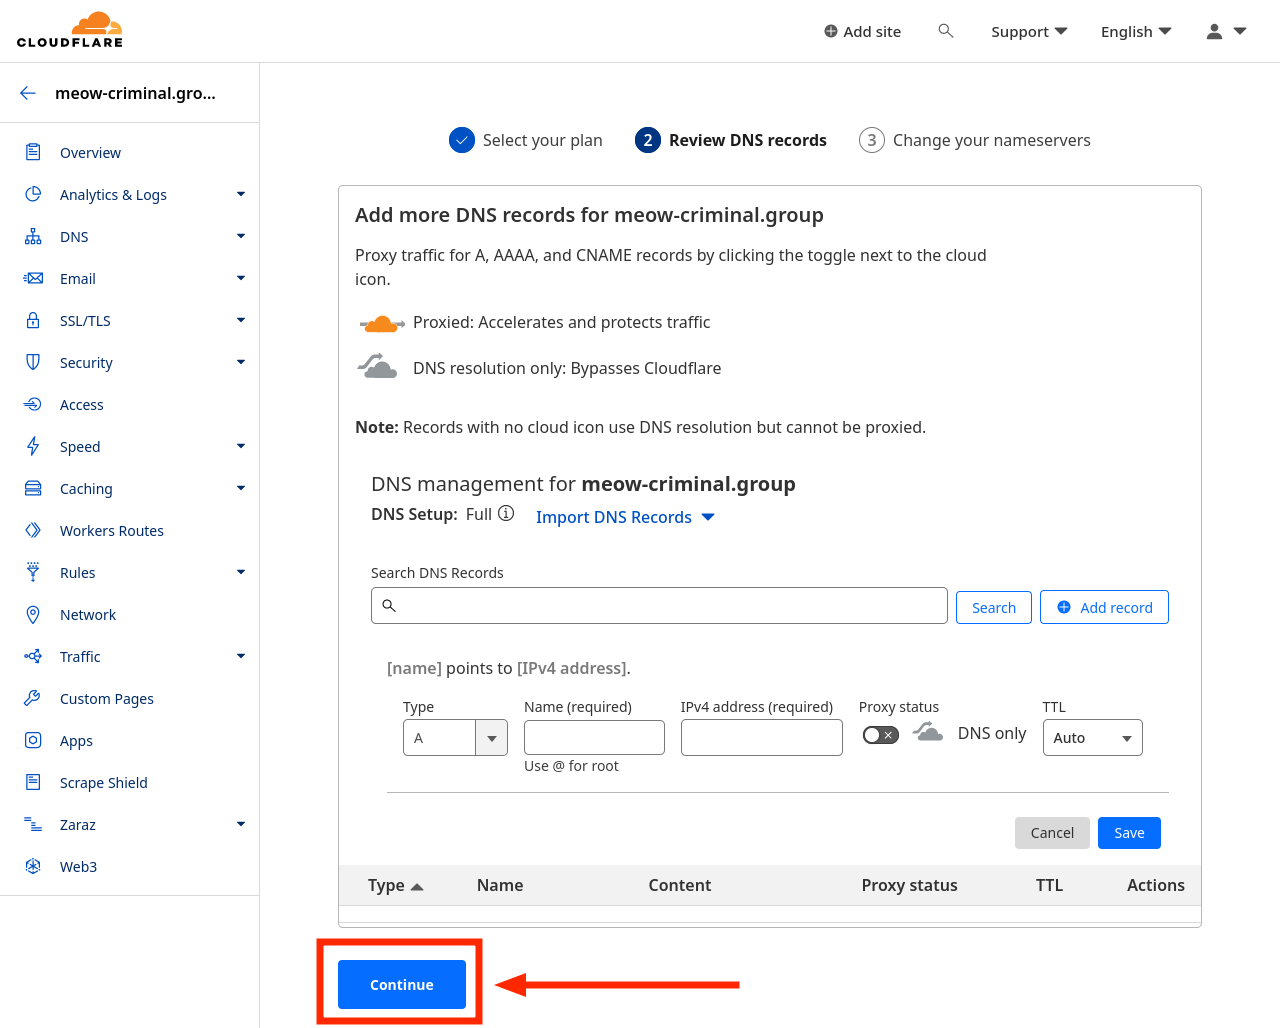
- On the Review DNS records tab, don’t change anything. Click Continue
- Copy the nameservers, paste them to password manager. Then click Continue
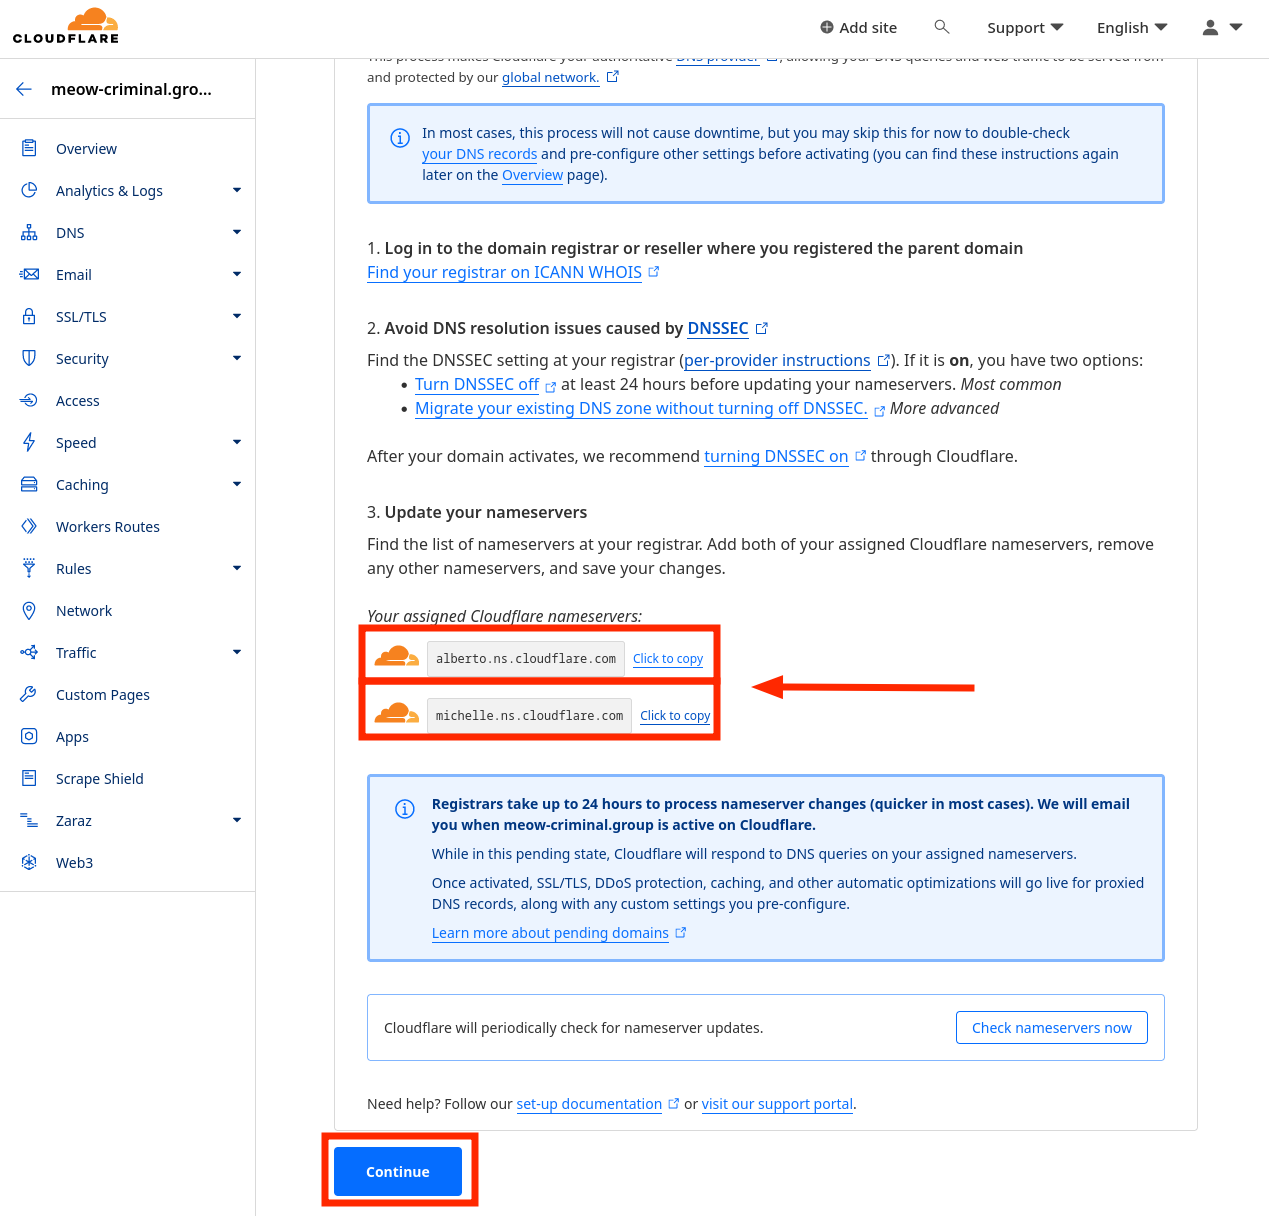
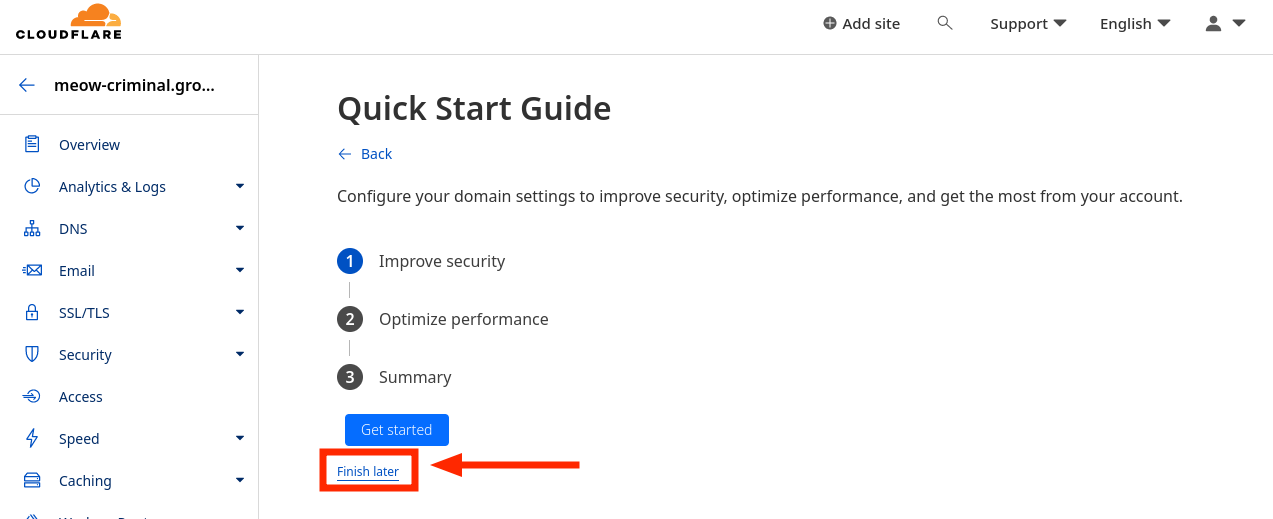
- On the final page, click Finish later
You will get the Nameservers.
For our example, they are:
alberto.ns.cloudflare.commichelle.ns.cloudflare.com
You’ll use them in the next step.
The nameservers you receive might be different.
If you chose DigitalOcean DNS: How to get nameservers
-
Create a New project, then go to manage the new project
-
Click the Create button at the top, and select Domain/DNS
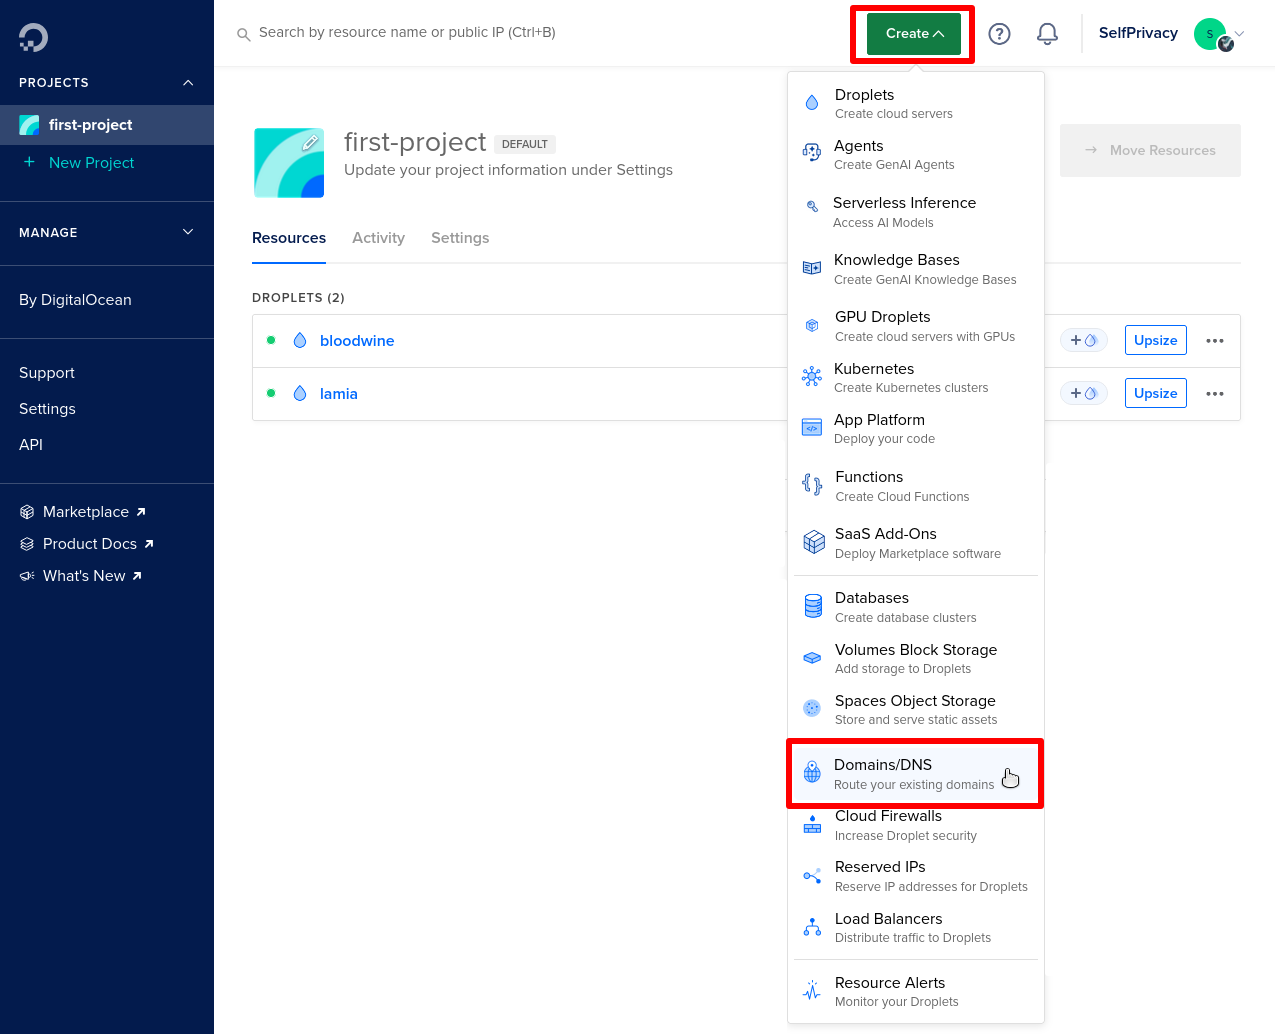
- Enter your Domain
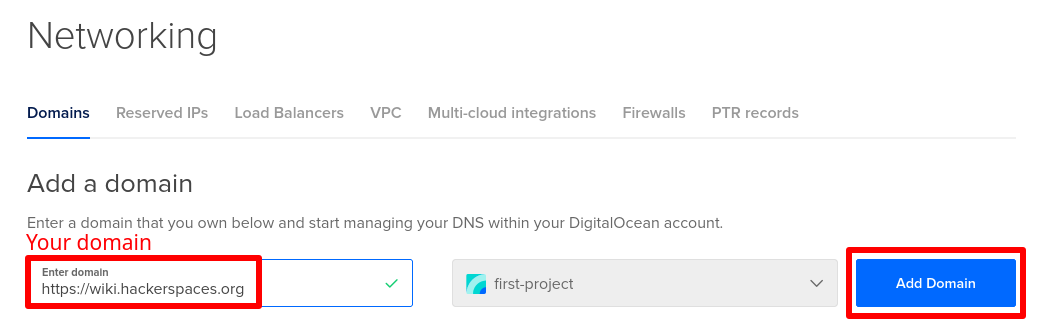
- Click Add Domain.
You will get the Nameservers.
For our example, they are:
ns1.digitalocean.comns2.digitalocean.com
You’ll use them in the next step.
The nameservers you receive might be different.
Configure Nameservers in Domain Registrar
DigitalOcean has a good guide for many popular registrars. Even if you are not using DigitalOcean for DNS, this guide can help you!
Here are the instructions for Porkbun, but you can use your domain registrar; the steps should be roughly similar.
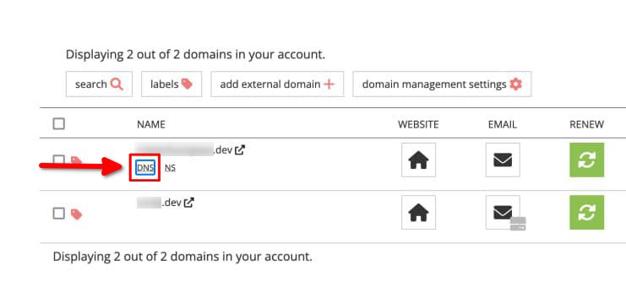
-
Go to the Domain management panel.

-
Hover over the purchased domain and click DNS.
-
In the Domain management panel, find the Authoritative nameservers setting.
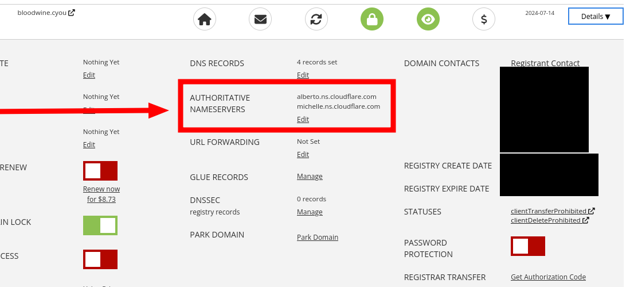
-
Click Edit.
-
Enter the
Nameserversobtained in the previous step.
Most changes happen in minutes but sometimes they need up to 48 hours.
Step 2: Generating API tokens
API tokens — are almost the same as login and password, only for a program, not a person.
SelfPrivacy application uses them to manage services in all accounts instead of you.
We will generate three tokens:
Store all your tokens in the password manager!
Generate DNS provider token
To manage the Domain, SelfPrivacy needs a DNS provider token, not a Domain registrar token.
If you chose deSEC: How to get a token
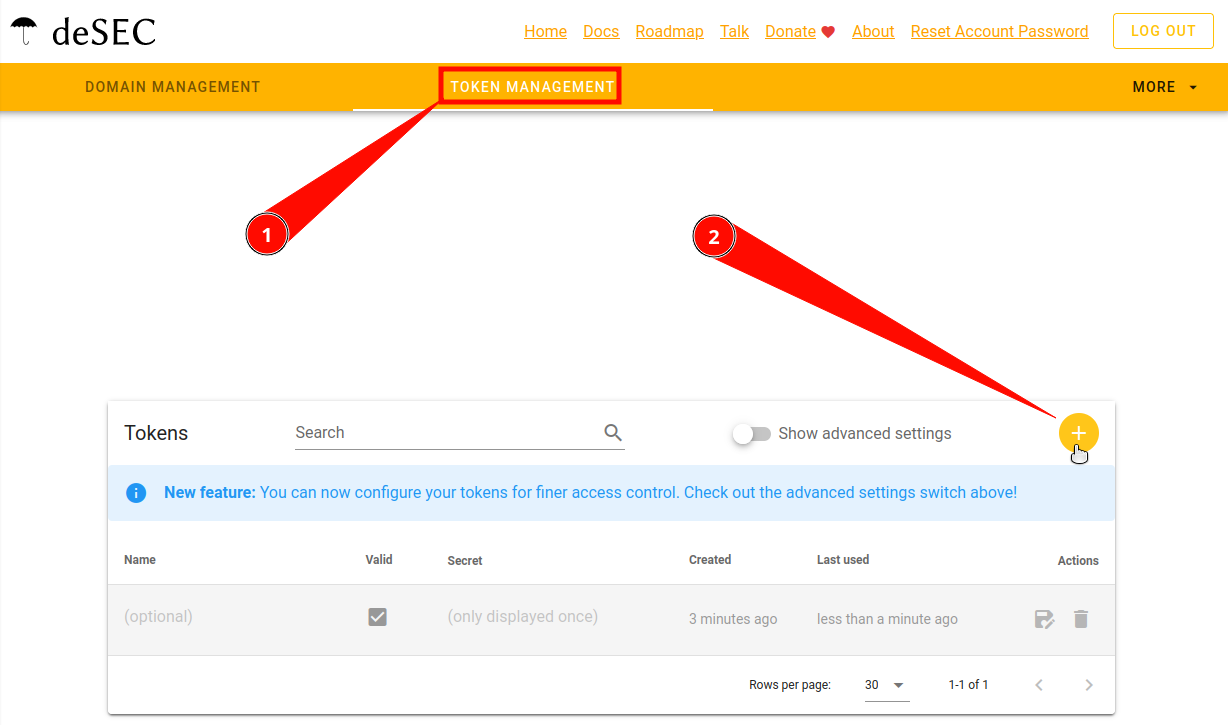
-
Go to the Token management tab.
-
Click on the round Plus button in the upper right corner.
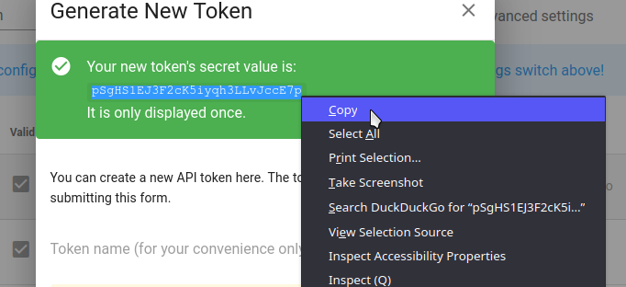
-
Generate New Token dialogue will be displayed. Enter any Token name you wish. Advanced settings are not required, so do not touch anything there.
-
Click on Save.
-
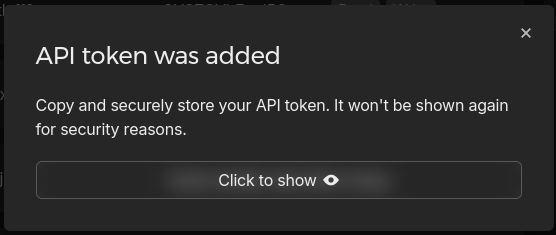
Make sure you save the token’s secret value as it will only be displayed once.
If you chose Cloudflare: How to get a token
You can choose the video tutorial or the detailed text description.
-
Go to the Cloudflare dashboard
-
Click on the profile icon in the upper right corner. For the mobile version: click on the menu button with three horizontal bars in the upper left corner
-
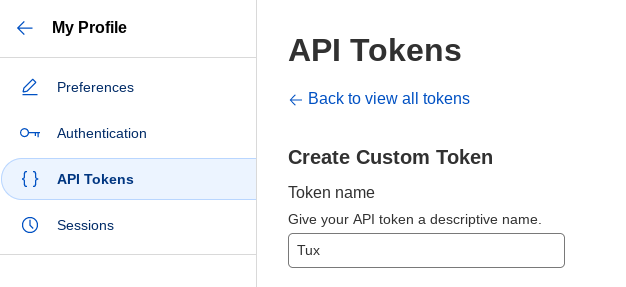
From the menu that appears, click My Profile
-
In the My Profile menu, select API Tokens
-
Click on the Create Token button
-
Scroll down until you see the Create Custom Token field and the Get Started button on the right side. Press it.
-
In the Token Name field, give your token any name
-
In Permissions. Click on the blue label at the bottom + Add more
-
Copy the settings shown in the screenshot below
Text settings description
First line: Zone, DNS, Edit
Second line: Zone, Zone, Read
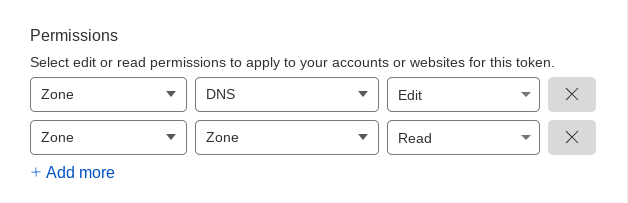
Your selection must look like this.
-
Next, look at Zone Resources. Below this heading there is a line with two fields. The first should be Include, and the second should be Specific Zone. Once you select Specific Zone, another field will appear on the right. Here you select your domain.
-
Scroll to the bottom and click the blue button Continue to Summary.
-
Check that you have selected everything correctly. You should see a line like this:
your.domain - DNS:Edit, Zone:Read
-
Press Create Token
-
Copy the created token
If you chose DigitalOcean DNS: How to get a token
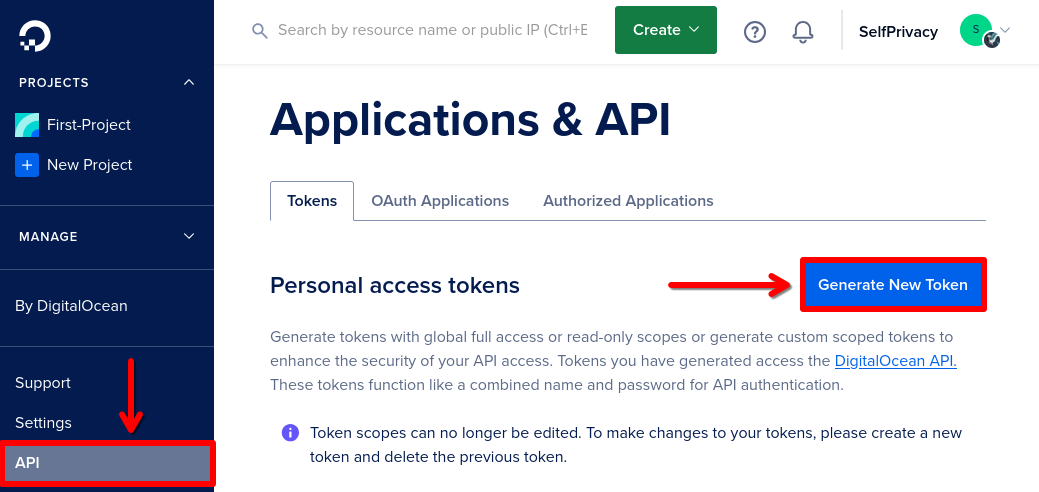
- Go to DigitalOcean API menu. Click Generate New Token
- Set Expiration to No expire. Scopes to Custom Scopes.
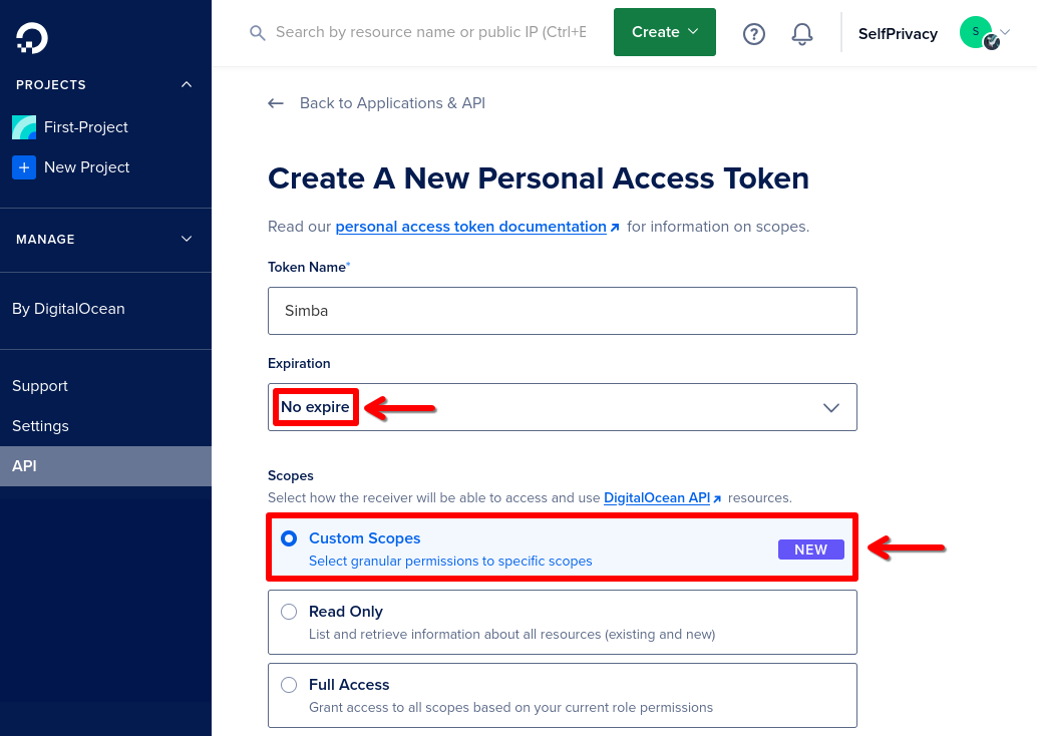
- In the Custom Scopes token rights menu, select only domain
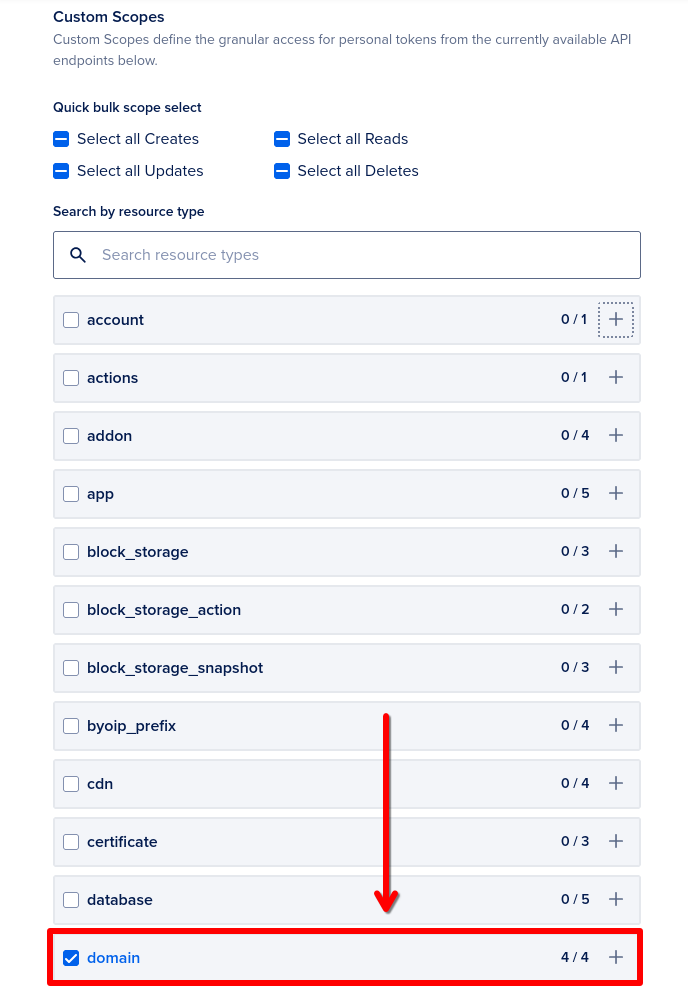
- Click Generate Token.
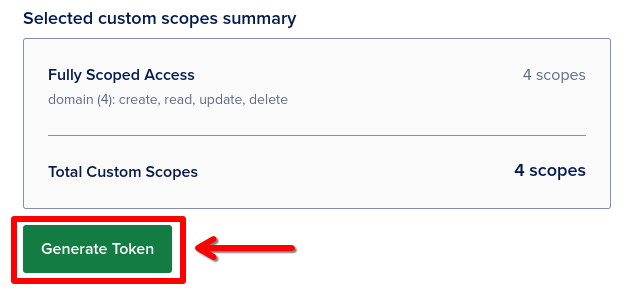
- Copy the token.
Generate Hosting provider token
We support two Hosting providers: pick one from the list below
| Parameter | Hetzner | DigitalOcean |
|---|---|---|
| Passport/ID required | Yes | No |
| Governing laws | GDPR, EU | GDPR, U.S. legislation |
| Logs collected | System logs only (Privacy Policy) | Google Analytics on the site (Privacy Policy) |
| Data disclosure | Does not disclose (GDPR-compliant) | May disclose under the U.S. CLOUD Act |
| Average monthly price (2 vCPU · 2 GB RAM · 50 GB SSD) |
$8 | $17 |
| Payment methods | Credit card, SWIFT transfer, SEPA | Credit card, PayPal, Google Pay |
| Available locations | Finland, Germany, USA | Germany, USA, Netherlands, Singapore, United Kingdom, Canada, India, Australia |
| Email Issues | E-mail service becomes available with a delay | E-mail service not available |
If you chose Hetzner: How to get a token
-
Visit the hetzner console page
-
Create a project
-
Point the mouse at the side panel. It should open and show you menu items. Click on Security (with a key icon).
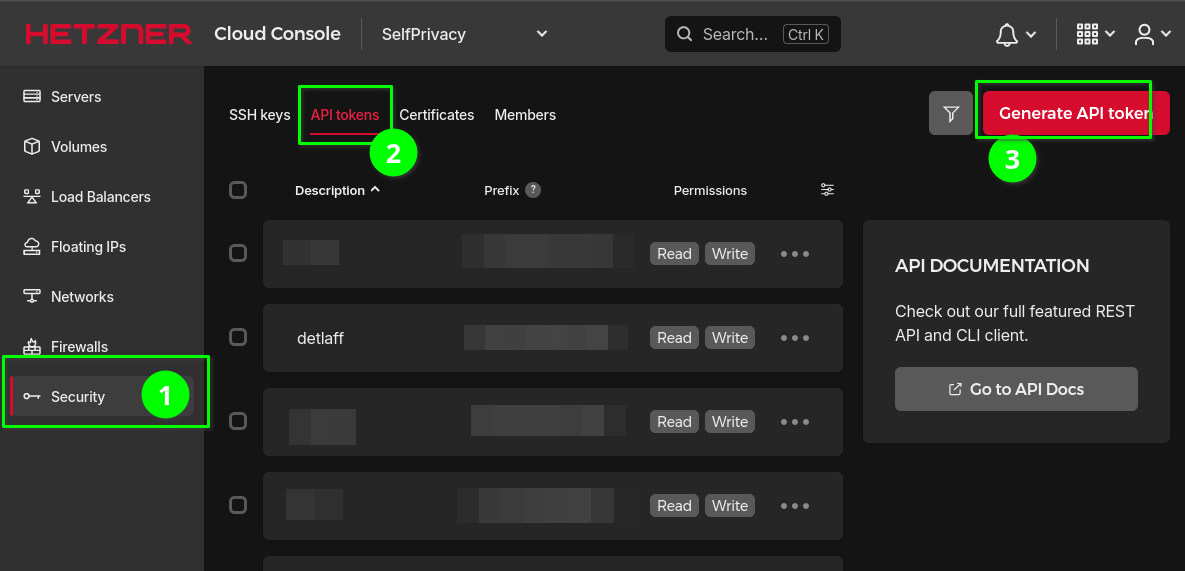
-
At the top of the interface click on API Tokens
-
On the right side press the Generate API token button
-
Enter any name in the Description field
-
In Permissions select Read & Write
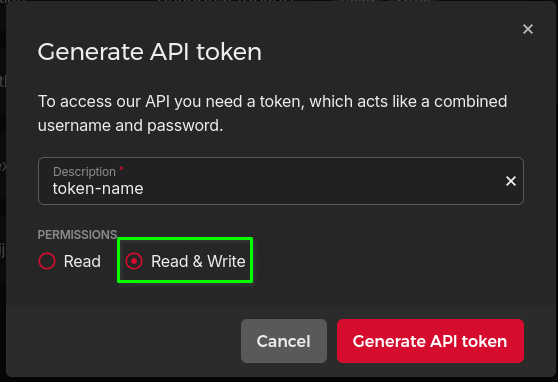
-
Click Generate API Token
-
Save the token
If you chose DigitalOcean: How to get a token
Do not reuse tokens!
If you’re using DigitalOcean as your DNS provider: do not use a previously created token.
We will generate tokens with different permissions for security reasons.
- Go to DigitalOcean API menu. Click Generate New Token
- Set Expiration to No expire. Scopes to Custom Scopes.
- In the Custom Scopes token rights menu, select:
accountblock_storageblock_storage_actiondropletimagemonitoringregionssizesuptime
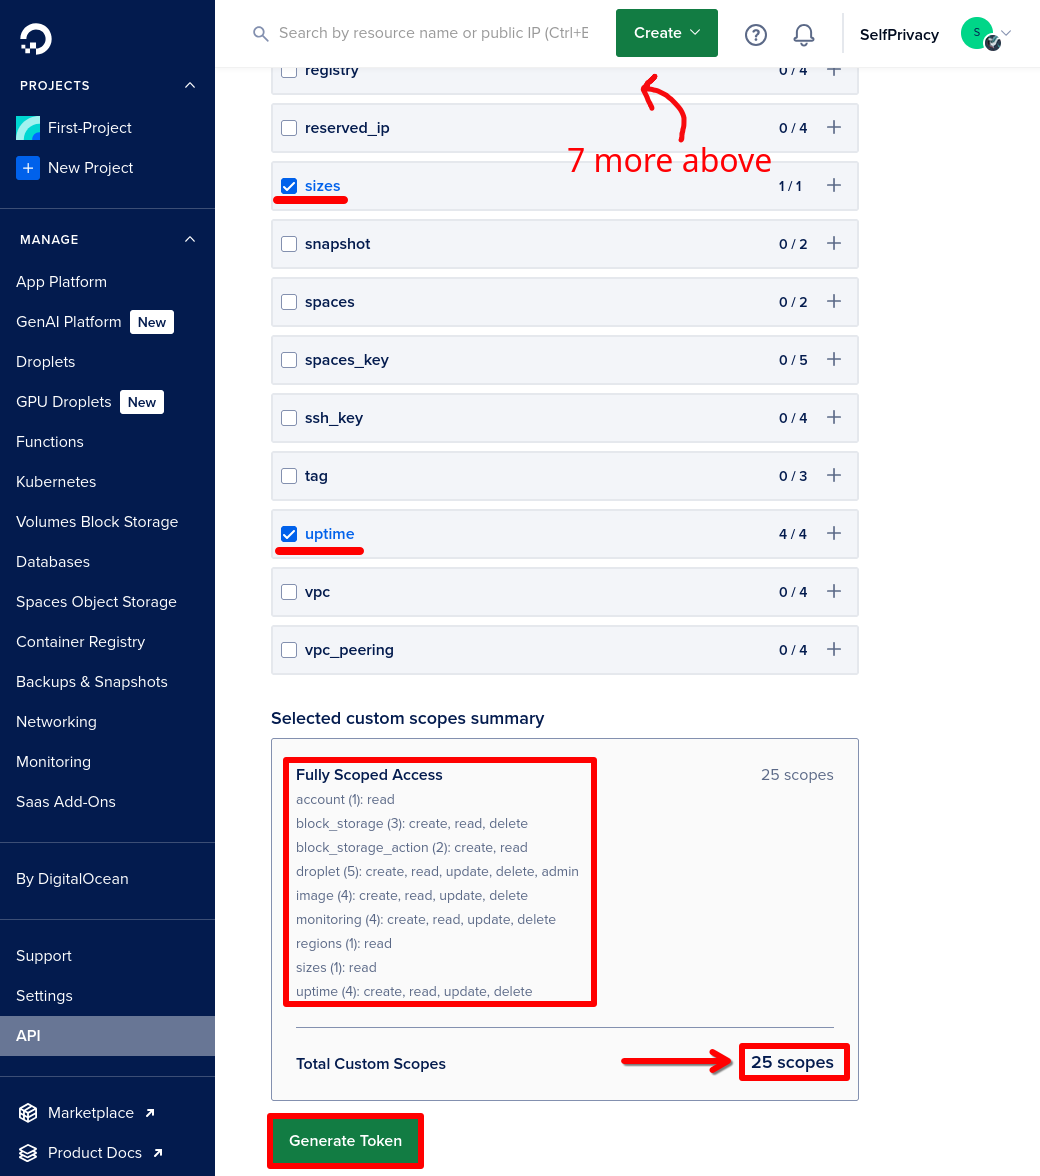
Double check that you select the correct rights! Total Custom Scopes must be 25.
-
Click Generate Token.
-
Copy the token.
Generate Backup provider token
Backblaze — is a Backup provider for storing your data.
SelfPrivacy makes only encrypted backups, so your information stays secure.
-
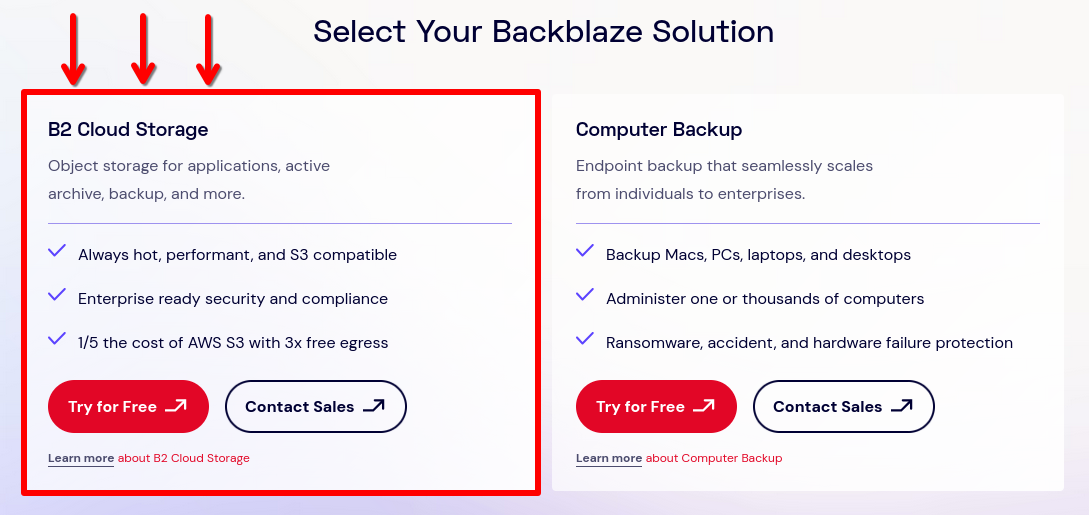
You may be asked Select Your Backblaze Solution, select B2 Cloud Storage
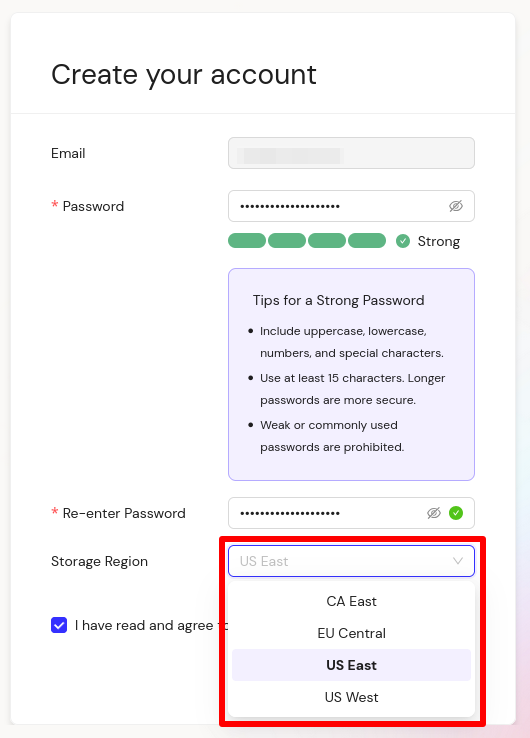
- Choose a storage location closer to your server location
-
Visit the following link (This page only allows you to log in to an existing account, not to create one)
-
Click on the blue Generate New Master Application Key button
-
Copy keyID and applicationKey
keyID: 17bd5c965c64                        <-- Like this one

applicationKey: 0047342ef1ab5da253d3e8fd   <-- And like this one
Step 3: Installation
Open the SelfPrivacy app. Enter the setup wizard. It’s time to use the tokens we obtained earlier.
The application will prompt you to choose the server location and specifications. We recommend selecting a server closer to your current location. If you have around 5 users, a server with minimal specifications will be sufficient.
The application will prompt you to create a master account that will act as the administrator. Save the account password in a password manager, such as KeePassXC.
At the end, click “Create Server”, the process may take up to 30 minutes.
If something goes wrong, contact the support chats.
After installation, we recommend creating a server recovery key
If something happens to your device, with the recovery key, you can seamlessly connect to the old server.
In the app, go to the “More” menu, then “Recovery Key”. Click “Generate Key”.
You will see a list of words — this will be your key. Save it in a password manager, such as KeePassXC. For security reasons, the application does not allow copying the key.
Remember, possessing this key gives an attacker full access to your server.
2 - Theory
Discussion of various aspects of the project
2.1 - How SelfPrivacy automates server management
SelfPrivacy tries to automate all steps of the server setup and management so it does not take much time
Self-hosted means “independent server hosting” or “hosting yourself”. This is when IT people do not use popular services like Google, they install free (like freedom) alternatives on their own or rented servers (VPS). It turns out that you get the same service, but under your own control. Often, free analogues will be more functional, private and secure than free off-the-shelf options from big companies.
Self-hosting provides complete privacy of data, including meta-information. But it also imposes an obligation to manually operate the system:
- You need to set up a domain for the application and a TLS certificate;
- You need to take care of the server security;
- Do not miss critical security updates;
- Make regular backups;
- Make sure that the disk does not overflow;
- Create and delete service users;
For an IT person, the tasks are manageable, even though they are troublesome. But for the rest of us, they are almost unbearable. The task of SelfPrivacy is to simplify this process as much as possible. You don’t need to use a console or be a skilled technician. The program automates all for you.
Domain Management
Full automation
Once you have configured your domain on CloudFlare and copied the API key into the SelfPrivacy application — your domain is managed completely automatically:
- Records are created for all services;
- Updated if necessary;
All you have to do is pay for the domain once a year at your registrar. Don’t forget to check your email account.
Certificate management
Full automation
Security of communication with your server is ensured by TLS ≥ v.1.2, like in banks. For this purpose SelfPrivacy uses a certificate from Let’s Encrypt, the world’s most popular provider trusted by millions of web portals.
Updating the operating system on your server
Full automation
A once-configured server is not completely secure. Over time, bugs may appear in the services, and the server becomes susceptible to hacking. Unfortunately, this is not such a rare occurrence. That’s why responsible IT professionals regularly update their servers. SelfPrivacy does it for you.
- System updates;
- Major NixOS releases;
Updating the server part of SelfPrivacy
Partial automation
SelfPrivacy consists of two parts - an app on your device, such as your phone or PC, and a server backend called the SelfPrivacy API. SelfPrivacy manages your service providers and your server. To do this, the SelfPrivacy API backend daemon runs on the server side. It also needs to be updated, for example when we add functionality or fix bugs. Updating often happens automatically, but sometimes you have to manually confirm a system configuration update to make the new features of the SelfPrivacy server side work.
Updating SelfPrivacy
Full automation
The SelfPrivacy application, roughly speaking, is a set of instructions that change something in the server. The work of the application after the initial configuration in no way affects the performance of services on your server. Nevertheless, every day we try to automate something, fix something, add new functionality. Application updates are done automatically from the repository, such as F-Droid, in the near future App Store and Google Play.
Server resource management
Partial automation
When there are a lot of users or services, the server can start to slow down. Through the application you can monitor the current resource consumption, and soon it will be possible to order an upgrade of the virtual machine.
Disk management
Partial automation
The application keeps track of the free space on the server disks and allows you to transfer data between them. If the partition is expandable, the app can automatically order more space after user confirmation.
Rescue copies
Full automation
Backups allow you to both repair broken servers and migrate from one server to another. All backups are encrypted, under the hood we use Restic. Each service’s data is backed up individually. Backups can also be done automatically at user-defined intervals.
User Management
Partial automation
Each service has its own administrator interface that allows you to manage users. However, we are working to integrate this functionality into the application and automatically create users from a common list.
Manual management via SSH (expert)
Manual operations
For security reasons, access to SelfPrivacy server administration via SSH is disabled by default. This reduces the attack surface. Console access is needed in exceptional cases:
- Upgrade error, or fixing unexpected situations;
- Server tuning, if you are an experienced NixOS user and want to tweak SelfPrivacy Server for your own needs;
In normal operation, the user does not need to use SSH administration through the console. We are working to ensure that the general configuration of SelfPrivacy can be extended with your own Nix files, which will not interfere with automatic updates.
The system is very complex, why is it private?
All transactions take place between your application, your server, and your service providers without SelfPrivacy being involved. Your copy of SelfPrivacy App is completely autonomous and independent in managing your infrastructure. No information about your interactions with your infrastructure reaches SelfPrivacy. All backups of your services leave your server in a fully encrypted form.
You can read more about this in our privacy policy.
2.2 - Project architecture
How the project is organized and how it works
Yes, you could use kubernetes. But why when immutability is ensured by NixOS?
User app: Flutter/Dart was chosen because of the speed and smoothness of the UI and cross-platform.
Server side (backend): NixOS + Python. NixOS was chosen because of its reproducibility, python because of its versatility and popularity.
Service providers
We do not get paid by any service providers! We are not affiliated with them in any way. We chose them purely for professional reasons. But we do not exclude partnership in the future.
Hosting
SelfPrivacy supports two hosting providers: Hetzer and DigitalOcean
Both were chosen because of low price and acceptable level of service, quality REST API.
Candidates:
- Own personal iron server. Our main priority right now;
- A service provider that will provide an API to deploy an iron server. Outside FVEY;
- OVH
- Scaleway
There’s also free Oracle Cloud, but where you don’t pay, you’re usually a commodity.
DNS
There’s a choice between Cloudflare, deSEC, or DigitalOcean DNS.
deSEC is a more private option and is recommended by default.
Cloudflare likely collects data in proxy traffic mode, otherwise it’s hard to explain why they would offer such services for free. In our case, we don’t proxy anything and use it only as a DNS server.
Backup repository
We use Backblaze.
The first 20GB are free and significantly cheaper than AWS. Backblaze publishes its hardware developments in open source. They also shares very useful statistics on disk failures, based on which one can choose the most reliable and tested option.
In the future, we might replace them with a self-hosted solution or a peer-to-peer one. Currently, this is not a top priority since the data is encrypted, and the service provider only sees the IP address of your server, not the device with the application.
2.3 - SelfPrivacy modules
The building blocks of SelfPrivacy
Overview
SelfPrivacy modules are the building blocks of SelfPrivacy. Every service you see in the “Services” tab of your app is a SelfPrivacy module. Usually a single SelfPrivacy module contains a single service, so these might be used interchangeably in this context. Sometimes we refer to these modules as “SP Modules”.
SelfPrivacy modules contain the following:
- Nix expressions that tell NixOS how to build and install a service;
- Metadata used by SelfPrivacy API to manipulate a service;
- Metadata used by SelfPrivacy app to render user interface about a service.
SelfPrivacy module is a folder that contains a Nix Flake. This flake must have three outputs:
- The NixOS module that is used to install the service;
- List of data the module needs to know to install the service correctly;
- Metadata object.
SelfPrivacy modules can do anything on your server
While custom SelfPrivacy modules give you great flexibility, using third-party modules comes with a huge risk! SelfPrivacy modules contain NixOS expressions that can do anything to your system, and installing a backdoor this way is trivial.
We recommend that you only use modules you have written yourself or forked and analyzed carefully.
Learning resources
This manual focuses on topics specific to SelfPrivacy modules and implies that you are already familiar with Nix, NixOS and Nix flakes. If you are new to Nix, here are some good starting points to learn about it:
Directory structure
Here is the minimal SelfPrivacy module structure.
.
├── config-paths-needed.json
├── flake.nix
├── icon.svg
└── module.nix
flake.nix
This is the entry point of a SelfPrivacy module. It is a Nix flake that has three outputs:
nixosModules.default— The NixOS module that installs and configures a service.configPathsNeeded— A JSON file with a list of config paths a module requires.meta— Meta information about this module that SelfPrivacy API uses for different tasks.
An example of a flake.nix file that shows all metadata fields:
{
  description = "Flake description";

  outputs = { self }: {
    nixosModules.default = import ./module.nix;
    configPathsNeeded =
      builtins.fromJSON (builtins.readFile ./config-paths-needed.json);
    meta = {lib, ...}: {
      spModuleSchemaVersion = 1;
      id = "jitsi-meet";
      name = "JitsiMeet";
      description = "Jitsi Meet is a free and open-source video conferencing solution.";
      svgIcon = builtins.readFile ./icon.svg;
      showUrl = true;
      primarySubdomain = "subdomain";
      isMovable = false;
      isRequired = false;
      canBeBackedUp = true;
      backupDescription = "Secrets that are used to encrypt the communication.";
      systemdServices = [
        "prosody.service"
        "jitsi-videobridge2.service"
        "jicofo.service"
      ];
      user = "jitsi-meet";
      group = "jitsi-meet";
      folders = [
        "/var/lib/jitsi-meet"
      ];
      ownedFolders = [
        {
          path = "/var/lib/prometheus";
          owner = "prometheus";
          group = "prometheus";
        }
      ];
      postgreDatabases = [];
      license = [
        lib.licenses.asl20
      ];
      homepage = "https://jitsi.org/meet";
      sourcePage = "https://github.com/jitsi/jitsi-meet";
      supportLevel = "normal";
    };
  };
}
In practice, you don’t need to define all metadata fields. Please refer to Flake metadata section to learn more about them.
config-paths-needed.json
It is a JSON file that contains a list of Nix config paths. Only paths defined here will be available to your Nix flake.
[
  ["selfprivacy", "domain"],
  ["selfprivacy", "modules", "roundcube"],
  ["mailserver", "fqdn"]
]
Commonly used paths include:
[ "selfprivacy", "modules", "YOUR_MODULE_ID" ]— Your flake needs access to its config. ReplaceYOUR_MODULE_IDwith your module’s ID.[ "selfprivacy", "domain" ]— Server’s domain. Usually needed by web services.[ "selfprivacy", "useBinds" ]— Add this if your service stores data on the disk. Refer to Mounting user data section.[ "security", "acme", "certs" ]— Only use this if you need direct access to TLS certificates.
icon.svg
This is an icon of the service that shall be displayed in user interface. It has the following requirements:
- Icon must only use the black color. It will be recolored by an app depending on the user’s theme and service’s state.
- Icon must be a square and have a square view box.
- Try to flatten the icon and minimize its size.
module.nix
This file contains the actual contents of your module! They vary heavily depending on your goals, but you can do anything that NixOS allows. Here is a generalized example of how the module might look like:
{ config, lib, pkgs, ... }:
let
  # Just for convinience, this module's config values
  sp = config.selfprivacy;
  cfg = sp.modules.service_id;
in
{
  # Here go the options you expose to the user.
  options.selfprivacy.modules.service_id = {
    # This is required and must always be named "enable"
    enable = (lib.mkOption {
      default = false;
      type = lib.types.bool;
      description = "Enable the service";
    }) // {
      meta = {
        type = "enable";
      };
    };
    # This is required if your service stores data on disk
    location = (lib.mkOption {
      type = lib.types.str;
      description = "Service location";
    }) // {
      meta = {
        type = "location";
      };
    };
    # This is required if your service needs a subdomain
    subdomain = (lib.mkOption {
      default = "password";
      type = lib.types.strMatching "[A-Za-z0-9][A-Za-z0-9\-]{0,61}[A-Za-z0-9]";
      description = "Subdomain";
    }) // {
      meta = {
        widget = "subdomain";
        type = "string";
        regex = "[A-Za-z0-9][A-Za-z0-9\-]{0,61}[A-Za-z0-9]";
        weight = 0;
      };
    };
    # Other options, that user sees directly.
    # Refer to Module options reference to learn more.
    signupsAllowed = (lib.mkOption {
      default = true;
      type = lib.types.bool;
      description = "Allow new user signups";
    }) // {
      meta = {
        type = "bool";
        weight = 1;
      };
    };
    appName = (lib.mkOption {
      default = "SelfPrivacy Service";
      type = lib.types.str;
      description = "The name displayed in the web interface";
    }) // {
      meta = {
        type = "string";
        weight = 2;
      };
    };
    defaultTheme = (lib.mkOption {
      default = "auto";
      type = lib.types.enum [
          "auto"
          "light"
          "dark"
      ];
      description = "Default theme";
    }) // {
      meta = {
        type = "enum";
        options = [
          "auto"
          "light"
          "dark"
        ];
        weight = 3;
      };
    };
  };

  # All your changes to the system must go to this config attrset.
  # It MUST use lib.mkIf with an enable option.
  # This makes sure your module only makes changes to the system
  # if the module is enabled.
  config = lib.mkIf cfg.enable {
    # If your service stores data on disk, you have to mount a folder
    # for this. useBinds is always true on modern SelfPrivacy installations
    # but we keep this mkIf to keep migration flow possible.
    fileSystems = lib.mkIf sp.useBinds {
      "/var/lib/service_id" = {
        device = "/volumes/${cfg.location}/service_id";
        # Make sure that your service does not start before folder mounts
        options = [
          "bind"
          "x-systemd.required-by=service-id.service"
          "x-systemd.before=service-id.service"
        ];
      };
    };
    # Your service configuration, varies heavily.
    # Refer to NixOS Options search.
    # You can use defined options here.
    services.service = {
      enable = true;
      domain = "${cfg.subdomain}.${sp.domain}";
      config = {
        theme = cfg.defaultTheme;
        appName = cfg.appName;
        signupsAllowed = cfg.signupsAllowed
      };
    };
    systemd = {
      services = {
        # Make sure all systemd units your module adds belong to a slice.
        # Slice must be named the same as your module id.
        # If your module id contains `-`, replace them with `_`.
        # For example, "my-awesome-service" becomes "my_awesome_service.slice"
        service-id.serviceConfig.Slice = "service_id.slice";
      };
      # Define the slice itself
      slices.service_id = {
        description = "Service slice";
      };
    };
    # You can define a reverse proxy for your service like this
    services.nginx.virtualHosts."${cfg.subdomain}.${sp.domain}" = {
      useACMEHost = sp.domain;
      forceSSL = true;
      extraConfig = ''
        add_header Strict-Transport-Security $hsts_header;
        add_header 'Referrer-Policy' 'origin-when-cross-origin';
        add_header X-Frame-Options SAMEORIGIN;
        add_header X-Content-Type-Options nosniff;
        add_header X-XSS-Protection "1; mode=block";
        proxy_cookie_path / "/; secure; HttpOnly; SameSite=strict";
      '';
      locations = {
        "/" = {
          proxyPass = "http://127.0.0.1:8222";
        };
      };
    };
  };
}
Module examples
You can find our official SelfPrivacy modules on our Git repostory. Every folder there is a SelfPrivacy module.
Getting started
Let’s walk over the process of developing and deploying the SeflPrivacy module. As a trivial example let’s package Syncplay — a simple service that synchronizes video playback across different players and allows you to watch films together with friends over the internet!
This service is already packaged for NixOS, and there is a module available. You can view available options via NixOS search. All we actually have to do to get started is to set services.syncplay.enable = true. This service doesn’t store any data, and we don’t even need a subdomain for this.
Start by creating a folder with a git repository. There, create 4 required files. Let’s go over them, starting with flake.nix.
{
  description = "An example of packaging to SelfPrivacy!";

  outputs = { self }: {
    nixosModules.default = import ./module.nix;
    configPathsNeeded =
      builtins.fromJSON (builtins.readFile ./config-paths-needed.json);
    meta = { lib, ... }: {
      spModuleSchemaVersion = 1;
      id = "syncplay";
      name = "Syncplay";
      description = "Solution to synchronize video playback across multiple instances of mpv, VLC, MPC-HC, MPC-BE and mplayer2 over the Internet.";
      svgIcon = builtins.readFile ./icon.svg;
      isMovable = false;
      isRequired = false;
      backupDescription = "Nothing to back up.";
      systemdServices = [
        "syncplay.service"
      ];
      license = [
        lib.licenses.asl20
      ];
      homepage = "https://syncplay.pl";
      sourcePage = "https://github.com/Syncplay/syncplay";
      supportLevel = "experimental";
    };
  };
}
- Flake description on the second line can be anything.
- We set
isMovableto false because there is nothing to move. - We set
canBeBackedUpto false because there is nothing to back up - Getting systemd services might be tricky before you check it yourself. API will track the status of systemd units you put here, and report it to the user. When you restart a service from the app, services defined here get rebooted. If you have some setup units, you probably don’t want them here, but you will still need to put them in a systemd slice.
- You can get a license by looking at the Nix derivation.
Next, we need to define config-paths-needed.json:
[
  [ "selfprivacy", "modules", "syncplay" ]
]
We don’t need much here because this service does not use domains and does not store data on the disk.
Next, populate icon.svg with a black icon of the service. Here, I traced it into SVG:
<svg width="340" height="340" viewBox="0 0 340 340" fill="none" xmlns="http://www.w3.org/2000/svg">
<path d="M322.552 0.932212C282.383 3.4625 227.45 16.2471 185.552 32.8938C95.3707 68.5842 34.8509 124.384 11.9731 192.702C6.78573 208.549 4.25854 220.801 1.99736 241.976C0.00220343 260.487 0.667256 269.676 4.65757 281.129C17.9586 318.817 72.7589 339.858 158.285 339.991C188.611 340.124 200.848 338.793 221.598 333.599C267.353 322.013 303.532 293.913 321.355 256.225C328.139 242.242 331.331 227.327 328.804 221.867C326.809 217.339 324.548 217.472 319.759 222.532C305.394 237.847 280.787 252.363 261.767 256.625C251.126 259.022 251.126 259.022 244.342 267.545C224.524 292.448 195.528 306.298 162.94 306.298C144.984 306.298 131.683 303.235 116.386 295.778C95.9027 285.656 80.3405 269.809 69.8327 248.368C62.1181 232.654 59.5909 221.467 59.5909 203.089C59.7239 167.266 77.0152 136.369 107.874 116.793C137.801 97.7491 177.438 96.0179 210.159 112.531C223.194 119.19 234.899 128.512 243.81 139.699C248.865 146.091 252.589 149.687 253.919 149.42C255.116 149.154 260.437 146.624 265.757 143.694C309.517 120.255 334.656 75.376 339.977 10.9202L340.908 0L335.055 0.266346C331.863 0.39952 326.277 0.665866 322.552 0.932212Z" fill="black"/>
<path d="M322.685 122.519C309.251 138.633 279.457 161.539 265.092 166.733C261.501 168.065 260.703 168.864 261.368 171.128C265.491 185.91 266.289 191.903 265.624 207.75C265.225 216.939 264.427 226.128 263.895 228.259L262.964 232.121L268.151 231.189C287.438 227.593 309.118 208.017 321.621 183.113C329.735 166.733 336.519 140.631 336.519 125.982C336.519 120.389 334.257 114.396 331.863 113.597C331.065 113.33 326.942 117.326 322.685 122.519Z" fill="black"/>
<path d="M141.259 123.851C112.396 131.442 89.3852 154.614 81.8036 183.912C78.3453 196.697 79.5424 220.002 84.1978 231.988C91.7794 251.697 105.745 267.545 123.569 276.867C136.604 283.659 147.644 286.322 162.94 286.322C177.704 286.322 188.877 283.792 200.582 277.799C229.312 263.017 245.938 235.983 246.071 204.154C246.071 189.505 244.209 181.249 237.825 167.798C233.435 158.609 230.376 154.481 221.598 145.825C215.08 139.299 207.631 133.44 202.577 130.776C184.754 121.454 160.945 118.657 141.259 123.851ZM174.246 174.057C216.676 199.627 219.203 201.891 215.479 208.682C212.952 213.21 138.333 256.758 132.88 256.891C130.884 257.024 127.958 255.826 126.229 254.494L123.037 251.964L122.638 206.285C122.372 174.99 122.771 159.541 123.702 157.011C125.165 153.549 129.155 150.752 133.013 150.619C134.077 150.486 152.698 161.14 174.246 174.057Z" fill="black"/>
</svg>
Now, the Nix module itself. Add this to module.nix:
{ config, lib, ... }:
let
  # Just a shorthand for the config
  sp = config.selfprivacy;
  cfg = sp.modules.syncplay;
in
{
  options.selfprivacy.modules.syncplay = {
    # We are required to add an enable option.
    enable = (lib.mkOption {
      default = false;
      type = lib.types.bool;
      description = "Enable Syncplay";
    }) // {
      meta = {
        type = "enable";
      };
    };

    # We don't need a "location" or a "subdomain" option, because
    # Syncplay doesn't use a web interface, and doesn't store any data.

    # Let's add some options to make it more interesting!

    enableChat = (lib.mkOption {
      default = true;
      type = lib.types.bool;
      description = "Enable chat feature";
    }) // {
      meta = {
        type = "bool";
        weight = 1;
      };
    };
    # Message of the day.
    motd = (lib.mkOption {
      default = "Welcome to Syncplay!";
      type = lib.types.str;
      description = "Text to display when users join.";
    }) // {
      meta = {
        type = "string";
        weight = 2;
      };
    };
  };

  # The config itself, applied only if we enable the module.
  config = lib.mkIf cfg.enable {
    services.syncplay = {
      # We enable syncplay...
      enable = true;
      # ...and set some extra arguments.
      # MOTD text has to be converted to a text file
      extraArgs = [ "--motd-file" (builtins.toFile "motd" cfg.motd) ]
        # We only need to add this option if we've disable the chat.
        ++ lib.optional (!cfg.enableChat) [ "--disable-chat" ];
    };

    # We need to open a port for Syncplay to work.
    networking.firewall.allowedTCPPorts = [ 8999 ];

    # Now we need to define a systemd slice and put syncplay service there.
    # It is required to track module's resource consumption.
    systemd = {
      services.syncplay = {
        serviceConfig = {
          Slice = "syncplay.slice";
        };
      };
      slices.syncplay = {
        description = "Syncplay service slice";
      };
    };
  };
}
Comments in the code should explain the idea.
Now, commit and push it somewhere! This can be your own Forgejo on your SelfPrivacy server, GitHub, or any other git forge. Grab a HTTPS link to your repository. In my case it is https://git.selfprivacy.org/SelfPrivacy/syncplay-module.git.
SSH into your server, go into /etc/nixos and edit the /etc/nixos/sp-modules/flake.nix file.
cd /etc/nixos
nano sp-modules/flake.nix
You will need to add your SelfPrivacy module as an input in the following format, prepending git+ in the front of your URL:
inputs.syncplay.url = git+https://git.selfprivacy.org/SelfPrivacy/syncplay-module.git;
The file should look something like this in the end:
{
  description = "SelfPrivacy NixOS PoC modules/extensions/bundles/packages/etc";

  # Here go the modules you already have preinstalled
  inputs.bitwarden.url = git+https://git.selfprivacy.org/SelfPrivacy/selfprivacy-nixos-config.git?ref=flakes&dir=sp-modules/bitwarden;
  inputs.gitea.url = git+https://git.selfprivacy.org/SelfPrivacy/selfprivacy-nixos-config.git?ref=flakes&dir=sp-modules/gitea;
  inputs.jitsi-meet.url = git+https://git.selfprivacy.org/SelfPrivacy/selfprivacy-nixos-config.git?ref=flakes&dir=sp-modules/jitsi-meet;
  inputs.nextcloud.url = git+https://git.selfprivacy.org/SelfPrivacy/selfprivacy-nixos-config.git?ref=flakes&dir=sp-modules/nextcloud;
  inputs.ocserv.url = git+https://git.selfprivacy.org/SelfPrivacy/selfprivacy-nixos-config.git?ref=flakes&dir=sp-modules/ocserv;
  inputs.pleroma.url = git+https://git.selfprivacy.org/SelfPrivacy/selfprivacy-nixos-config.git?ref=flakes&dir=sp-modules/pleroma;
  inputs.simple-nixos-mailserver.url = git+https://git.selfprivacy.org/SelfPrivacy/selfprivacy-nixos-config.git?ref=flakes&dir=sp-modules/simple-nixos-mailserver;
  inputs.monitoring.url = git+https://git.selfprivacy.org/SelfPrivacy/selfprivacy-nixos-config.git?ref=flakes&dir=sp-modules/monitoring;
  inputs.roundcube.url = git+https://git.selfprivacy.org/SelfPrivacy/selfprivacy-nixos-config.git?ref=flakes&dir=sp-modules/roundcube;
  inputs.mumble.url = git+https://git.selfprivacy.org/SelfPrivacy/selfprivacy-nixos-config.git?ref=flakes&dir=sp-modules/mumble;

  # Your own module!
  inputs.syncplay.url = git+https://git.selfprivacy.org/SelfPrivacy/syncplay-module.git;

  outputs = _: { };
}
Now, make sure your working directory is /etc/nixos. Update flake inputs first with this command:
nix flake update --override-input selfprivacy-nixos-config git+https://git.selfprivacy.org/SelfPrivacy/selfprivacy-nixos-config.git?ref=flakes
(Do not change the link in the command above, it makes sure that official SelfPrivacy modules are up to date.)
If all went well, you will see that your flake got added as an input:
warning: updating lock file '/etc/nixos/flake.lock':
• Updated input 'sp-modules':
    'path:./sp-modules?lastModified=1&narHash=sha256-HFXUKSRXMVIMQtC/C3G2xHuTP1l5XmA5PJYKphyZQ5Q%3D' (1970-01-01)
  → 'path:./sp-modules?lastModified=1&narHash=sha256-oNTIichm/6AnXjV1ytNZdTdMDQasPoUYFITuulmB83Y%3D' (1970-01-01)
• Added input 'sp-modules/syncplay':
    'git+https://git.selfprivacy.org/SelfPrivacy/syncplay-module.git?ref=refs/heads/master&rev=7e04cef393909231cdf1d162acd357fd5d36136d' (2024-12-29)
Now, we can rebuild the system with this command:
nixos-rebuild switch --flake .#default
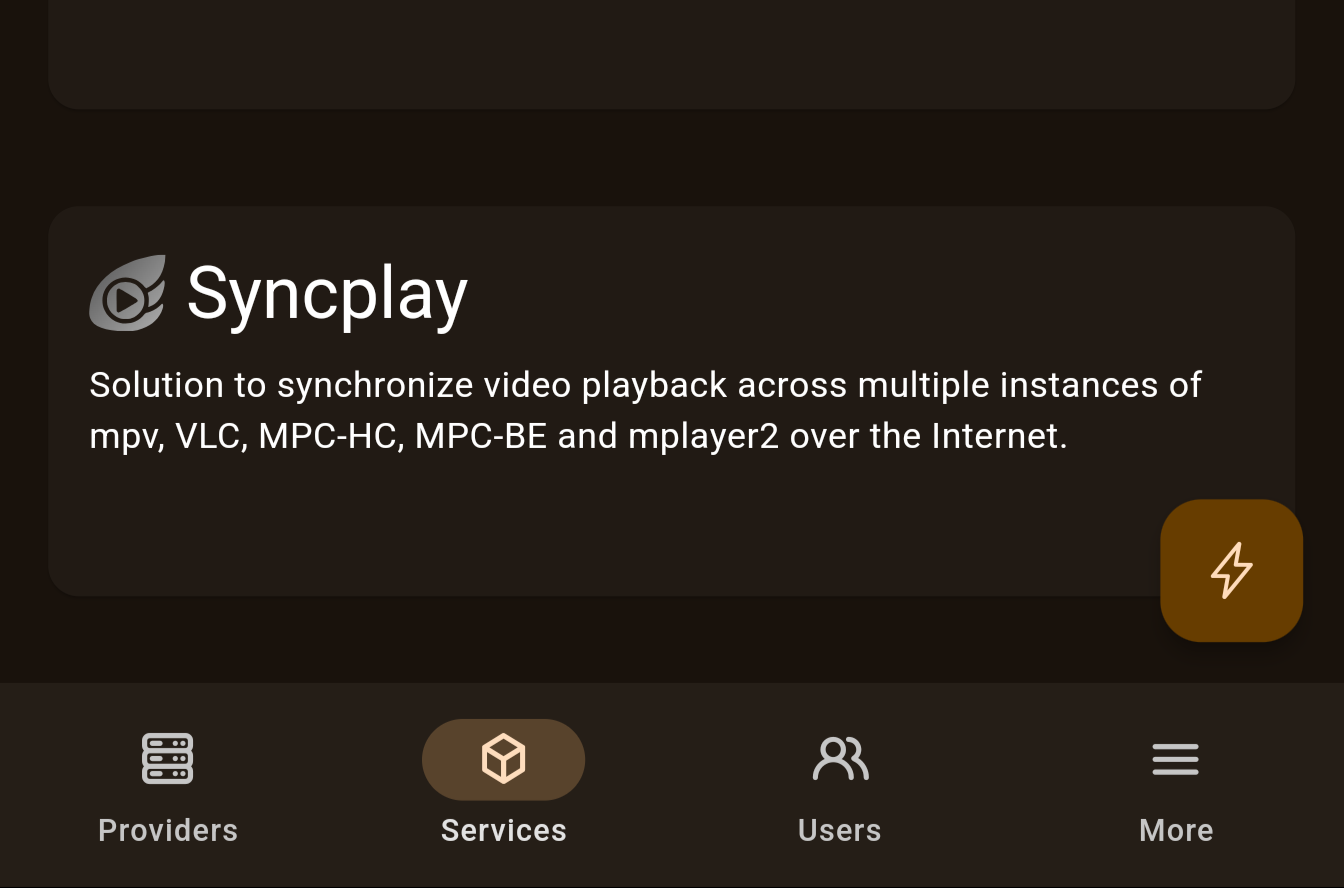
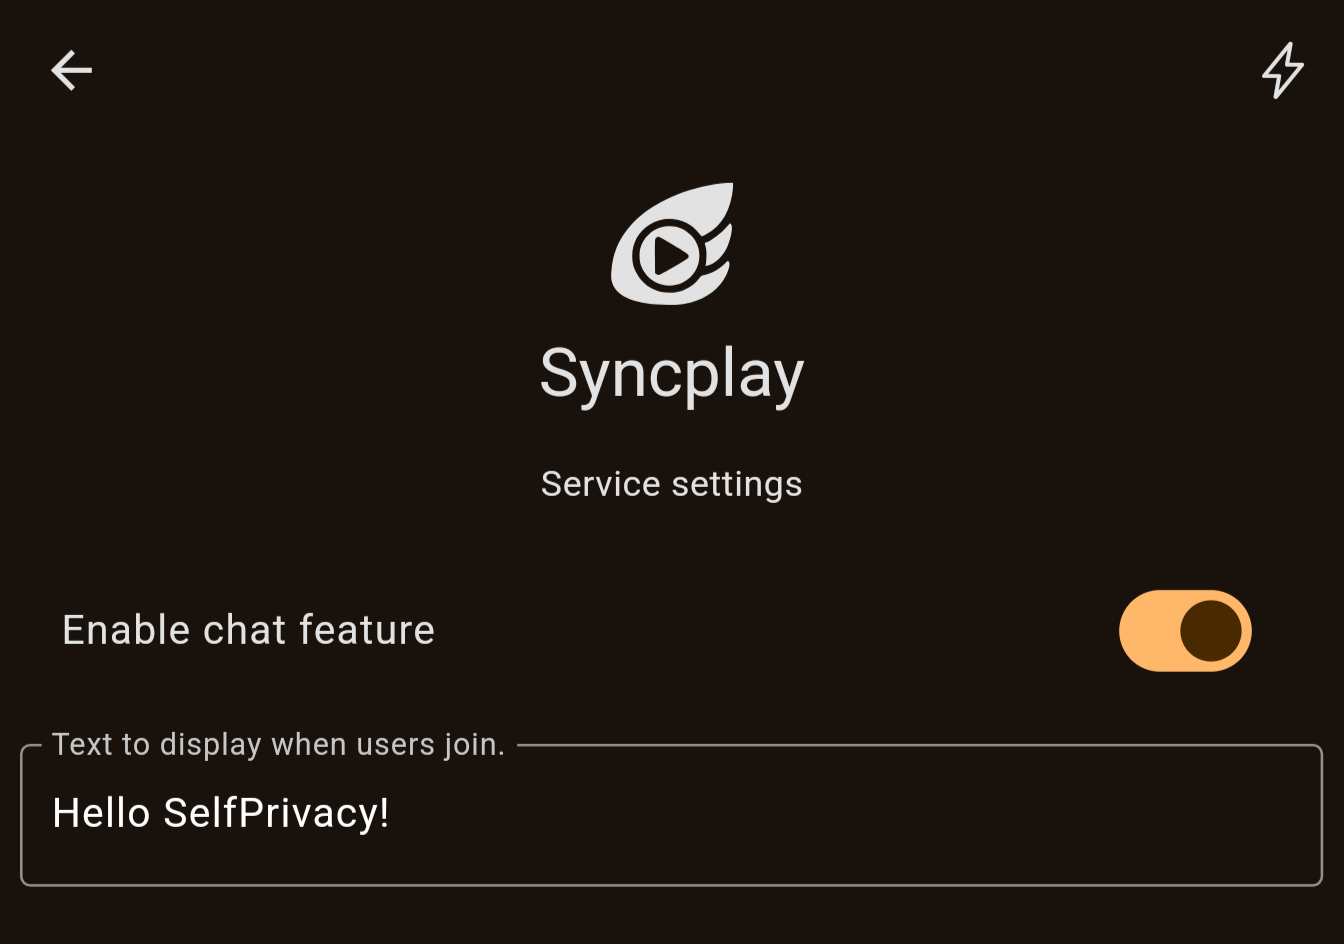
After system rebuild, open your SelfPrivacy app. You will see a Syncplay service appear in your Services list. It is disabled right now, so go ahead and enable it. You can also change the MOTD or disable chat function from the app now.
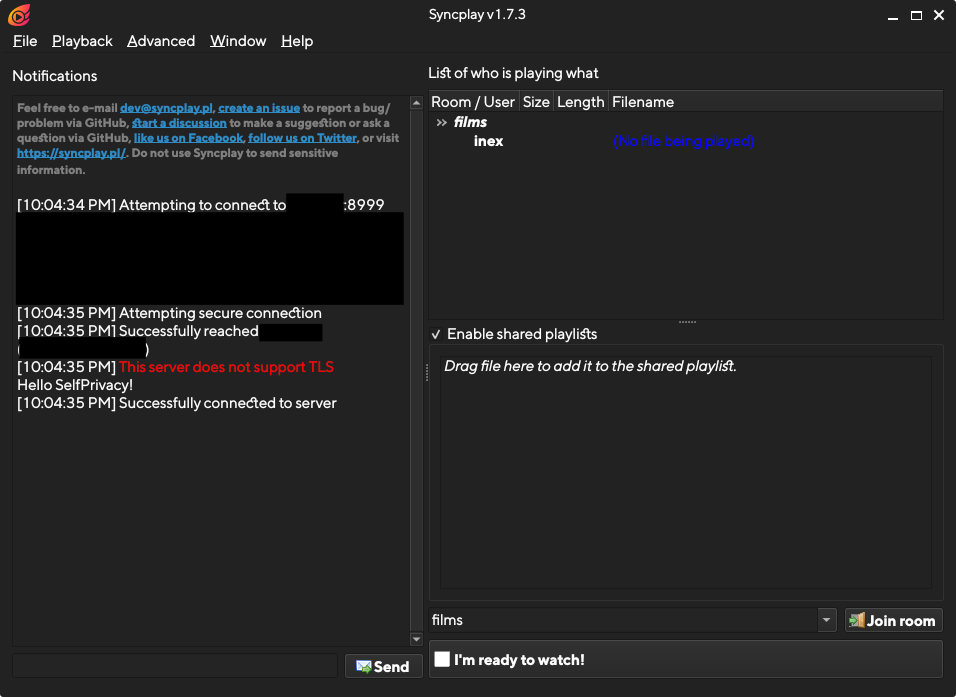
You can now try it out by connecting a Syncplay client to your server, using your.domain:8999
That’s it! Now, you can read the reference below for more advanced topics.
If you do any changes to your SelfPrivacy module and push it to your git repository, these changes will be applied with the next server upgrade.
Reference
Flake metadata
Here is a general overview of all metadata options in the flake.nix file.
{
  description = "Flake description";

  outputs = { self }: {
    nixosModules.default = import ./module.nix;
    configPathsNeeded =
      builtins.fromJSON (builtins.readFile ./config-paths-needed.json);
    meta = {lib, ...}: {
      # Schema version
      spModuleSchemaVersion = 1;
      # Must be the same name as flake and Systemd slice
      id = "jitsi-meet";
      # Service name displayed to a user
      name = "JitsiMeet";
      # Description displayed to a user
      description = "Jitsi Meet is a free and open-source video conferencing solution.";
      # Icon of the service
      svgIcon = builtins.readFile ./icon.svg;
      # Do we need to show URL in the UI? True by default
      showUrl = true;
      # If there are several subdomain options, which one to use to generate the URL?
      primarySubdomain = "subdomain";
      # Can be moved to another volume?
      isMovable = false;
      # Is required for SelfPrivacy operation?
      isRequired = false;
      # Can be backed up by API?
      # Implied to be TRUE by default
      canBeBackedUp = true;
      # Description of the backup
      backupDescription = "Secrets that are used to encrypt the communication.";
      # Systemd services that API checks and manipulates
      systemdServices = [
        "prosody.service"
        "jitsi-videobridge2.service"
        "jicofo.service"
      ];
      # A unix user used by this service
      # By default implied to be the same as the service ID
      user = "jitsi-meet";
      # A unix group used by this group
      # By default implied to be the same as the user
      group = "jitsi-meet";
      # Folders that have to be moved or backed up
      # Ownership is implied by the user/group defined above
      folders = [
        "/var/lib/jitsi-meet"
      ];
      # Same as above, but if you need to overwrite ownership
      ownedFolders = [
        {
          path = "/var/lib/prometheus";
          owner = "prometheus";
          group = "prometheus";
        }
      ];
      # PostgreSQL databases to back up
      postgreDatabases = [];
      # Licenses of this service
      license = [
        lib.licenses.asl20
      ];
      # Homepage for this service
      homepage = "https://jitsi.org/meet";
      # Git repository with the sources of this service
      sourcePage = "https://github.com/jitsi/jitsi-meet";
      # What is our support level for this service?
      # Supported values:
      # - normal
      # - deprecated
      # - experimental
      # - community
      supportLevel = "normal";
    };
  };
}
spModuleSchemaVersion
Integer, required. Set it to 1. We will increment it in case we make backwards incompatible changes to our module schema.
id
String, required
An ID of your module. Generally, it is the same as the name of the service your module provides.
Alphanumeric (A-Za-z0-9) symbols and hyphens (-) are allowed. Your systemd slice must have the same name, but with hyphens (-) replaced by underscores (_). It is implied by default that the unix user and group names are the same as the ID. If they are not, you will have to define them separately.
name
String, required
A display name of your module. Generally, it is a display name of the service your module provides.
It will be shown to the user in the app.
description
String, required
A description of your module. Generally, it is a description of the service your module provides.
It will be shown to the user in the app.
svgIcon
String, required
An icon of your module. Generally, it is an icon of the service your module provides.
Usually defined like this: svgIcon = builtins.readFile ./icon.svg;
Place an icon into the icon.svg file. It has the following requirements:
- Icon must only use the black color. It will be recolored by an app depending on the user’s theme and service’s state.
- Icon must be a square and have a square view box.
- Try to flatten the icon and minimize its size.
showUrl
Bool, optional. Implied to be true by default
If true, the app will show an “open in browser” button in the interface.
Usually turned off for the services that don’t provide a web interface.
primarySubdomain
String, optional
By default, API looks at the subdomain option to determine service’s URL. If your service has multiple subdomain, you can set which subdomain option should be used during URL generation.
The option you provide here MUST have a type of string and a widget set to subdomain in its metadata.
isMovable
Bool, optional. Implied to be false by default
If true, API will allow the user to move the module’s floders between disk volumes. In this case, your module MUST have folders or ownedFolders defined, and a location option in your module options is also required. Refer to Mounting user data section.
If false, API won’t allow the user to move the data between disk volumes.
isRequired
Bool, optional. Implied to be false by default
If true, the option to disable or enable the module will be unavailable.
Custom modules MUST set this to false.
canBeBackedUp
Bool, optional. Implied to be true by default
If true, API will allow the user to make backups of this module. It will back up defined folders, ownedFolders and postgreDatabases.
If false, backups feature will be disabled for this module.
backupDescription
String, optional. Implied to be “No backup description found!” by default
If you set canBeBackedUp to true, you must define a brief description of what will be backed up. Here are some examples:
- Password database, encryption certificate and attachments.
- Git repositories, database and user data.
- All the files and other data stored in Nextcloud.
Keep it short, in a single sentence.
systemdServices
A list of strings, required
Here you must define all sytsemd units that API must manage. Use full forms, such as forgejo.service, instead of forgejo.
API will:
- Track their status
- Allow the user to restart them
- Stop these services during backup restoration or when moving between volumes
Generally, all service daemons go here. Utility one-shot units can be omitted here.
Examples:
# Fogejo is a single service.
systemdServices = [
  "forgejo.service"
];
# PHP software on NixOS has units like these
systemdServices = [
  "phpfpm-roundcube.service"
];
# Here, we do not include services such as
# nextcloud-setup, nextcloud-cron or nextcloud-update-db
# because they do not represent the current state of the service.
systemdServices = [
  "phpfpm-nextcloud.service"
];
# Jitsi has several services
systemdServices = [
  "prosody.service"
  "jitsi-videobridge2.service"
  "jicofo.service"
];
user
String, optional. Implied to be the same value as id by default
The unix user of the service provided by this module. Used to ensure ownership of data folders.
group
String, optional. Implied to be the same value as user by default
The unix group of the service provided by this module. Used to ensure ownership of data folders.
folders
List of strings, optional
A list of folders that have to be backed up and moved between volumes. Generally, you should gut here folders that you bind mount somewhere in /var/lib. It is implied that these folders are owned by user and group described above. If you need the folder to be owned by someone else, use ownedFolders.
All folders here must be bind mounted! Refer to Mounting user data section for more info.
Examples:
folders = [
  "/var/lib/gitea"
];
folders = [
  "/var/lib/nextcloud"
];
# Due to historical reasons, our Vaultwarden module
# has two folders.
folders = [
  "/var/lib/bitwarden"
  "/var/lib/bitwarden_rs"
];
ownedFolders
List of attrsets, optional
A list of folders that have to be backed up and moved between volumes, but require ownership other than defined in user and group.
All folders here must be bind mounted! Refer to Mounting user data section for more info.
Examples:
ownedFolders = [
  {
    path = "/var/lib/prometheus";
    owner = "prometheus";
    group = "prometheus";
  }
];
postgreDatabases
List of strings, optional
A list of database names, that must be backed up. It is your responsibility to ensure that they exist. Refer to PostgreSQL databases section for more info.
license
List of licenses, optional
A list of license objects. Full list of licenses available: https://github.com/NixOS/nixpkgs/blob/master/lib/licenses.nix
Examples:
# GNU Affero General Public License v3.0 only
license = [
    lib.licenses.agpl3Only
];
# GNU General Public License v3.0 or later
license = [
    lib.licenses.gpl3Plus
];
# Apache License 2.0
license = [
    lib.licenses.asl20
];
# BSD 3-clause "New" or "Revised" License
license = [
    lib.licenses.bsd3
];
homepage
String, optional
URL to the homepage of the service.
sourcePage
String, optional
URL to the source code of the service.
supportLevel
Enum, required
The support level of this module. One of the following values:
normal— A general support level for official modules.deprecated— Deprecated modules that we provide as is.experimental— Experimental modules where we can’t guarantee stable operation yet.community— Modules managed by community.
If you make a custom SelfPrivacy module we advise you to set community value.
Module options
All module options are defined in the following structure:
options.selfprivacy.modules.<MODULE ID> = {
  <OPTION NAME> = (lib.mkOption {
    default = <DEFAULT VALUE>;
    type = <NIX TYPE>;
    description = <DESCRIPTION>;
  }) // {
    meta = {
      type = <UI TYPE>;
      weight = <INT>;
      widget = <UI WIDGET NAME>;
      <OTHER META FIELDS DEPENDING ON UI TYPE>
    };
  };
};
Different UI TYPES have different requirements for metadata fields. There are also three special options:
- enable
- location
- subdomain
The weight defines how the options are ordered in UI. By default the weight is 50. There is no need to set it for enable and location options because they are not displayed on the Service Settings screen.
The description is the name of the option to be shown in the UI.
Enable
It is a special option type that is required to be in every SelfPrivacy module. Generally, you can just copy the following and replace the description:
enable = (lib.mkOption {
  default = false;
  type = lib.types.bool;
  description = "Enable <SERVICE>";
}) // {
  meta = {
    type = "enable";
  };
};
You MUST use this value like this:
{ config, lib, ... }:
let
  sp = config.selfprivacy;
  cfg = sp.modules.mumble;
  domain = sp.domain;
in
{
  options.selfprivacy.modules.mumble = {
    enable = (lib.mkOption {
      default = false;
      type = lib.types.bool;
      description = "Enable Mumble";
    }) // {
      meta = {
        type = "enable";
      };
    };
    # ...other options
  };

  # !! Only apply config if enable set to true.
  config = lib.mkIf cfg.enable {
    # ...config definitions
  };
}
It must follow these rules:
- The name is
enable - The nix type is
lib.types.bool - The default value is
false - The UI type is
enable
Location
It is a special option type that is required to be in every SelfPrivacy module that wants to allow the service data to be moved between volumes.
Generally, it is enough to copy the following definition:
location = (lib.mkOption {
  type = lib.types.str;
  description = "Location";
}) // {
  meta = {
    type = "location";
  };
};
Then, you MUST use it to create a bind mount. Refer to Mounting user data section for more info.
Subdomain
It is a special option type that is required to be in every SelfPrivacy module that needs a subdomain. SelfPrivacy app will ensure that the DNS record for this subdomain exists.
Example:
subdomain = (lib.mkOption {
  default = "DEFAULT_SUBDOMAIN";
  type = lib.types.strMatching "[A-Za-z0-9][A-Za-z0-9\-]{0,61}[A-Za-z0-9]";
  description = "Subdomain";
}) // {
  meta = {
    widget = "subdomain";
    type = "string";
    regex = "[A-Za-z0-9][A-Za-z0-9\-]{0,61}[A-Za-z0-9]";
    weight = 0;
  };
};
Generally, you should use this definition, and replace the default value with something sensible. Usually it is a name of the service. You can then use the value in your Nix module to set up a web server, etc.
If you need several subdomains for your module, define several subdomain options with different names, and set the primarySubdomain value in Flake metadata.
String
A generic String value. Will be shown to the user. The Nix type can be lib.types.str or lib.types.strMatching. The meta attrset has the following fields:
type— Set it to"string"widget— Optional. If set, the app will alter the way it renders this option. At the moment, supported values are:"subdomain"
weight— Integer value used to sort option items on the screenregex— If you want the string to be validated with regex, set it here. Also uselib.types.strMatchingas a nix type.allowEmpty— Bool value used to indicated that a string can be empty. False by default.
Some examples of its usage:
# A simple string option
appName = (lib.mkOption {
  default = "SelfPrivacy git Service";
  type = lib.types.str;
  description = "The name displayed in the web interface";
}) // {
  meta = {
    type = "string";
    weight = 1;
  };
};

# Subdomain option uses string type and a subdomain widget
# Here you can see how to use regex validation
subdomain = (lib.mkOption {
  default = "mumble";
  type = lib.types.strMatching "[A-Za-z0-9][A-Za-z0-9\-]{0,61}[A-Za-z0-9]";
  description = "Subdomain";
}) // {
  meta = {
    widget = "subdomain";
    type = "string";
    regex = "[A-Za-z0-9][A-Za-z0-9\-]{0,61}[A-Za-z0-9]";
    weight = 0;
  };
};

# An example of the string that can be empty
# Notice how we still do not allow null values!
motd = (lib.mkOption {
  default = "";
  type = lib.types.str;
  description = "Text to display when users join.";
}) // {
  meta = {
    type = "string";
    allowEmpty = true;
    weight = 2;
  };
};
Bool
A generic bool value. Can be true or false. Renders in the app as a switch.
Some examples of its usage:
# An option that is true by default
enableLfs = (lib.mkOption {
  default = true;
  type = lib.types.bool;
  description = "Enable Git LFS";
}) // {
  meta = {
    type = "bool";
    weight = 2;
  };
};

# An option that is false by default
requireSigninView = (lib.mkOption {
  default = false;
  type = lib.types.bool;
  description = "Force users to log in to view any page";
}) // {
  meta = {
    type = "bool";
    weight = 5;
  };
};
Enum
A generic enum value. Renders in the app as a dropdown list.
Example of usage:
let
  # Here we define possible values so we do not repeat
  # ourselves in two places.
  themes = [
    "forgejo-auto"
    "forgejo-light"
    "forgejo-dark"
    "gitea-auto"
    "gitea-light"
    "gitea-dark"
  ];
in
{
  # ...other options
  options.selfprivacy.modules.gitea = {
    defaultTheme = (lib.mkOption {
      default = "forgejo-auto";
      # Set the possible values here
      type = lib.types.enum themes;
      description = "Default theme";
    }) // {
      meta = {
        type = "enum";
        # And here.
        options = themes;
        weight = 6;
      };
    };
  };
  # ...
};
Integer
A generic integer value. The Nix type can be any from lib.types.ints. The meta attrset has the following fields:
type— Set it to"int"widget— Optional. If set, the app will alter the way it renders this option. At the moment, supported values are:- coming soon…
weight— Integer value used to sort option items on the screenminValue— Minimum value, optional.maxValue— Maximum value, optional.
Developing modules
Mounting user data
If your service needs to store data on the disk, you have to do the following:
- Add
[ "selfprivacy", "useBinds" ]to yourconfig-paths-needed.json - Add a
locationoption to your module - Find all folders that your service creates and stores data in. Write down the ownership of these folders.
- Find all systemd services that use these folders and write them down.
- In your Nix module, make bind mounts of these folders. You have to mount them from a new folder in
/volumes/${cfg.location}/FOLDER_NAMEto a place where services except the folder to be (for example,/var/lib/FOLDER_NAME). - Add
x-systemd.required-byandx-systemd.beforeoptions to your bind mounts for every systemd unit you found. - In the
flake.nixmetadata, definefoldersand/orownedFolders, and also setisMovabletotrue. - Test it. If the service module does not ensure folder ownership, you will have to do it yourself. You might use
systemd.tmpfiles.rulesfor this or write a custom systemd unit.
The mount pattern looks like this:
fileSystems = lib.mkIf sp.useBinds {
      "/var/lib/FOLDER_1" = {
        device = "/volumes/${cfg.location}/FOLDER_1";
        options = [
          "bind"
          "x-systemd.required-by=SERVICE-1.service"
          "x-systemd.required-by=SERVICE-2.service"
          "x-systemd.required-by=SERVICE-3.service"
          "x-systemd.before=SERVICE-1.service"
          "x-systemd.before=SERVICE-2.service"
          "x-systemd.before=SERVICE-3.service"
        ];
      };
      "/var/lib/FOLDER_2" = {
        device = "/volumes/${cfg.location}/FOLDER_2";
        options = [
          "bind"
          "x-systemd.required-by=SERVICE-1.service"
          "x-systemd.required-by=SERVICE-2.service"
          "x-systemd.required-by=SERVICE-3.service"
          "x-systemd.before=SERVICE-1.service"
          "x-systemd.before=SERVICE-2.service"
          "x-systemd.before=SERVICE-3.service"
        ];
      };
    };
With this configuration, in flake.nix:
{
  description = "...";

  outputs = { self }: {
    # ...
    meta = { lib, ... }: {
      # ...
      folders = [
        "/var/lib/FOLDER_1"
        "/var/lib/FOLDER_2"
      ];
      # ...
    };
  };
}
Some modules that you can use as examples:
Systemd slices
Every SelfPrivacy module must have its own systemd slice. Slice must have the same name as the module ID, but with hyphens (-) replaced by underscores (_). For example, my-awesome-service becomes my_awesome_service.slice. The slice is used for resource usage monitoring.
You will have to find all systemd units your module creates. You can use systemctl status for this to look up all units that do not belong to SelfPrivacy slices. Usually they end up in system.slice.
To set a slice for systemd units use the following pattern. In this example, we found three systemd units: jicofo.service, jitsi-videobridge2.service and prosody.service. The module ID is jitsi-meet, so we need to add them all to the jitsi_meet.slice.
systemd = {
  services = {
    jicofo.serviceConfig.Slice = "jitsi_meet.slice";
    jitsi-videobridge2.serviceConfig.Slice = "jitsi_meet.slice";
    prosody.serviceConfig.Slice = "jitsi_meet.slice";
  };
  slices.jitsi_meet = {
    description = "Jitsi Meet service slice";
  };
};
PostgreSQL databases
SelfPrivacy manages a PostgreSQL database for you. If you need a database, do the following:
- Ensure that the Postgre database and user for your service exist using
services.postgresql.ensureDatabasesandservices.postgresql.ensureUsers. User name must be the same as the unix user name of your service. Peer auth is used, no password required. - Tell your service to use a socket connection. The socket directory is at
/run/postgresql. - Add database names to
postgreDatabasesfield of yourflake.nixmetadata.
An example of ensuring the database exists:
services.postgresql = {
  ensureDatabases = [
    "pleroma"
  ];
  ensureUsers = [
    {
      name = "pleroma";
      ensureDBOwnership = true;
    }
  ];
};
And then, for this example, in flake.nix set postgreDatabases = [ "pleroma" ]; in the meta attrset.
Reverse proxy
If your service provides a web service, you might want to use a reverse proxy. Just define a subdomain option for your module and add a nginx virtual host to your module. Here are some examples:
# Just proxy to a localhost port
services.nginx.virtualHosts."${cfg.subdomain}.${sp.domain}" = {
  # This is important: SelfPrivacy uses wildcard TLS certificates.
  useACMEHost = sp.domain;
  forceSSL = true;
  # if needed, you can define custom headers here.
  extraConfig = ''
    add_header Strict-Transport-Security $hsts_header;
    add_header 'Referrer-Policy' 'origin-when-cross-origin';
    add_header X-Frame-Options DENY;
    add_header X-Content-Type-Options nosniff;
    add_header X-XSS-Protection "1; mode=block";
    proxy_cookie_path / "/; secure; HttpOnly; SameSite=strict";
  '';
  locations = {
    "/" = {
      proxyPass = "http://127.0.0.1:3000";
    };
  };
};

# If you use a NixOS module that already sets up nginx, you will have to overwrite certificate like this!
services.nginx.virtualHosts."${cfg.subdomain}.${sp.domain}" = {
  forceSSL = true;
  useACMEHost = domain;
  enableACME = false;
};
3 - Available services
What services are available and how to use them
3.1 - E-mail
E-mail service with roundcube WEB-interface
E-mail is a time-tested protocol that needs no introduction. A personal mail server will provide special privacy for all correspondence and is useful for registering in online services and personal correspondence, especially for Delta.Chat.
Important! Provider may be blocking email sending.
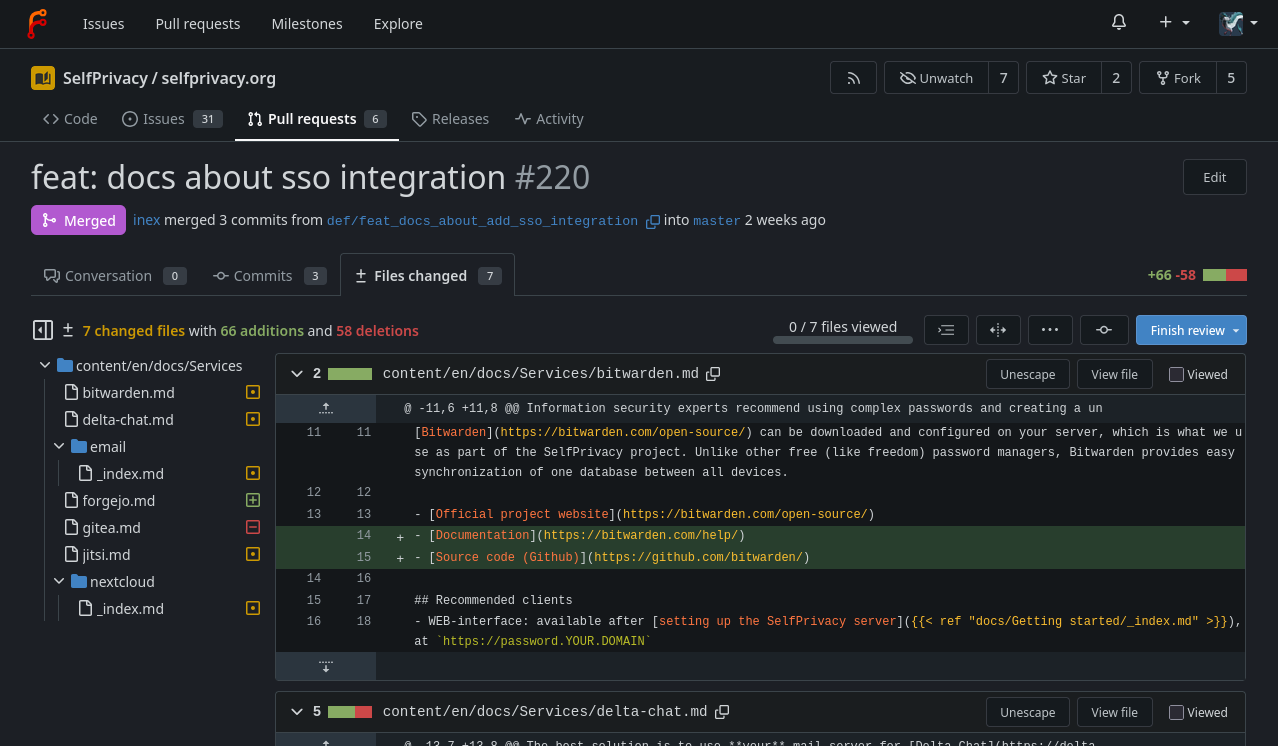
About SSO integration
- E-mail passwords management, with a quick setup button for Delta Chat availeble at
https://api.YOUR.DOMAIN. There will be a self-service portal for your users - To log in, use your full email address (including the domain) as your username
For details, what is SSO and how to use it?
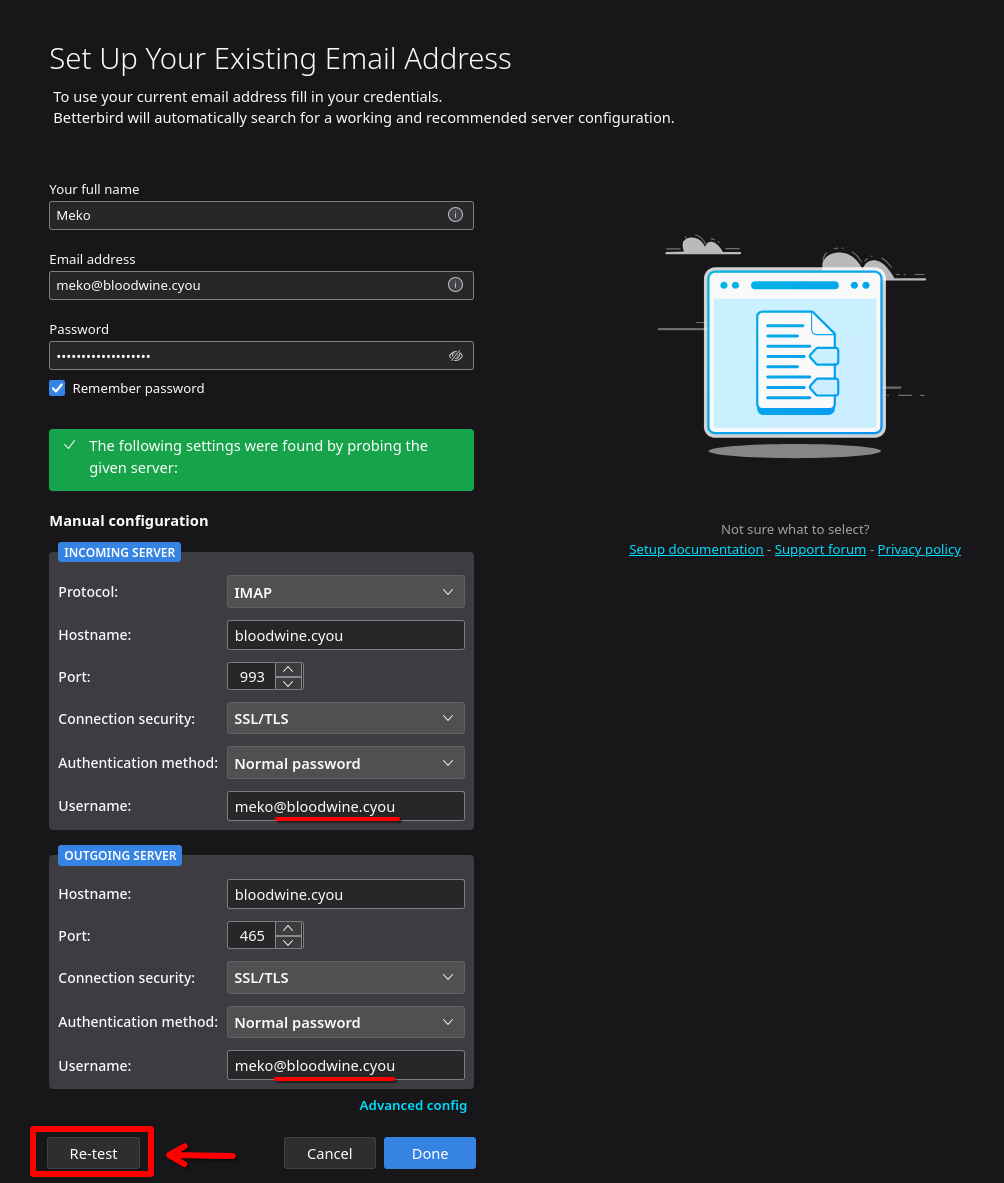
Connection configuration
Login must the username with the domain. For example, user@domain.tld.
The email account password must be set separately on the following page: https://api.YOUR.DOMAIN.
Incoming server: IMAP
Protocol: IMAP
Hostname / IMAP Server: your.domain
Port / IMAP Port: 993
Connection security: SSL/TLS
Authentication method: Normal password
Username: your_username@your.domain (your full email address)
Outgoing server: SMTP
Hostname / SMTP Server: your.domain
Port / SMTP Port: 465
Connection security: SSL/TLS
Authentication method: Normal password
Username: your_username@your.domain (your full email address)
Recommended E-mail Clients
- WEB-interface “Roundcube”: can be enabled after setting up the SelfPrivacy server. It will be accessible at
https://roundcube.YOUR.DOMAIN(Use full email address as login:your_username@your.domain) - FairEmail (Android)
- Mozilla Thunderbird (GNU/Linux, Windows, MacOS)
Configuration example for Mozilla Thunderbird. Don’t forget to click the “re-test” button after you have entered the correct configuration.
What do we use as our email server?
On the deployed server, the following components are responsible for sending, receiving, filtering emails:
- Postfix — SMTP server;
- Dovecot 2 — IMAP server;
- Rspamd — SPAM filter;
Tips
Alias for addresses
Use aliases for questionable services or one-time needs.
Messages for user+alias@domain.com will go to user@domain.com. It can be useful for spam origin analysis if a unique alias is used for each online service when registering.
For example, bank+user@domain.com, cryptoexchenge+user@domain.com, and so on.
Directory Filter
Create directories of filters for different purposes. This will help protect against phishing and clogging your inbox.
The message for user-dir@domain.com will create a dir directory in the user@domain.com mailbox and all mail will arrive in the dir directory.
Examples:
user-w@domain.com- for registering with web servicesuser-shops- for web-storesuser-pay- payment systemsuser-forum- forum notifications
Sending email does not work
Sending email may be blocked by your provider.
Hetzner responds that they do indeed block the email for new accounts. After one month of server operation and the first successful payment, Hetzner asks to contact support to clarify the reasons for using email. You may mention that you plan to use email to communicate with users of your services.
With DigitalOcean, you can’t send emails at all. They would tell you to use a third-party service like SendGrid as a relay. You can track the status of relay support in SelfPrivacy in the issue.
3.2 - Nextcloud
Cloud file storage, swiss knife in the business of working together
Nextcloud is a file storage, calendar, task manager, contacts, notes, music, gallery, and a whole bunch of other features, all with collaborative work functionality.
For servers created before 25.04.2025
When creating a server, `admin` Nextcloud user is created with the password you've used for your primary user.About SSO integration
- If the SSO account has the same username as an account previously created on Nextcloud, they will be merged. You will be able to log in using both SSO and old username/password. In other words, SSO becomes a secondary login method for these accounts.
- If you grant SSO account admin rights, it will have admin rights in Nextcloud
- SSO users with usernames that didn’t exist in Nextcloud before, won’t have an option to set a password in Nextcloud. In other words, SSO will be the only possible login method for these accounts
For details, what is SSO and how to use it?
Recommended clients
- WEB-interface: available after setting up the SelfPrivacy server, at
https://cloud.YOUR.DOMAIN - Official application (GNU/Linux, Windows, macOS, Android, iOS)
FAQ
Nextcloud Updater does not work
It’s fine, it should be. Nextcloud is updated via NixOS, and depends on our NixOS repository. Everything happens without your intervention.
Why can’t I use my Nextcloud in third-party services?
This can happen if the third-party service has a restriction to only connect to a specific Nextcloud instance.
Should I use an extension to encrypt my Nextcloud?
We do not recommend it. The encryption keys are stored on the server, which makes such encryption practically useless.
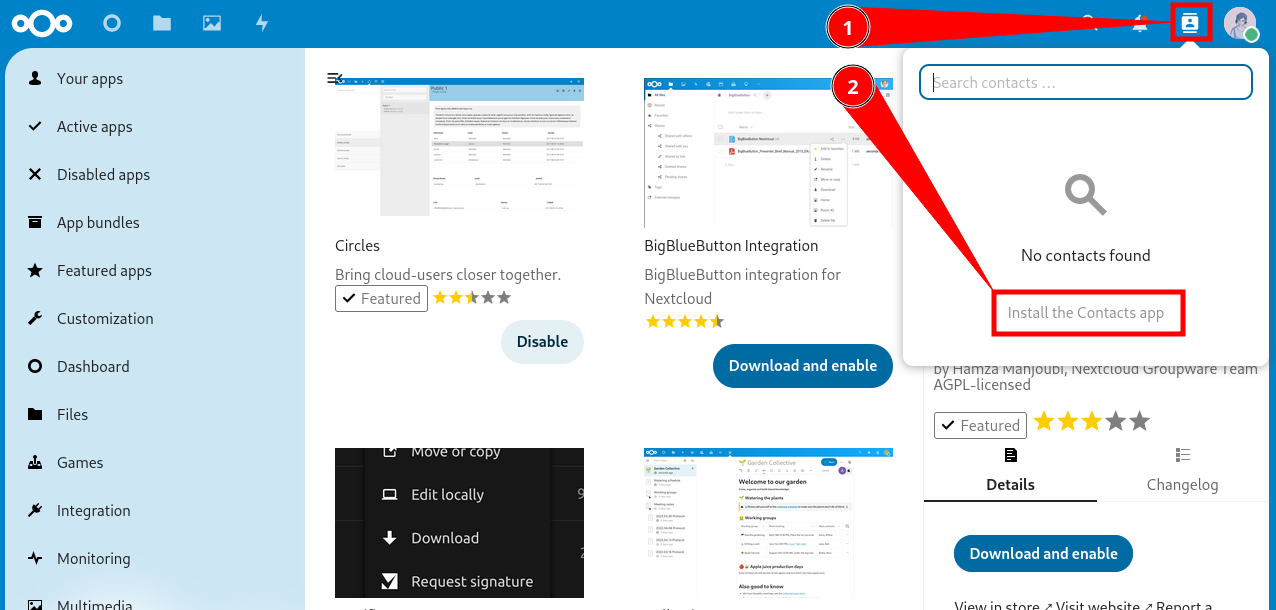
Adding Contacts
- Open your Nextcloud, click on the contacts icon in the top right corner. Then click on “Install the Contacts app”.
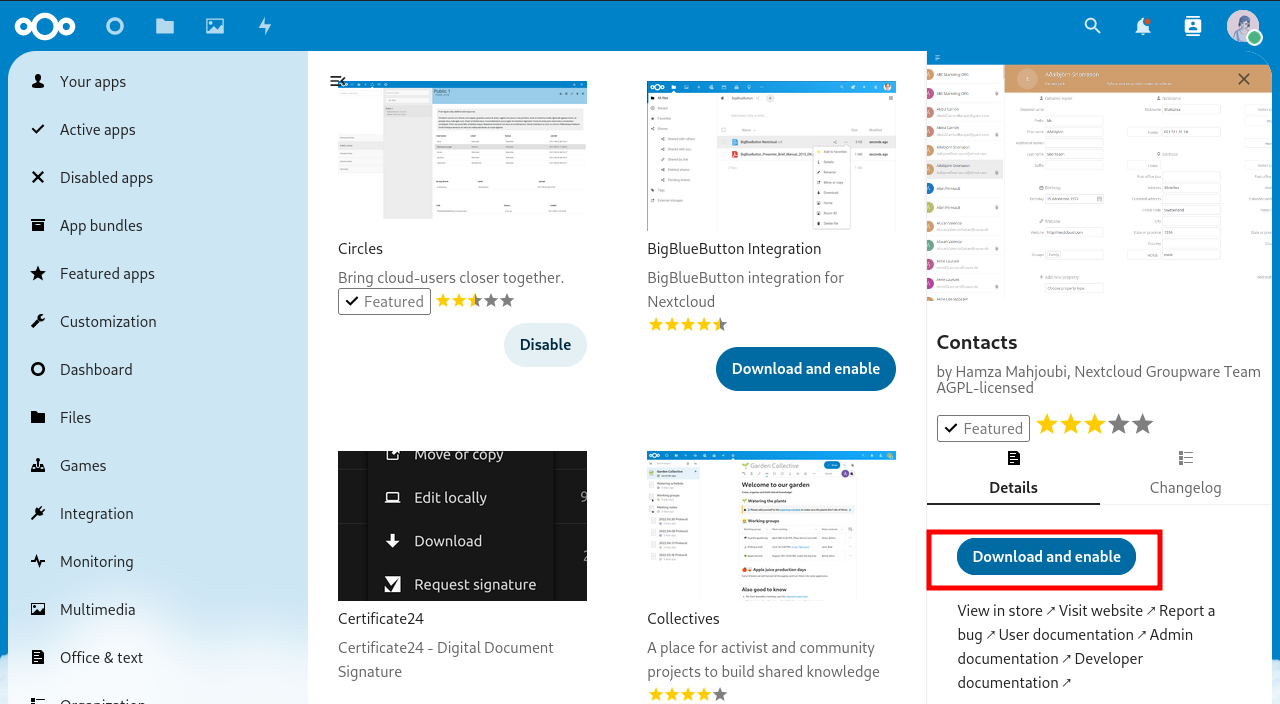
- Click “Download and enable”.
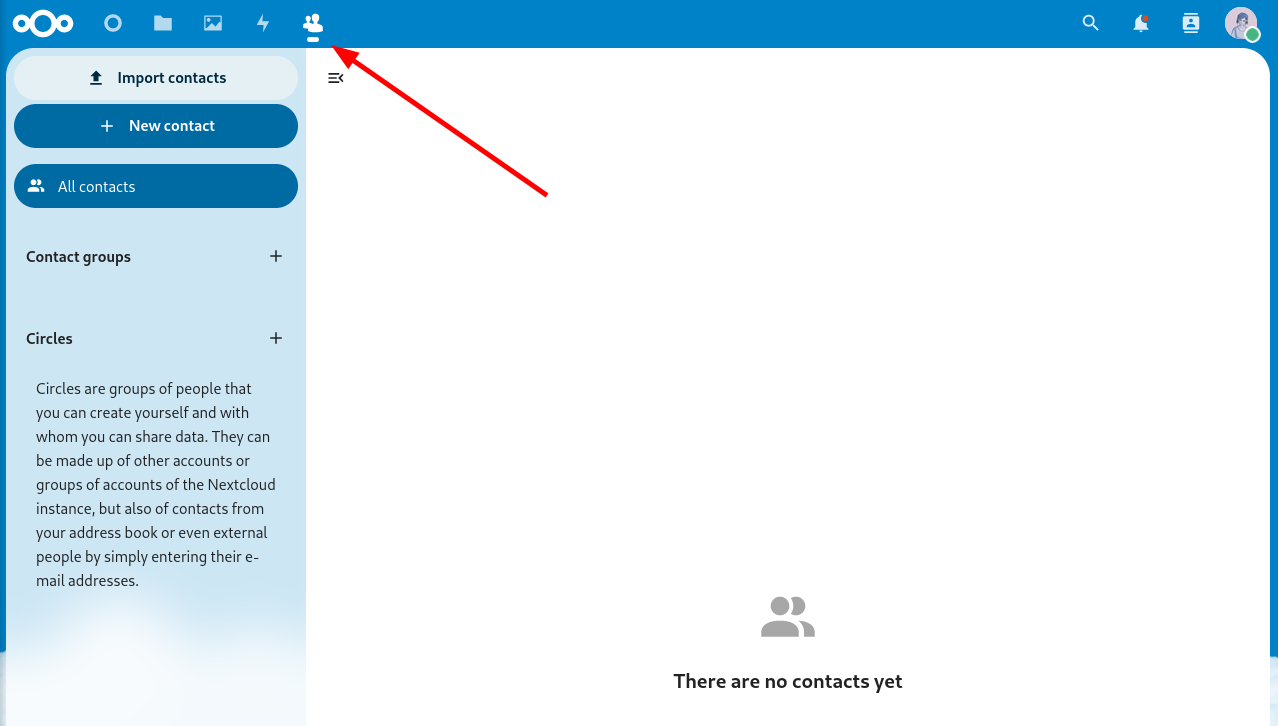
- Now you have a new item in the menu.
Adding Calendar
-
Click on your profile avatar in the top right corner.
-
In the dropdown menu, click “Apps”.
-
You will be taken to the app store, go to the “Organization” category and find the “Calendar” app.
-
Click “Download and enable”.
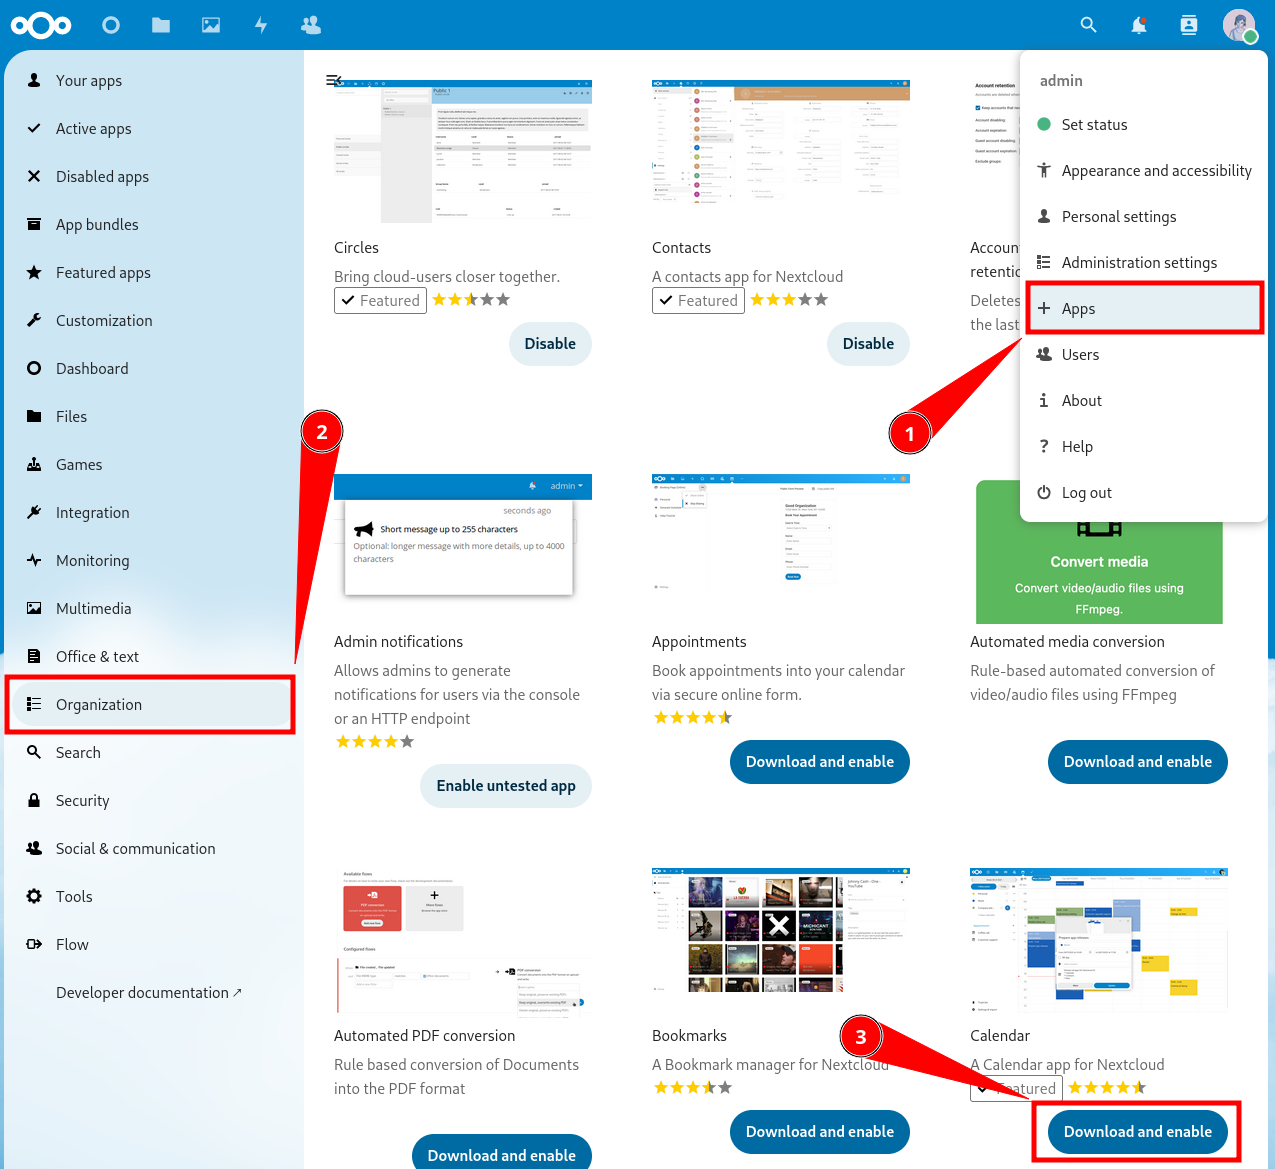
- You now have another new item in the menu.
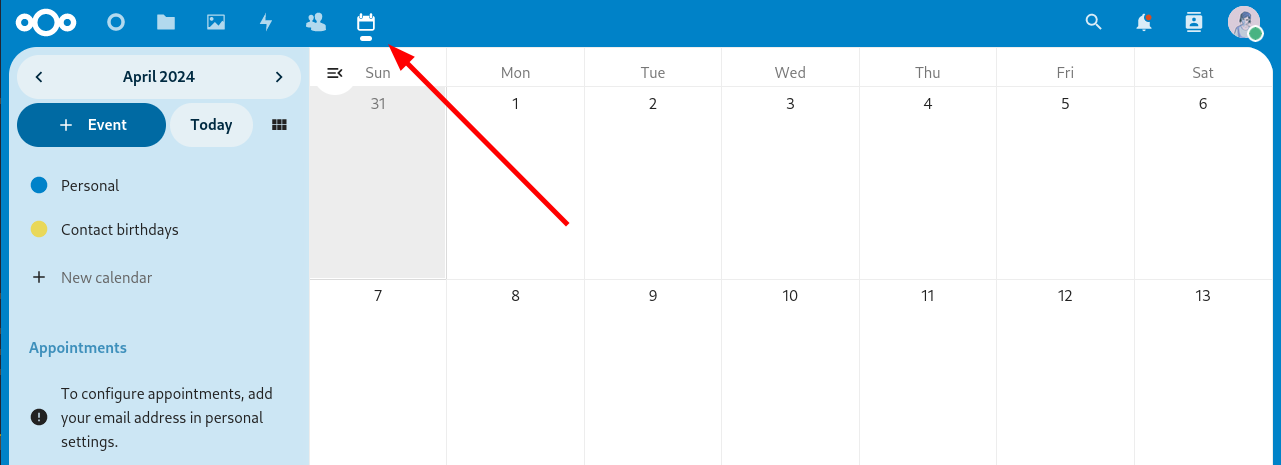
Synchronizing Nextcloud Across Different Devices
Download the Nextcloud main app (GNU/Linux, Windows, macOS, Android, iOS). It will help you synchronize files.
How to set up synchronization for contacts and calendar? Instructions for different systems and applications.
-
Android — see below
How to Synchronize Nextcloud with an Android Smartphone?
-
Download the DAVx⁵ app on your Android device from F-Droid or the Google Play Store.
-
Open the app, and create a new account by tapping the “plus” button.
-
In the account creation menu, select the last option “Nextcloud”.
-
The app will prompt you to enter the URL of your Nextcloud instance. The URL should look like:
https://cloud.YOUR.DOMAIN. -
A browser will open. You need to log into your Nextcloud account and grant access.
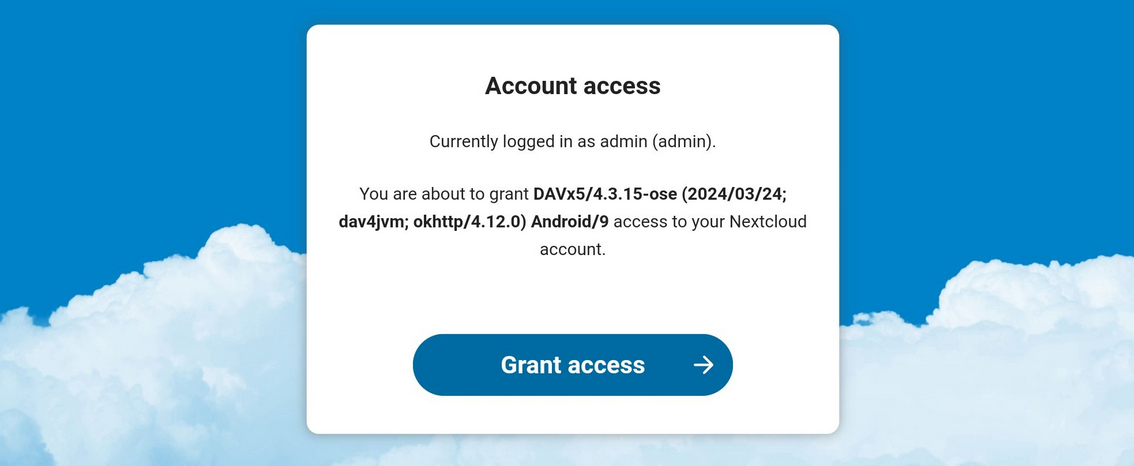
-
Return to the DAVx⁵ app. For the name, enter the email address registered in your Nextcloud account settings.
-
In the “Contact group method” section, choose “Groups are categories of contacts”.
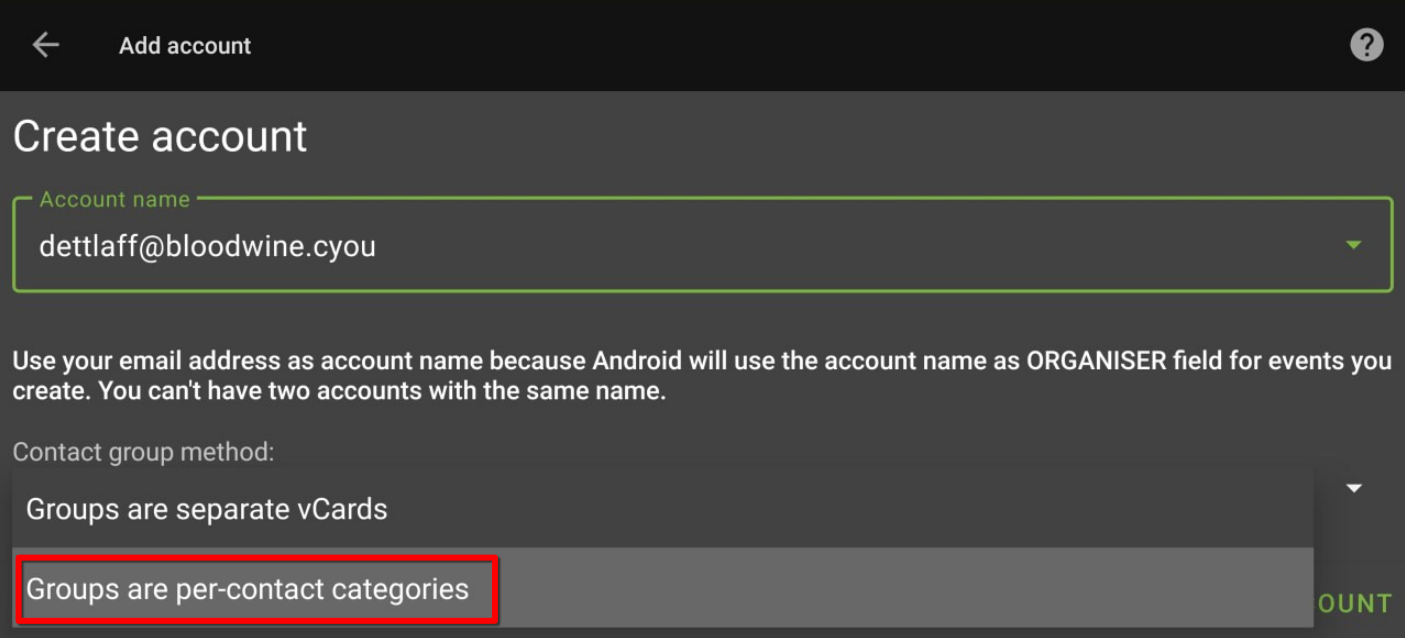
- Select the data you want to synchronize.
3.3 - Forgejo
Git service with a web GUI forked from Gitea
Forgejo is a collaboration platform for Git repositories with a web GUI.
Git is a feature-rich version control system that tracks changes in code and text files over time, widely used by programmers. For details, see what is Git?
For servers created before 25.04.2025
Be careful, the first account registered on your instance, gets admin rights.About SSO integration
- Users can only log in via SSO
- Old accounts can still be accessed if you create a SSO user with the same username
- If an SSO account is granted admin rights, it will also have admin rights in Forgejo
For details, what is SSO and how to use it?
Recommended clients
- WEB-interface: available after setting up the SelfPrivacy server, at
https://git.YOUR.DOMAIN - Official console git client (GNU/Linux, Windows, macOS, *unix)
If you want a client with a graphical interface, you can choose it from list of recommendations on the official website.
3.4 - Delta.Chat
E-mail-based messenger with end-to-end encryption
Delta.Chat is a messenger based on the email protocol.
Delta.Chat will use your mail server set up by SelfPrivacy. If your conversation partner doesn’t use Delta.Chat, it will be just an ordinary email correspondence for him.
Recommended clients
- Official client (GNU/Linux, Android, Windows, macOS, iOS)
Features of Delta.Chat
- Regular email client with all the features of IM.
- Reliable end-to-end encryption (e2e), provided a personal email server is used by both interlocutors or a personal key exchange, such as via QR code.
- Can use any email server, but then you lose control over the meta-information and risk key-swapping man-in-the-middle attack.
- Slightly slower than usual messengers
- First message is not encrypted because public encryption keys are sent with it.
- There are problems with sending files > 5-7MB.
- There are no convenient channels (chats for mass discussions and sending out information).
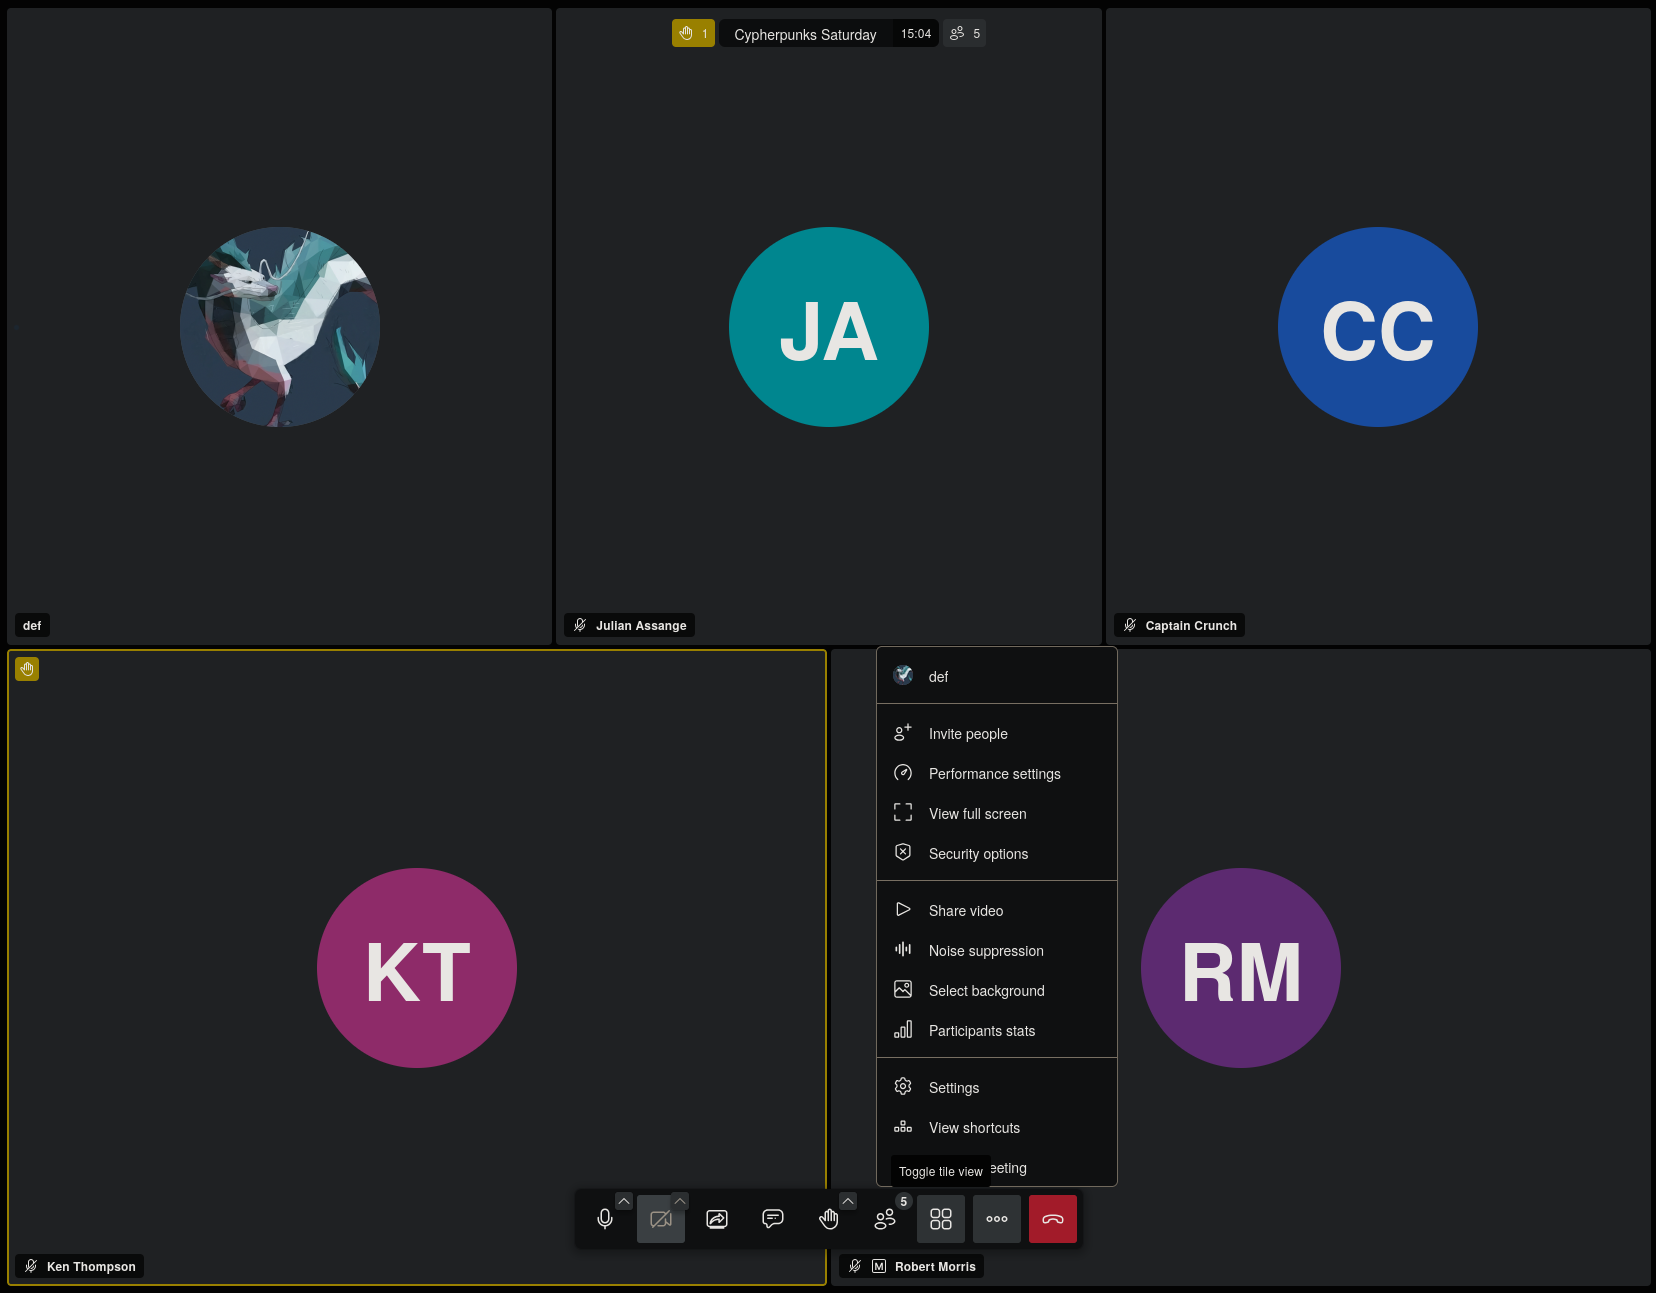
3.5 - Jitsi
Video conference
Jitsi is an open source videoconferencing service.
It is similar to proprietary services like Google Meet or Zoom, but unlike them, it does not have limitations in its free version.
Recommended official clients
-
WEB-interface: available after setting up the SelfPrivacy server, at
https://meet.YOUR.DOMAIN. -
Also see the builds in your distribution’s repositories.
Features of Jitsi
- Does not require registration;
- Uses avatar from gravatar.com if you specify mail (may violate privacy!);
3.6 - Mumble
Voice-chat platform
Mumble is an open-source, low-latency voice-chat platform designed for clear, real-time communication.
Mumble uses the Opus codec and an efficient UDP protocol to deliver high-quality audio with minimal delay, even on slow connections.
It supports nested channels with fine-grained ACLs, positional audio for supported games, and automatic volume leveling to keep every participant equally audible. All traffic between client and server is protected by end-to-end encryption. An in-game overlay shows who is talking inside fullscreen games.
How to connect?
Use your domain name as the server address. The port is the default: 64738.
Recommended clients
- Official client (GNU/Linux, Windows, macOS, iOS)
- Third party client: Mumla (Android)
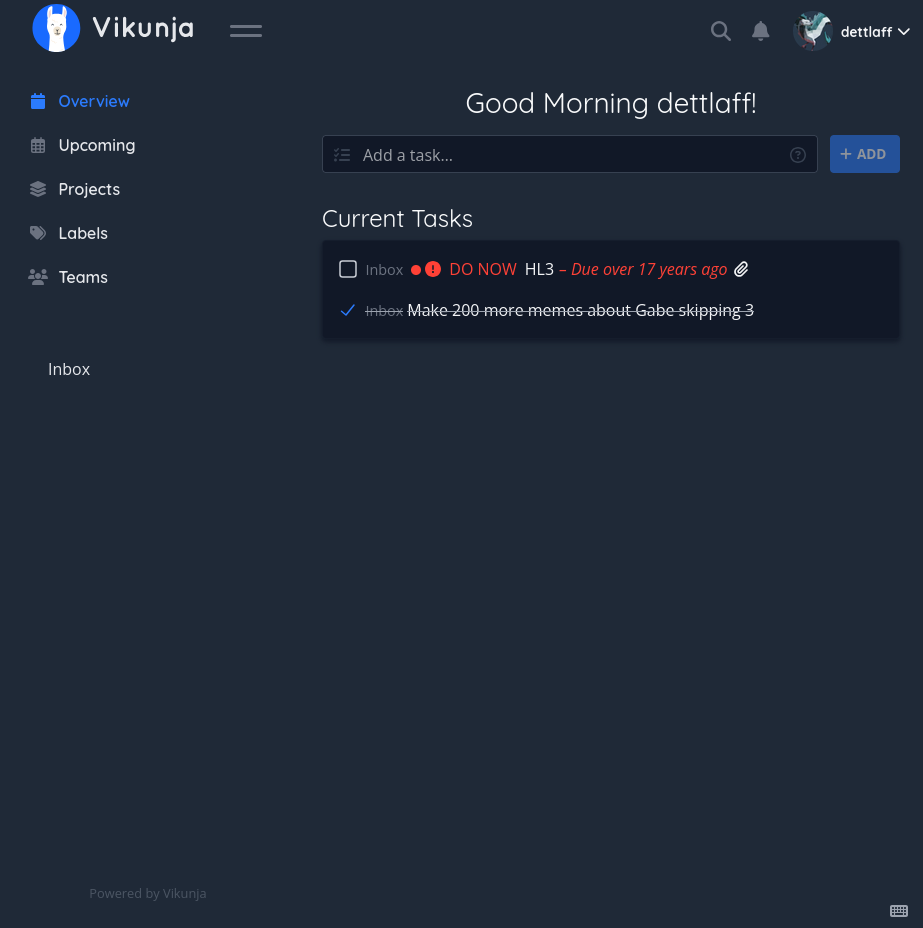
3.7 - Vikunja
Task management platform
Vikunja is an open-source task management platform.
Vikunja supports hierarchical organization of projects with subprojects and offers four ways to display tasks — a classic list, a Gantt chart, and a Kanban board.
In addition to core features like due-date reminders and recurring tasks, it provides the ability to split tasks into subtasks, assign labels, save filters, link tasks via relations, and CalDAV integration for calendar synchronization.
About SSO integration
- Users can only log in via SSO
For details, what is SSO and how to use it?
Recommended clients
- WEB-interface: Accessible after installation at
https://vikunja.YOUR.DOMAIN - Tasks.org: Android app that can sync with Vikunja via CalDAV
3.8 - Vaultwarden
The password manager, compatible with Bitwarden clients
Vaultwarden is a password manager with end-to-end encryption and multi-device synchronization. Written as a free (as freedom) alternative backend server for Bitwarden clients.
Why you need to use password manager?
Information security experts recommend using complex passwords and creating a unique one for each account. Even three or four passwords are difficult to remember, so people often use the same password or similar ones. A password manager solves this problem: it generates complex passwords and stores them in a convenient form. It can also be used with automatic password filling via a browser extension.
Why Vaultwarden server and Bitwarden clients?
There is a popular password manager called Bitwarden. The Bitwarden team develops the server and clients. Bitwarden’s server code is not free software; its source is available. What the difference?. Moreover, many useful features such as item sharing with more than two users, advanced two-factor authentication options, and organization management are only available on the paid tiers.
That’s why we use an alternative server implementation called Vaultwarden. You can use Bitwarden clients with Vaultwarden server without any issues.
Vaultwarden                          Bitwarden
    ||                                   ||
    \/                                   \/
  Server (SelfPrivacy instance) <--> Clients (Mobile app, Desktop)
Recommended clients
- WEB-interface: available after setting up the SelfPrivacy server, at
https://password.YOUR.DOMAIN - Official Bitwarden clients (GNU/Linux, Windows, macOS, Android, iOS)
Setting an admin token manually
All commands in this guide are executed as root over SSH. If you do not have root access, see this guide for more information.
First, we have to generate an admin token. Run the following:
nix-shell -p openssl --run 'openssl rand -base64 48'
It will output a string like this:
47pFSgYBbS0G0vCG63nX1yyblzgNaqZ40bNuJnwq2hvOy8ABfe+iHRfBeXlfrRdJ
This will be a password to your admin account. Copy it and paste it somewhere safe. To set it, we will run the following, replacing PASSWORD with the password you just generated:
jq '.bitwarden.adminToken = "PASSWORD"' /etc/selfprivacy/secrets.json > /etc/selfprivacy/secrets.json.new && mv /etc/selfprivacy/secrets.json.new /etc/selfprivacy/secrets.json
Now, we have to apply the changes. To do this, press “Upgrade server” in your app. After the upgrade is complete, restart Bitwarden using the app.
Now, your admin interface is available on https://password.YOUR.DOMAIN/admin.
4 - Backups
Backing up your services so that they are not lost
Why backing up
When your service is broken but it worked yesterday you have two options:
- Spend some time reading logs and debugging what went wrong. Meanwhile the service is unusable and maybe some data is irreversibly lost;
- Restore the service to a working state and then debug at a more relaxed pace. Hopefully it was just a solar flare or a glitch in the Matrix.
This second, nerve-saving option is enabled by backing up regularly, and even better, automatically.
Having a backup simplifies the process of transferring a service between machines, ensuring minimal inconvenience. This is useful if your datacenter is on fire, if your server provider gets bought out by another corporation, or when shareholders decide that it is finally time to make more profit.
This document covers the basic terms and usage of SelfPrivacy backup subsystem.
What is a snapshot?
SelfPrivacy does not make backups of the whole machine. Instead, it saves the states of each service. The state of the files used by a service, taken at a certain time, is called a Snapshot. In the interface, you can see that a snapshot has an ID, a service it backs up, and a date of creation.
When backups occur?
A snapshot is created in 3 cases:
- By user’s manual command to back up a service;
- Automatically at specified intervals if Automatic Backups are enabled;
- As a precaution before an in-place restore of a service.
How the data is stored?
The service’s files are stored at the cloud of the user’s choice. We currently support Backblaze, with more to come.
All of the service data is encrypted with a local secret that the cloud never receives. Under the hood, we use Restic to transfer encrypted data.
Cloud storage providers, such as Backblaze, have an option to prevent immediate deletion of data.
SelfPrivacy app uses this option so that in case when the server is hacked the data cannot be erased.
Listing snapshots
There are 2 factors to keep in mind when looking at the list:
- For the sake of performance, the list is cached. If some snapshots are missing which you think should be there, invalidate the cache so it reloads;
- If you delete some snapshots, they will be removed from the list, but for some limited time they are still restorable with the help of the cloud.
Restoring a snapshot
Restoring a snapshot involves stopping the service and reverting all files to their state at the snapshot’s creation. This process can be accomplished in two distinct ways.
The safest one, the default one, is to download the snapshot in its entirety, verify that data is not damaged, and replace the service files with the files from the snapshot. However, this method requires additional storage space for the snapshot.
A somewhat riskier way is to overwrite the service files directly, without intermediate storage. It requires less space, but if the transfer goes wrong, you end up with a broken service. To help reduce the impact, a snapshot is taken just before restoring.
The app does check that we have enough space before attempting a restore.
Forgetting a snapshot
Forgetting makes the snapshot inaccessible from the server, but deletion itself is reversible from cloud UI for some time (30 days for Backblaze by default).
Automatic Backup
If you set up an automatic backup period, all of the services will be backed up according to the set period.
Note that backups are independent per service. If you have services A and B backed up automatically every day in the morning, and then you back up service B manually at noon, then service A’s next backup will be in the morning as usual, but B’s backups will occur at noons.
If it is disabled, automatic backups will not be performed.
Restoring after someone has deleted all the snapshots
- Go to your Backblaze/other cloud interface directly;
- Rewind the bucket to its previous state before the deletion event;
- Open SelfPrivacy app;
- Update the snapshot list;
- Restore from snapshots as usual.
Troubleshooting backups
- If you suspect that the list of snapshots is incorrect, try updating the snapshot list;
- If an inplace restore has failed, make sure that your cloud is accessible and your contract is active. Then try to restore either a snapshot that you tried to restore or a pre-restore snapshot that was automatically generated;
- If you do not have enough space on the disk for a safe restore, try restoring inplace.
5 - How-to guides
These are the guides on how to perform common tasks
5.1 - How to get root access via SSH
If you need to manually perform some tasks, you can get root access via SSH
To access your server’s root shell you will have to generate your SSH key and add it to your server’s authorized keys.
How to generate SSH key
If you are a Unix-like system user
- Open the terminal.
- Run the following command:
You will be asked to enter a passphrase. You can leave it empty, but it is recommended to use a passphrase. If you do not want to use a passphrase, press Enter.
ssh-keygen -t ed25519 -f ~/.ssh/id_ed25519 - Print the public key to the terminal and copy it:
cat ~/.ssh/id_ed25519.pub - Refer to the next section to add the key to your server.
If you are a Windows user
- Open settings and under “Applications” click on “Manage additional components”.
- Press “Add Component”.
- Enter “OpenSSH client” in the search box and install it.
- Open the Command Prompt. You can do this by pressing Win+R, typing
cmdand pressing Enter. - Run the following command, replacing
user_namewith your Windows username:You will be asked to enter a passphrase. You can leave it empty, but it is recommended to use a passphrase. If you do not want to use a passphrase, press Enter.ssh-keygen -t ed25519 -f C:\Users\user_name\.ssh\id_ed25519 - Print the public key to the terminal and copy it:
Once again, replace
type C:\Users\user_name\.ssh\id_ed25519.pubuser_namewith your Windows username. - Refer to the next section to add the key to your server.
If you are a Android (Termux) user
- Install Termux. We recommend installing it from F-Droid.
- Open Termux.
- Run the following command:
You will be asked to enter a passphrase. You can leave it empty, but it is recommended to use a passphrase. If you do not want to use a passphrase, press Enter.
apt update -y && apt upgrade -y && apt install openssh -y && ssh-keygen -t ed25519 -f /data/data/com.termux/files/usr/etc/ssh/ssh_host_ed25519_key - Print the public key to the terminal and copy it:
cat /data/data/com.termux/files/usr/etc/ssh/ssh_host_ed25519_key.pub - Refer to the next section to add the key to your server.
How to add the key to your server
- Open the SelfPrivacy app.
- Go to the “More” tab.
- Tap on “Superuser SSH keys”.
- Tap on the “Create SSH key” button.
- Paste the public key you copied earlier.
- Tap on the “Create SSH key” button.
- Open the Jobs list
- Tap on the “Start” button.
- In a few minutes, you will be able to access your server’s root shell via SSH.
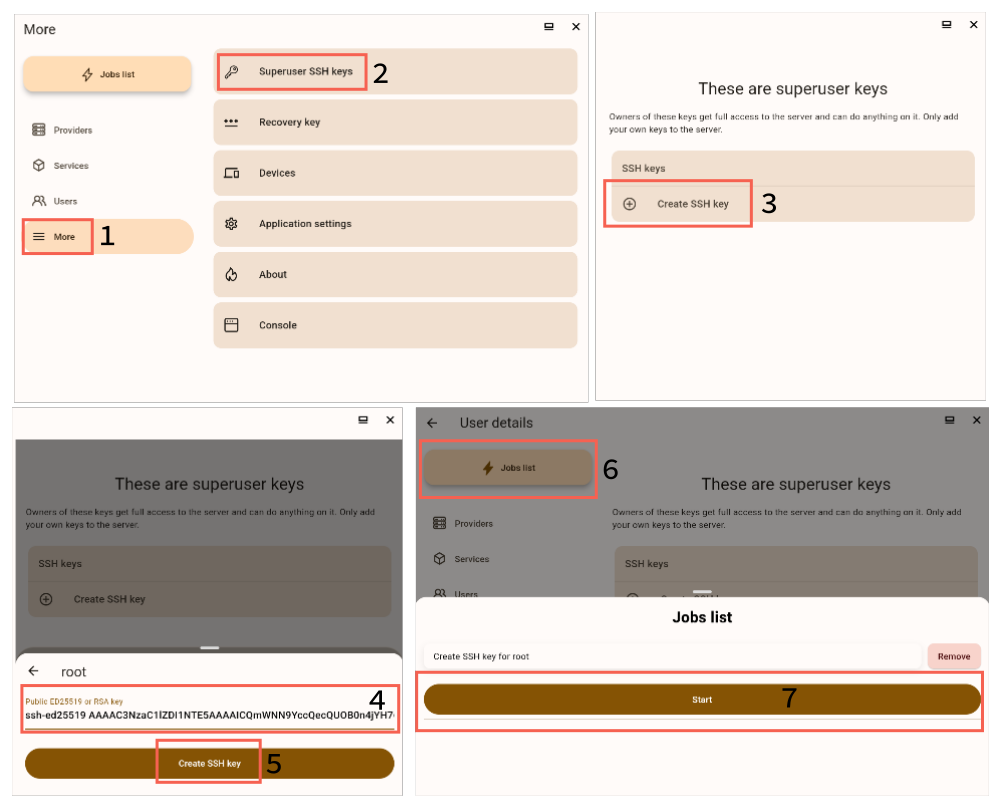
How to access your server’s root shell via SSH
- Open the terminal or Command Prompt.
- Run the following command, replacing
server_domainwith your server’s domain:ssh root@server_domain - Enter the passphrase you entered when generating the SSH key, if you used one.
Be careful when using the root shell. If you do not know what you are doing, you can break your server or leak your data. Responsibility for the consequences of your actions lies with you. Respect the privacy of other users.
5.2 - How to change the DNS provider to deSEC
For those who want to change their DNS provider after server installation
We recommend using deSEC instead of CloudFlare. DeSEC is dedicated to privacy.
If you have first tied your domain to CloudFlare and now you want to change providers, this article is for you.
Attention, the process is quite complicated, and if you feel that something goes wrong, you can feel free to write us in the chat.
During this process, your services will be temporarily unavailable. Also, write down the IP address of your server, as you will not be able to access it by domain name.
Transferring the nameserver
A nameserver is a server that translates your domain (letters) into a server IP address (numbers).
-
Register with deSEC.
-
On the “domains” page, click on the “plus” button.
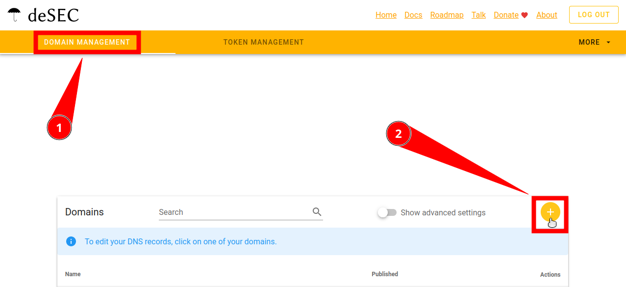
-
Enter your domain.
-
Copy “nameservers”.
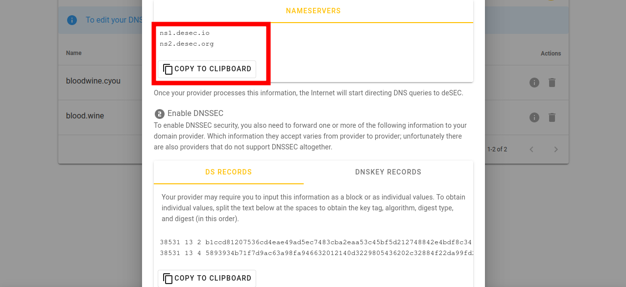
Now go to the website of the domain registrar from whom you purchased the domain. The actions will be similar for all providers, we will show using Porkbun as an example.
-
Go to your domain control panel.
-
Find there the “Authoritative nameservers” parameter.

-
Replace the current addresses with those that we copied from deSEC in the instructions earlier.
-
Save the changes.
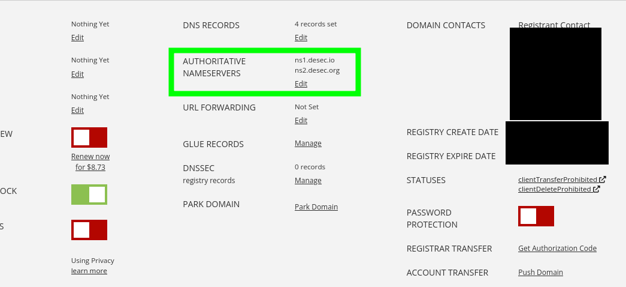
Getting the deSEC token
-
Log in here.
-
Go to the Domains page.
-
Go to the Token management tab.
-
Click on the round “plus” button in the upper right corner.
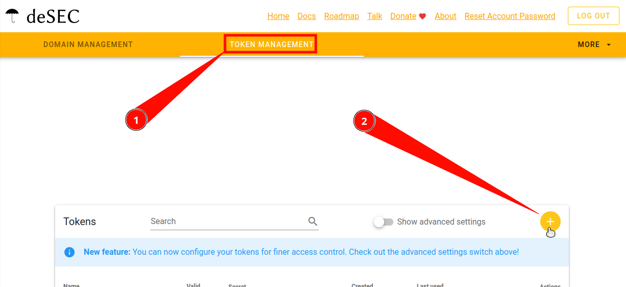
-
“Generate New Token” dialogue must be displayed. Enter any Token name you wish. Advanced settings are not required, so do not touch anything there.
-
Click on Save.
-
Make sure you save the token’s “secret value” as it will only be displayed once.

- Now you can safely close the dialogue.
Migrating records
Log into both CloudFlare and deSEC.
On the deSEC website
Follow the link in the “Domain Management” panel, click on your domain.
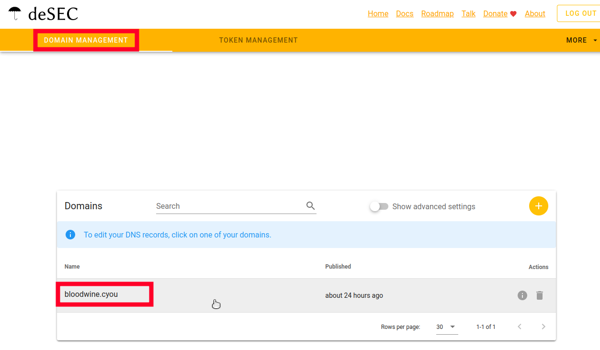
Now you can add new entries to it using the “Plus” button.
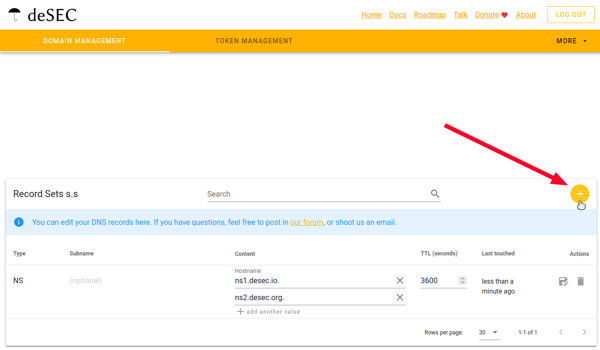
On the CloudFlare website
Follow this link and go to the settings of your domain, which is located under the “Websites” section.
Select your domain.
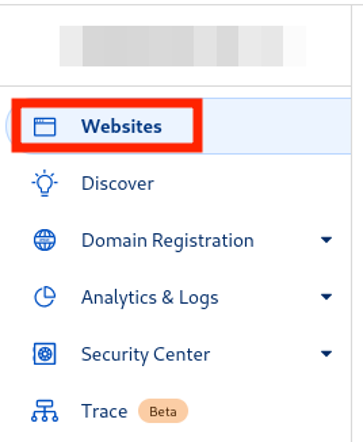
Now go to “DNS”, then “Records”.
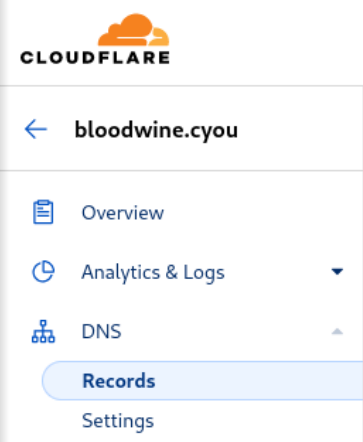
First record: api
Based on the example in the screenshot, transfer the parameters of your “api” record (look at the “Name” column) according to their colors.
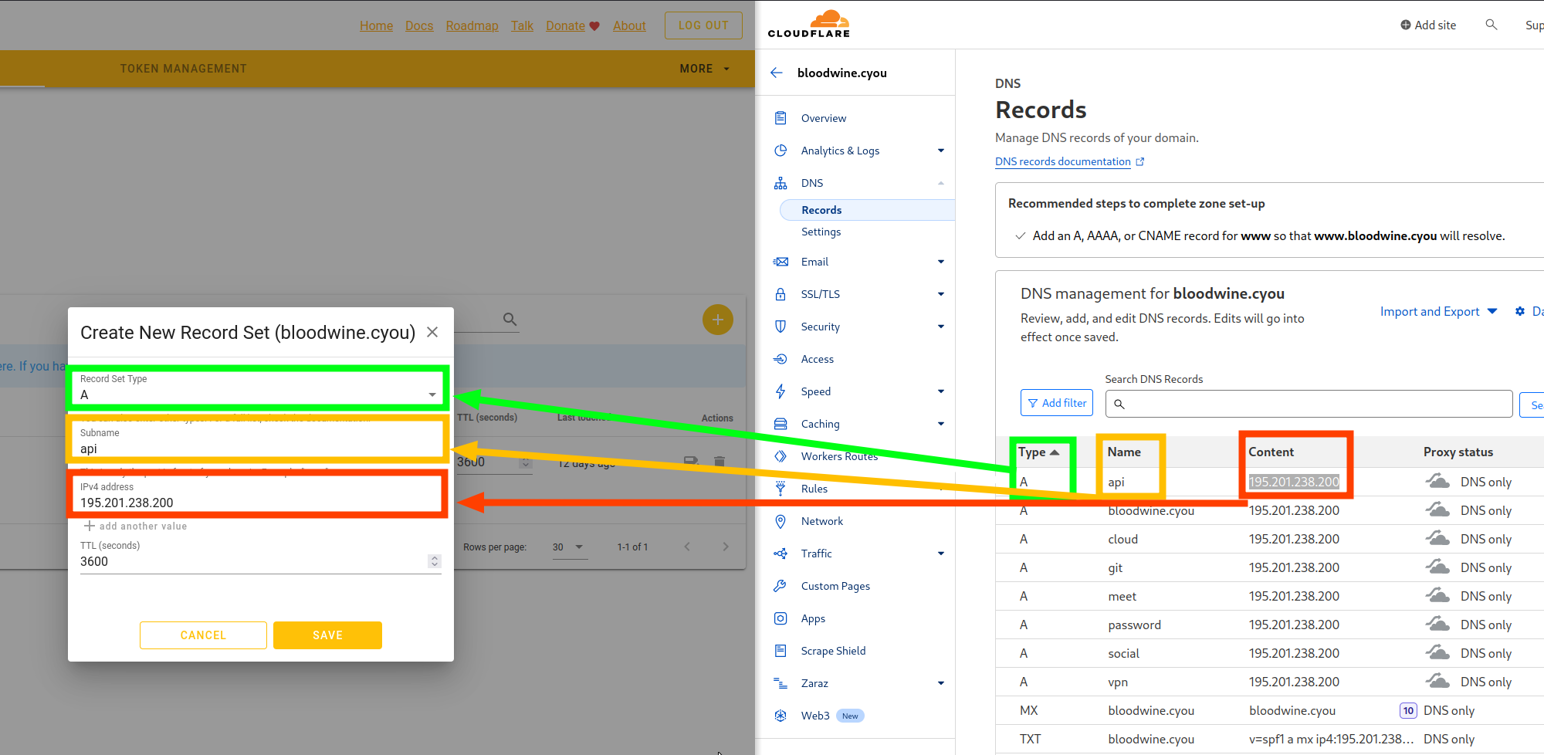
On the left side of the screenshot is deSEC, and on the right side is Cloudflare. You need to sequentially transfer each parameter of this record.
Second record: root
Create a new record of type “A”, in the “IPv4 address” field, enter your server address, which you have already entered in the “Content” field of the previous record.
You don’t need to transfer all the records! You have created two records, and the third one has already been created for you.
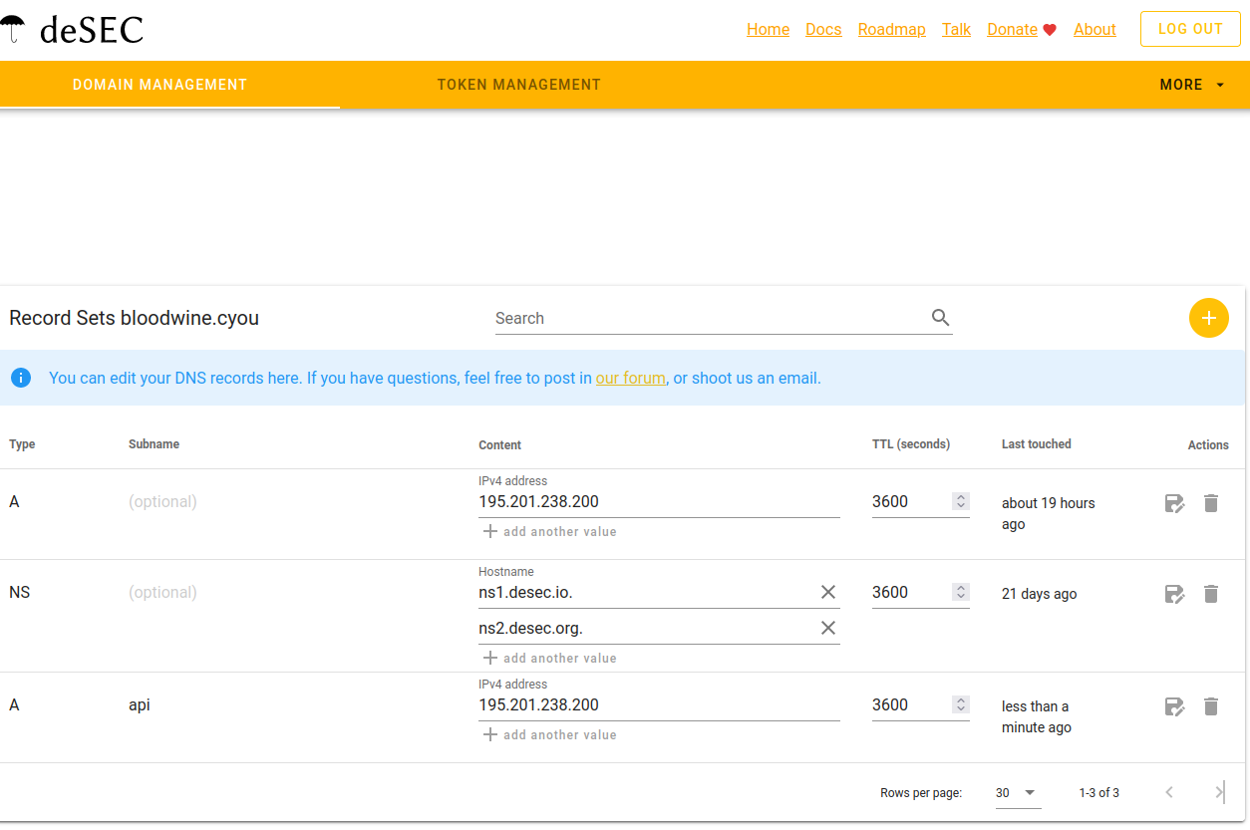
Connecting to the server
To perform the following actions, you will need to connect to the server via SSH with administrator privileges. Basic understanding of the command line is recommended ;)
You can find instructions on how to connect here.
After connecting to the server, enter the following command:
nano /etc/nixos/userdata.json
You are in a terminal text editor called “nano”.
You are editing the file /etc/nixos/userdata.json, and you can use the arrow keys to navigate.
Find the following lines in the file:
"dns": {
    "provider": "CLOUDFLARE",
    "useStagingACME": false
},
Replace:
"provider": "CLOUDFLARE",
with
"provider": "DESEC",
Now press CTRL+X, and then key Y.
Then edit another file:
nano /etc/selfprivacy/secrets.json
Find the following:
"dns": {
    "apiKey": "SECRET-HERE"
},
Remove your old token from CloudFlare and paste the copied token from deSEC. (If CTRL+V doesn’t work, try SHIFT+CTRL+V)
"apiKey": "Your deSEC token",
It should now look like this:
"dns": {
        "apiKey": "Your deSEC token"
    },
Press CTRL+X, then Y to save the file.
If the file has been saved and you have successfully exited the text editor, enter the command:
systemctl start sp-nixos-rebuild.service
It will start the rebuild of your system with new options. You may close the console now.
Reconfiguring the application
You will have to reset the application config to work properly. Don’t forget to create a recovery key and save it in a safe place (password manager).
How to reset the application:
Go to Application Settings.

Press “Reset application config”.
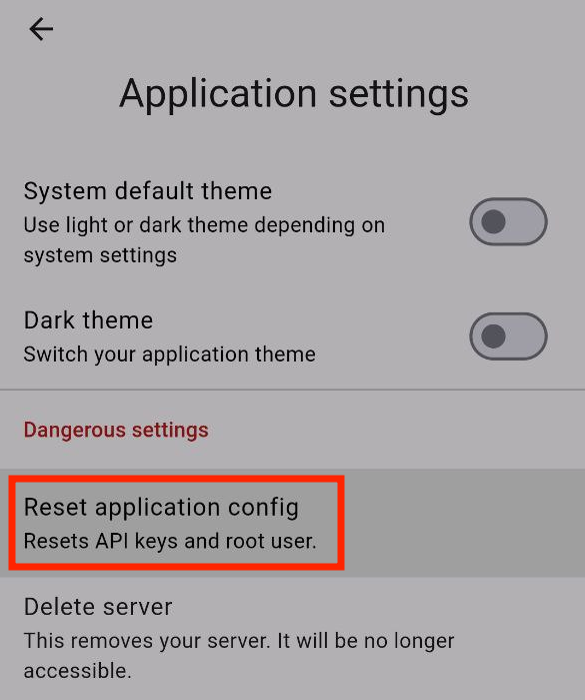
Now go to the “Setup Wizard” section where you configured your server when you first launched the application.
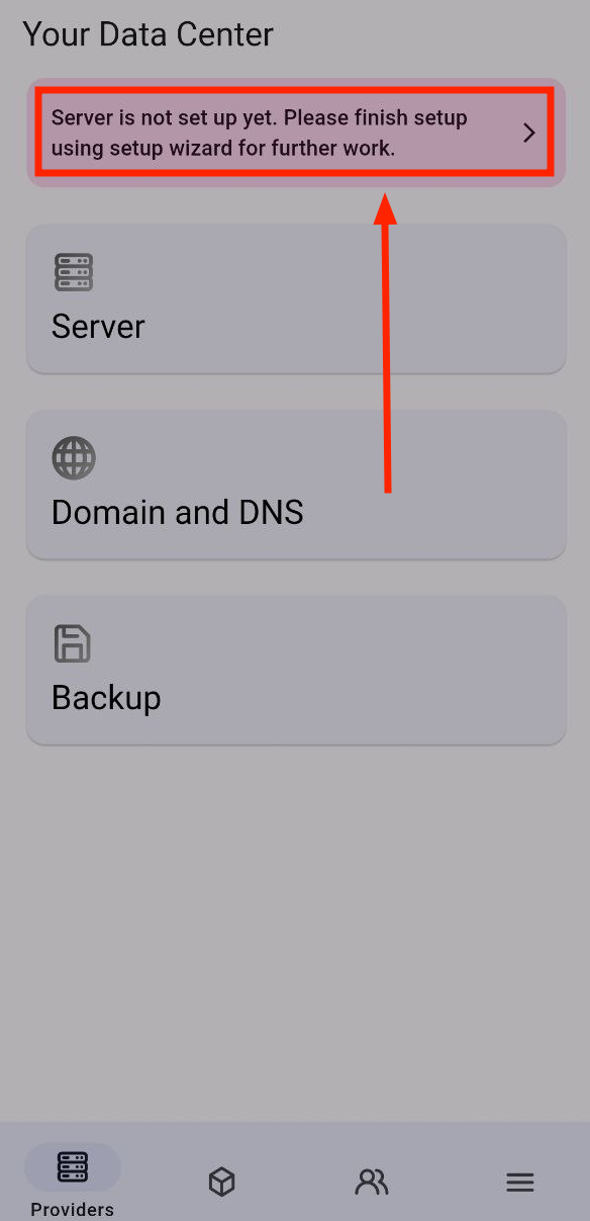
Tap “I already have a SelfPrivacy server!”.
(In the old version it might be called “Connect to an existing server”).
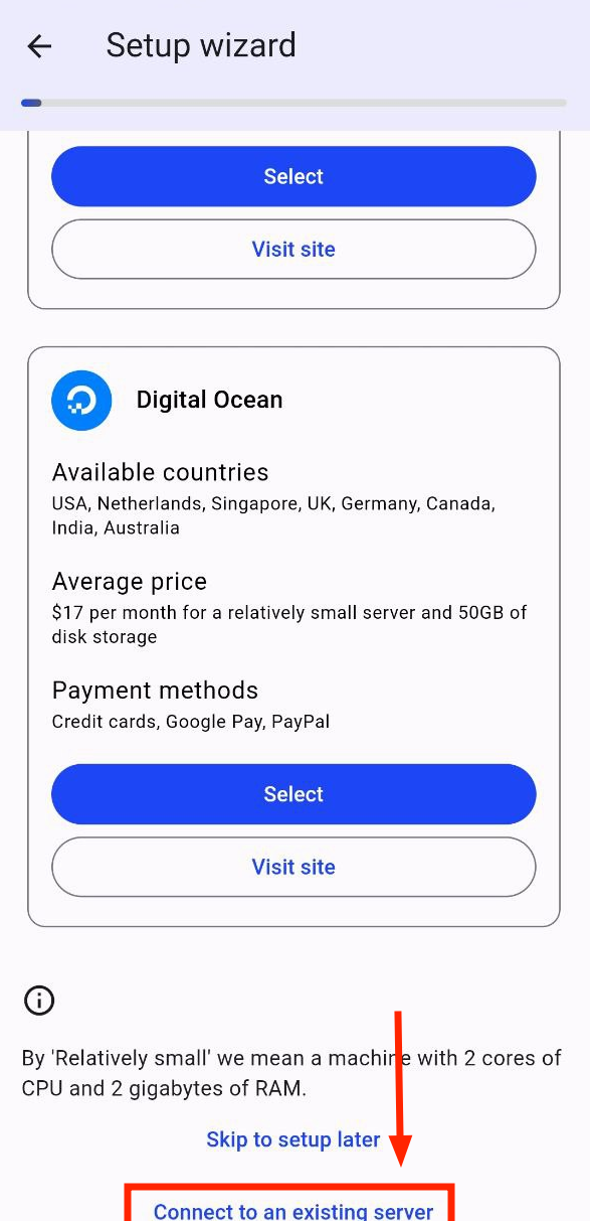
Next, follow the instructions in the app and enter the recovery key or code from another device where the SelfPrivacy app is installed.
After installation, you will see some problems with Domain and DNS. The application will offer you to fix them. Accept the fixes.
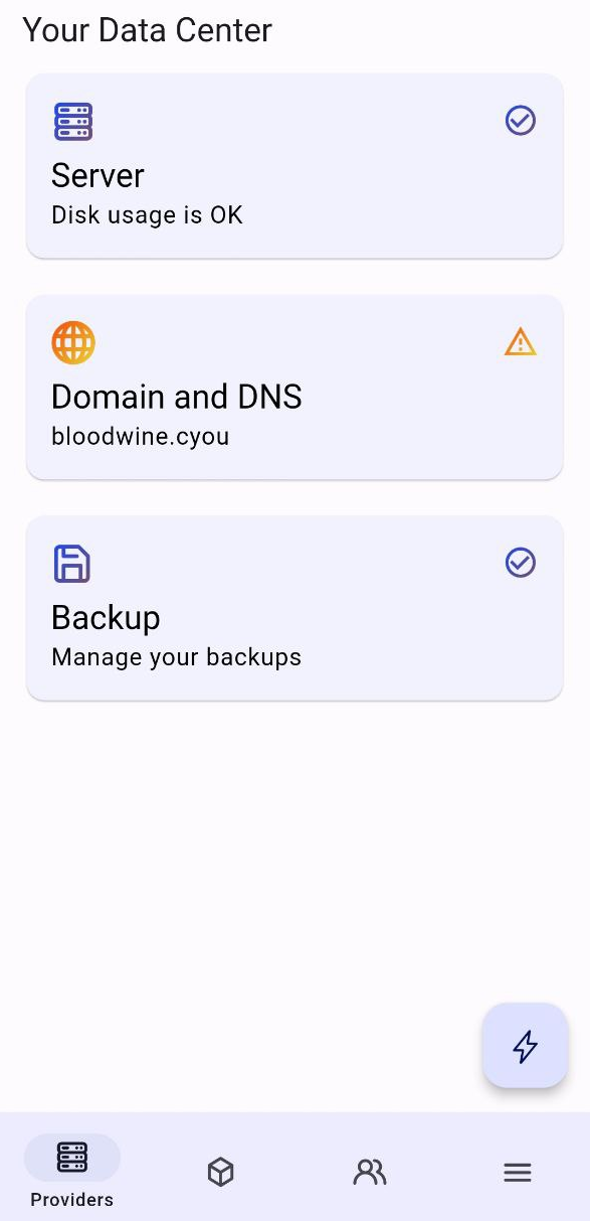

Congratulations! You have successfully changed your domain provider. We recommend you to check that all services are working correctly.
5.3 - How to manually clean up your server's disk space
Manual cleanup might be required if you need more space on system volume
All commands in this guide are executed as root over SSH. If you do not have root access, see this guide for more information.
If you have no space left, you will only be able to use the SSH keys you previously added. If you run out of disk space and have not added any SSH keys, contact SelfPrivacy support for further assistance.
There are several ways to clean up your server’s disk space.
To check how much disk space you have, run the following command:
df -h
This will output a table like this:
Filesystem      Size  Used Avail Use% Mounted on
devtmpfs         97M     0   97M   0% /dev
tmpfs           969M   52K  969M   1% /dev/shm
tmpfs           485M  3.8M  481M   1% /run
tmpfs           969M  432K  968M   1% /run/wrappers
/dev/sda1        19G  8.2G  9.5G  47% /
/dev/sdb         18G   62M   17G   1% /volumes/sdb
tmpfs           194M     0  194M   0% /run/user/0
Here, the filesystem mounted on just / is your system volume.
Deleting old NixOS generations
Zero space warning
This method won’t work if you have no space left on your system volume. Use other methods first.
NixOS allows you to roll back to previous system states at any time, at the cost of disk space. SelfPrivacy servers are configured to reclaim disk space by automatically deleting old system states, but only states older than 7 days are deleted, so you can still use the rollback feature.
It is possible to manually delete all old system states, and it may give you more much needed disk space. To do this, simply run the following command as root:
nix-collect-garbage -d
This operation might take a while, depending on the number of system states you have. When it is done, you will see how much disk space you have freed up.
Deleting old logs
Logs sometimes may take up quite a lot of disk space. On SelfPrivacy servers, system logs are always limited to 500MiB, but these are not the only log files you have on your server.
To check how much disk space logs take up, run the following command:
du -h --max-depth=1 /var/log
The output will look something like this:
4.0K	/var/log/private
14M     /var/log/nginx
499M	/var/log/journal
587M	/var/log
System journal
Here, /var/log/journal are the system logs where all apps usually write their logs. As you can see in this example,
they respect the 500MiB limit.
If you want to clear all system logs, run the following command:
journalctl --rotate && journalctl --vacuum-time=1s
This will usually give you around 450 MiB of free disk space, but not for long. This may though be enough to run some commands that will free up more space.
Nginx logs
The /var/log/nginx directory contains logs for the Nginx web server. If they got too big, you can clear them by running:
rm /var/log/nginx/* && systemctl reload nginx
As you can see, we don’t just delete the files, but also reload Nginx. This is because Nginx will get confused by the missing log files, and they will not be recreated until Nginx is reloaded.
6 - About us
Who we are, our motivation and policies
6.1 - Team
Our team, contributors and like-minded people
About us
International team of independent professionals:
- Zholnay Kirill - Founder/CEO/CISO. For more than 15 years builds and protects corporate infrastructure in medium and large companies
- Dettlaff - core-team backend developer
- Houkime - core-team backend developer
- Inex Code - core-team full-stack developer
- NaiJi - core-team Flutter developer
- ilchub - DevOps, Backend developer
- kherel - Flutter developer
- nikolai - QA Engineer
- and a lot of cool contributors and volunteers
We get help
- NLnet;
- Roskomsvoboda. Speech in Russian youtube;
- Privacy Accelerator;
- Open Source World Community;
- NixOS Community.
Like-minded people
- Cloudron - commercial project, code closed, from $15 per month for email and multiple services. You have to install the application yourself on the server, keep an eye on the server resources;
- IndieWeb - open-source project, complicated in configuration;
- Kubenav - a promising tool for managing Docker containers for highly skilled users;
- Yunohost - an open-source project for manual installation on a server;
- FreedomBox - an open-source project for manual installation on a server;
- Turnkeylinux - ready-to-use software for experienced users;
- Lunni - a commercial open-source project;
- Softaculous - a commercial closed-source project.
Useful
6.2 - Motivation
Why we do it and what we want to achieve
Every internet user is forced to use centralized services sacrificing privacy and personal freedoms:
As a result, users:
- Accept incomprehensible license agreements;
- Endure ads;
- Hand over their data to unknown entities;
- Become trapped in a “recommendation bubble”;
- Are subjected to censorship and blocking.
When we use centralized services, such as popular social networks, we place our trust in the administrators of these platforms. They store our conversations, our photos, and even our most important secrets shared in chats with loved ones. We allow them to analyze our interests and communications to deliver targeted advertising. Often, the data collected leaks into the public domain due to a company breach or an untrustworthy employee. We become dependent on centralized solutions, which can permanently ban your account without explanation due to a simple spam filter failure, along with all the data accumulated over the years.
We want digital independence and privacy for our data.
Our mission is to offer an alternative. Your services - your rules:
- No license agreements, advertisements, surveillance, telemetry, bans, or censorship;
- Your data is stored on your server and belongs solely to you.
Why do we need this?
Our team consists of programmers and system administrators from various countries. Perhaps we are romantics, the Don Quixotes of the free internet. It is important for us not only to complete the work but also to understand its impact — contributing to a positive change in people’s attitudes toward privacy and independence.
The primary motivation behind SelfPrivacy, guiding our team, is to make internet usage a bit more comfortable, a bit simpler, and — most importantly — a bit more private.
Privacy is an inherent human right that allows us to feel like subjects, independent individuals. We are creating a public project to draw inspiration for new features and identify errors not through the efforts of a few individuals but by leveraging the resources of an unlimited audience. After all, why does a musician compose melodies, and an artist create paintings? Moreover, developing a free, open solution capable of elevating users to a new level of privacy is a matter of honor. And samurai do not have a goal — they only have a path.
6.3 - Roadmap
What we are going to do next
The following is a list of our tasks in no particular order, grouped by topics. This is a living document that will change over time.
Tasks in bold are sponsored, for example, by NlNet. Tasks in italic are in our current focus.
SP Nix flake format
- Restructure the NixOS configuration to use Nix flakes and migrate to newer NixOS version (nixos-config#38)
- Migrate to NixOS 23.05
- Package the SelfPrivacy API into a flake (selfprivacy-api#63)
- Develop the manifest format for packaging services to work with SelfPrivacy (nixos-config#40)
- Move existing services to SP Modules
- Email server (nixos-config#41)
- Bitwarden (nixos-config#42)
- Gitea / Forgejo (nixos-config#43)
- Nextcloud (nixos-config#44)
- Pleroma (nixos-config#45)
- Jitsi (nixos-config#46)
- Adapt SelfPrivacy API to manage these modules (selfprivacy-api#65)
- Implement the support from the GUI side
- Document the developed format of modules, write a user manual on creating a new one
Single sign on (SSO)
- Analyze protocols supported by different services. (LDAP, oAuth, OIDC, …)
- Compare different SSO solutions, choose the most appropriate.
- Implement Nix modules to integrate the selected SSO solution with the services we install.
- Add support for the SSO administration on the SelfPrivacy API and app side.
- Develop the self-service portal for the users.
Security
- Harden the systemd units
- System security audit logging
- GUI to view the audit log events
- Monitoring
- Alerts
Automatic backups
- Implement the new backups subsytem on the API in the storage-agnostic way
- Implement automatic backups and rotation
- Implement automatic restoration from the snapshot
- Allow recreating the server on the new machine using the backup automatically
- Automatic migration between machines
Add services
- Self-hosting a static website (selfprivacy#17)
- LibreOffice online
- BigBlueButton
- Corteza
- Flarum
- FileSender
- GoToSocial
- GNU Social
- KBin
- Funkwhale
- Castopod
- Mastodon
- UnifiedPush provider (for example, ntfy)
- Matrix server
- VPN (Collaboration with leap.se is possible)
Provisioning
- Refactor the provisioning logic
- Backup credentials are no longer need during setup (selfprivacy#370)
- Providers’ credentials are no longer needed to communicate with an existing server
- It is possible to update the token
- Multitenancy
- The installation progress can be tracked by the app
- More tools to debug failed installation
Manual installer (support for bare metal)
While cloud server providers offer APIs that allow us to perform almost fully automated server installation, it is not true self-hosting, if you can’t install the system on your own hardware. The installer shall be developed to allow deploying SelfPrivacy on systems where APIs are not available. There will be UX challenges on how to make this process as simple to the end user as possible. In the end, the user shall be able to control their server from the mobile SelfPrivacy app just like if they installed it using the cloud provider.
New providers (server)
- Scaleway
- We’re open for suggestions!
New providers (DNS)
- Porkbun
- We’re open for suggestions!
New providers (backup storage)
- SFTP
- Restic REST server
- We’re open for suggestions!
System management
- Track the progress of system rebuilds
- Allow deleting old system generations from GUI
- API to read logs from the services
App reactivity
- Handle situations when the server is offline
- Use websockets to keep information updated in real time
Localization and accessibility
- Translate server-side messages to the client’s language
- Make sure the app is fully usable with a keyboard
- Make sure the app is compliant with WCAG
Publishing
- Publish on Google Play
- Publish on Apple App Store
6.4 - Donations
Donate to Selfprivacy
Unfortunately, you can’t make a mass product on enthusiasm. Many choose to go the commercial route, but that imposes limitations:
- A focus on making money, not privacy
- Willingness to sell out to a mega-corporation
- Functionality dictated by market, marketing, buzzwords.
The best option is regular funding. At least $1 a month.
As of 2019, I’m investing a noticeable chunk of my family budget and time into the project. Because I am confident in the necessity of SelfPrivacy.
— Kirill Zholnay (Founder)
All donations will go to the development of the project and decent pay for the team. We, like any other opensource project, live off donations.
💸 Liberapay: For regular payments
6.5 - Privacy Policy
Our policies and politics
Last updated: May 15, 2023
This SelfPrivacy (“SelfPrivacy” or “we” or “us” or “our”) privacy policy (the “Privacy Policy”) is designed to help you understand what information we collect, including information that directly or indirectly identifies an individual (“personal information”), and how we use or share that information.
We take your privacy very seriously, and we are committed to ensuring that your personal information is kept safe and secure. This Privacy Policy explains how we manage your personal information when you use our application.
We want to keep it simple, and we don’t want to hide behind long paragraphs of text, small lines or difficult words.
SelfPrivacy is an open-source project. Please note that we are neither the data controller nor the data processor for any data processing operations carried out through our application. We do not have control over how users utilize the application or how they process any data that they may choose to host or store through the application. As such, we cannot be held responsible for any data processing activities carried out by our users. We encourage all users to carefully consider their data processing activities and to comply with applicable data protection laws and regulations.
Collection of Information
Our application does not collect any personal information from you. We do not collect your name, email address, or any other contact information. We also do not collect any technical information about your device, including your IP address, operating system, or browser type.
SelfPrivacy does not collect limited service and usage data like error and diagnostics information, security alerts, and log file reports associated with device identifiers. We refer to this information as “telemetry data,” and it does not include any end user personal identifiers or message contents.
We collect access logs to determine our user count and the countries they are visiting from. However, we store visitor IP addresses as subnets (x.x.x.0) which may not be sufficient to uniquely identify individuals. Although we cannot guarantee that our server provider does not collect meta-information, we advise users to use methods of traffic anonymization for added privacy.
Tracking
Our application provides users with the necessary tools to create self-hosted services, such as web servers or databases, without requiring them to provide any personal information. We do not track users’ activities or behaviors within the application, and we do not use cookies or other tracking technologies.
Third-party service providers
We have no control over the personal information that users provide to third-party service providers when opting for self-hosted services. Our application initiates interactions with third-party service providers only after the user has selected them. When users consent to allow third-party service providers to collect and process personal information about their online activities using cookies, pixels, local storage, and other technologies, we are not accountable for the privacy practices of these third parties. This Privacy Policy does not cover the information practices of these third parties.
Use of Information
Since we do not collect any personal information from you, we cannot use it for any purpose. Our application is designed to allow you to set up and use self-hosted services without the need for any personal information. We do not use your information for marketing purposes.
Disclosure of Information
Since we do not collect any personal information from you, we cannot disclose it to anyone. We do not share your personal information with any third parties.
Protection of Information
We take the security of your personal information very seriously. Even though we do not collect any personal information about you, we still use industry-standard security measures to protect our application and the data it contains. We use encryption, firewalls, and other security measures to protect your information from unauthorized access, disclosure, alteration, or destruction.
Changes to this Privacy Policy
We may update this Privacy Policy from time to time to reflect changes in our practices or to comply with legal requirements. We encourage you to review this Privacy Policy regularly to stay informed about how we collect, use, and protect your personal information.
Contact Us
If you have any questions or concerns about our Privacy Policy or the collection, use, or disclosure of your personal information, please contact us at privacy@selfprivacy.org. We will do our best to address your concerns in a timely and satisfactory manner.
We are pleased to offer this Privacy Policy under Creative Commons Zero license as a template that can be used by anyone in the open-source community. We hope that this contribution will help to support the development of privacy policies that promote transparency, accountability, and respect for the privacy of individuals. As part of our commitment to open-source values, we believe in sharing knowledge and resources to foster innovation and collaboration. Therefore, we encourage others to adapt and modify our privacy policy to meet their specific needs, while ensuring that they comply with applicable laws and regulations.
![]()
7 - How to contribute
You can help with translations and programming
Help us translate
We use our own weblate instance to collaborate. You can create an account and help us translate the project into your native language.
If you’re a programmer
You can read about how SelfPrivacy works in documentation.
You can help us close Issues which are marked with the “Contributions welcome” tag. For example, at this link you will see tasks tagged “Contributions welcome” for the main application.
We cannot approve major changes without the approval of the core developers. Of course you can create a fork of the project, but if you want to get approval, please discuss the proposed changes in one of the project chats:
Python / NixOS - backend
The server side of SelfPrivacy uses the NixOS distribution, and a daemon program written in Python called SelfPrivacy API. The daemon works to provide a link between your server and SelfPrivacy app. You can read here about how to test and make changes to the SelfPrivacy API.
You can also improve other components:
Dart + Flatter - frontend app
Hugo / Docsy
If you want to improve our site:
For any help, please contact our chats:
8 - Frequently Asked Questions
Frequently asked questions about our project
How to get help?
If you encounter a problem, feel free to write to the SelfPrivacy chats ;)
- Telegram chat: @selfprivacy_chat
- Matrix chat: #chat:selfprivacy.org
Or you can create an issue in our project repositories:
What are self-hosted services and what are their advantages?
When we use centralised services, such as popular social networks, we trust the admins of the resource that stores our correspondence, our photos and even the most important secrets said in a chat with close people. We allow our interests and music preferences to be analyzed, receive targeted advertising based on them, and most likely participate in unnamed audience analysis programs and all sorts of surveillance.
Self-hosted is the term for keeping an online service in-house. The key to this approach is that you have an independent copy of the software on your server, without a third party running the service. To be an administrator, you don’t need to be a programmer and understand all the intricacies of the inner workings of the server application, i.e. the service. Typically, application developers who are not beholden to the head office and its ad trackers will try to make the service as clear and simple to use as possible.
Popular examples include self-hosted email servers, messengers such as XMPP or Matrix, and VPN solutions. If you’ve worked in a large organisation, you’ve probably seen a standalone email service on the company domain, and you’ve probably also come across corporate messengers. These are all self-hosted, but not by you, but by the company you worked for.
Why does a company need its own email and messenger? The answer is simple: to keep employee communications and company secrets in their own hands, under their own control.
If you want flexible self-host tools that you can customise, or you just don’t trust big companies and want to keep your data under your own control, self-hosting is for you.
Can I trust my hosting provider?
We have all experienced being disconnected from the Internet due to overdue payments, or having our home power cut off due to technical problems somewhere in the house or city. Therefore, in order to provide a stable online service, they turn to hosting providers - special companies that provide computer facilities for rent and undertake to do everything possible for their stable operation: backup power supply schemes of equipment in case of emergency, backup highways to connect to the Internet, as well as protection against earthquakes, fires and floods according to the latest science and technology.
A reasonable question: can you trust these services, since all the data stored on your leased server is, after all, the data stored on the disc provider’s discs.
There is no clear answer to this question, because at the request of law enforcement agencies from the provider’s jurisdiction, your data will surely be handed over without too many questions. But… do you often have problems with the foreign law?
The hoster is asking for my passport, what should I do?
The SelfPrivacy infrastructure currently relies on the hosting capabilities of Hetzner and DigitalOcean. Sometimes the hosting provider may ask for proof of identity when you sign up. This protects them from spammers. In addition, the European jurisdiction requires to know your customer (KYC). We apologise for the fact that Hetzner is not involved in the collection of unnecessary data and the disclosure of information about users.
Providing photos or photocopies of documents to anyone online is a bad practice that we condemn. But thousands of users and we can vouch for the reliability of Hetzner, which is more privacy oriented. They have been around for many years and have a good reputation. For our part, however, we are looking for alternative solutions to this problem.
Will this protect me from the FBI, FSB, Mi6, …?
We do our best to keep your data technically intact. But your hosting has to comply with the laws of its jurisdiction. We choose to host in as legal a jurisdiction as possible. So unless you are involved in criminal activities such as drug dealing, illegal porn, terrorism, and the like, your data is unlikely to be threatened.
Can I put SelfPrivacy on my hardware?
Unfortunately, no. But it is one of the features we plan to introduce in future updates.
Do we make money off of users?
No, we do not make money from users. We have no agreements with ISPs, nor do we use advertising or analytics in the app.
Where do we get the money from?
We are a non-profit project and do not make money from our users. Our main sponsor is the European fund NLnet. Here is our project page on the fund’s website.
We are also supported by the fund Privacy Accelerator and your donations.
What’s the point of a non-profit project?
In a climate of aggressive consumerism, where only stories about effective business sell like hot cakes, non-profit projects are cautious.
The main motive behind SelfPrivacy that runs through our team is to make using the internet a little more comfortable, a little easier and - most importantly - a little more private.
Privacy is an inalienable human right that allows us to feel like subjects, independent individuals. We’re making a public project to get inspiration for new features and to look for bugs, not by a few people, but by tapping into the resources of an unlimited audience. After all, why does a musician write tunes and an artist create paintings? Moreover, developing a free solution that can take users to a new level of privacy is a matter of honour. And samurai have no goal, only a way.
Why do we choose providers?
There are several criteria we use when choosing a provider:
- Availability of an API interface for developers that manages the creation of the VPS. Otherwise SelfPrivacy will not be able to automatically create and configure the server, and much of the work will fall on the user’s shoulders. Also, automatic disk expansion will not work (when the amount of data on your server grows and needs more space);
- Quality of service;
- Price.
We would like to add support for new hosting providers, but at the moment all the alternatives do not support the functionality we need, or are excluded for other good reasons. Hetzner has a weak support service, but they have a good network and a great price. Their competitors are significantly more expensive and have a questionable attitude to privacy.
Those who don’t ask for a passport or other substantial proof of identity tend to create problems for email traffic - they send spam from them. For example, scaleway’s emails are blocked and you have to write to support to get them unblocked. This severely disrupts the end-to-end process of using the email service in SelfPrivacy.
Is CloudFlare required for SelfPrivacy to work?
No, it is not mandatory. Users have the option to choose between deSEC, CloudFlare, and DigitalOcean. We recommend choosing deSEC, as it is a privacy-oriented service.
Why do we allow the use of CloudFlare? The service is reliable and free. It likely collects data; otherwise, it’s difficult to explain why they would proxy other people’s traffic for free. In our case, we use it only as a DNS server and do not proxy anything. In the future, we may replace it with DNS on the user’s server if reliability issues are resolved.
Currently, we are testing Yggdrasil + Alfis.
Why does SelfPrivacy use NixOS?
SelfPrivacy uses NixOS as the operating system for servers, which may seem like a strange choice, but let’s explain main points why NixOS is better for SelfPrivacy use-case:
-
NixOS can be state-less (and it is in SelfPrivacy). NixOS can bootstrap itself from a NixOS configuration on every boot, so we can omit additional state and keep only /nix/store and data of your services.
-
NixOS is atomic. Updates are applied atomically, and can be roll-backed just in case.
-
NixOS allows to keep all the configuration in one place, and modify it via single mechanism (Nix language).
What do we use as our email server?
On the deployed server, the following components are responsible for sending, receiving, filtering emails:
- Postfix — SMTP server;
- Dovecot 2 — IMAP server;
- Rspamd — SPAM filter.
You can read more about using email on the service page.
Sending Email does not work
The issue is described on the service page.